Configure Unity events
You can use the following properties to configure PlayerInput:
| Component (UI) property | Description | Matching property |
|---|---|---|
| Actions | The set of Input Actions associated with the player. Typically you would set this to Project-Wide Actions, however you can also assign an ActionAsset reference instead. To receive input, each player must have an associated set of Actions. | actions |
| Default Scheme | The Control Scheme to enable by default, as defined in the PlayerInput.actions property. |
defaultControlScheme |
| Default Map | The Action Map in the PlayerInput.actions property to enable by default. If set to None, then the player starts with no Actions being enabled. |
defaultActionMap |
| Camera | The individual camera associated with the player. This is only required when employing split-screen setups and has no effect otherwise. | camera |
| Behavior | How the PlayerInput component notifies game code about input actions and other input-related events happening to the player or that the player initiates. |
notificationBehavior |
Actions
To receive input, each player must have an associated set of Input Actions.
Specifying the Actions to use
The simplest workflow is to use the project-wide actions defined in the Input Actions editor. However, the Player Input component also allows you to use an Actions Asset to specify the actions that should be used by any instance of the component. If you set the Actions field to Actions Asset, the inspector displays a field into which you can assign an actions asset, and a Create Actions button which allows you to create a new actions asset. When you create these with the Player Input inspector's Create Actions button, the Input System creates a default set of Actions. However, the Player Input component places no restrictions on the arrangement of Actions.
Enabling and disabling Actions
The Player Input component automatically handles enabling and disabling Actions, and also handles installing callbacks on the Actions. When several active Player Input components use the same action asset, each component after the first works with its own private copy of the actions. For this reason, don't use InputSystem.actions in input code for a Player Input component. InputSystem.actions refers to the project-wide asset, not the copy used by that component.
A single Player Input component doesn't make a copy. It uses the asset directly. If that asset is the project-wide asset, the component shares it with InputSystem.actions, and the Input System enables every action map in it, including maps that the component doesn't use. Actions in those maps keep responding to input, even after the component switches to a different action map.
If you use the project-wide asset with a single Player Input component, disable the action maps that the component doesn't use in Start. If a UI Input Module also uses the project-wide asset, keep its UI action map enabled. For example:
using UnityEngine;
using UnityEngine.InputSystem;

/// <summary>
/// Example script that disables the project-wide action maps that the
/// PlayerInput component doesn't use.
/// </summary>
public class MyPlayerScript : MonoBehaviour
{
    PlayerInput playerInput;

    void Start()
    {
        playerInput = GetComponent<PlayerInput>();

        foreach (var actionMap in InputSystem.actions.actionMaps)
        {
            // Keep the map that PlayerInput uses. Also keep the UI map, in case
            // a UI Input Module uses the project-wide actions.
            if (actionMap == playerInput.currentActionMap || actionMap.name == "UI")
                continue;

            actionMap.Disable();
        }
    }
}
When first enabled, the Player Input component enables all Actions from the the Default Action Map. If no default Action Map exists, the Player Input component does not enable any Actions. To manually enable Actions, you can call Enable and Disable on the action maps or Actions, like you would do without PlayerInput. To check which Action Map is currently enabled, or to switch to a different one, use the PlayerInput.currentActionMap property. To switch actions maps with an action map name, you can also call PlayerInput.SwitchCurrentActionMap.
To disable a player's input, call PlayerInput.DeactivateInput. To re-enable it, call PlayerInput.ActivateInput. The latter enables the default Action Map, if it exists.
When PlayerInput is disabled, it automatically disables the currently active Action Map (PlayerInput.currentActionMap) and disassociate any Devices paired to the player.
See the notification behaviors section below for how to be notified when player triggers an Action.
When using Send Messages or Broadcast Messages
When the notification behavior of PlayerInput is set to Send Messages or Broadcast Messages, you can set your app to respond to Actions by defining methods in components like so:
using UnityEngine;
using UnityEngine.InputSystem;

/// <summary>
/// Example script demonstrating the <c>PlayerInput</c> "Send Messages" behavior.
/// </summary>
public class MyPlayerScript : MonoBehaviour
{
    // "jump" action becomes "OnJump" method.

    /// <summary>
    /// Called by <c>PlayerInput</c> when the "jump" action is triggered.
    /// </summary>
    // If you're not interested in the value from the control that triggers the action, use a method without arguments.
    public void OnJump()
    {
        // your Jump code here
    }

    /// <summary>
    /// Called by <c>PlayerInput</c> when the "move" action is triggered.
    /// </summary>
    /// <param name="value">Value of the control that triggered the action.</param>
    // If you are interested in the value from the control that triggers an action, you can declare a parameter of type InputValue.
    public void OnMove(InputValue value)
    {
        // Read value from control. The type depends on what type of controls.
        // the action is bound to.
        var v = value.Get<Vector2>();

        // IMPORTANT:
        // The given InputValue is only valid for the duration of the callback. Storing the InputValue references somewhere and calling Get<T>() later does not work correctly.
    }
}
The component must be on the same GameObject if you are using Send Messages, or on the same or any child GameObject if you are using Broadcast Messages.
When using Invoke Unity Events
When the notification behavior of PlayerInput is set to Invoke Unity Events, each Action has to be routed to a target method. The methods have the same format as the started, performed, and canceled callbacks on InputAction.
To connect actions to methods with Unity events:
- Create a script with a public method for each action, and attach the script to a GameObject.
- In the Player Input component, set Behavior to Invoke Unity Events.
- Expand Events, then expand the action map, such as Player.
- For each action, select Add (+), assign the GameObject that has your script, and select the method, such as OnMove.
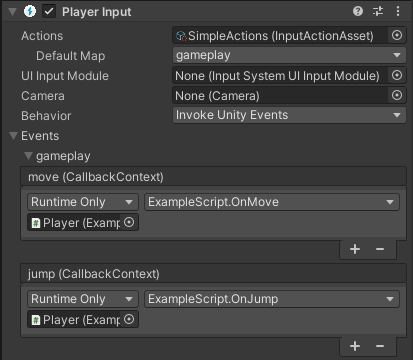
The following example script has methods that you can connect to actions:
using UnityEngine;
using UnityEngine.InputSystem;

/// <summary>
/// Example script demonstrating the <c>PlayerInput</c> "Invoke Unity Events" behavior.
/// </summary>
public class MyPlayerScript : MonoBehaviour
{
    /// <summary>
    /// Called when the "fire" action is triggered.
    /// </summary>
    /// <param name="context">Context for the triggered action.</param>
    public void OnFire(InputAction.CallbackContext context)
    {
    }

    /// <summary>
    /// Called when the "move" action is triggered.
    /// </summary>
    /// <param name="context">Context for the triggered action.</param>
    public void OnMove(InputAction.CallbackContext context)
    {
        var value = context.ReadValue<Vector2>();
    }
}