Apply common effects with built-in filters
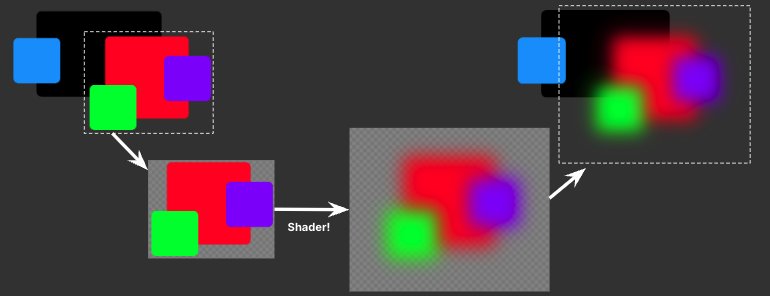
Filters use materials to apply effects to a visual element subtree per-pixel. For example, to post-process a red element, its content and children are rendered to a texture, which can then be processed by a shader. The processed result is then reinserted into the visual element hierarchy. You can expand the processed texture’s bounds with margins to accommodate certain effects. In this example, a blurred texture has enlarged bounds to fit the blur radius.
Built-in filter functions
UI Toolkit provides a set of built-in filter functions that you can use to apply common effects to visual elements. They are similar to CSS filters.
filter: blur(<length>) | grayscale(<number>) | invert(<number>) | opacity(<number>) | sepia(<number>) | tint(<color>) | hue-rotate(<angle>) | contrast(<number>)
The following example demonstrates different filter functions effects:
| Original image | blur(20px) |
grayscale(100%) |
invert(100%) |
opacity(50%) |
sepia(100%) |
tint(#00ff99) |
hue-rotate(90deg) |
contrast(200%) |
|---|---|---|---|---|---|---|---|---|
 |
 |
 |
 |
 |
 |
 |
 |
 |
Note:
- The
tintfunction is a Unity-specific filter function that tints the element with a color. This function isn’t supported in CSS. - USS doesn’t support the
drop-shadowCSS filter functions.
Apply built-in filters to visual elements
You can apply built-in filters to visual elements in UI Builder, USS, or C# code. You can also combine multiple filter functions to create complex effects.
Note: Filters work as a sequential pipeline where each pass processes the output from the previous pass. Pass N can only read from pass N–1, not from pass N–2 or earlier.
Apply filters in UI Builder
You can apply built-in filters to visual elements directly in the UI Builder:
- Open the UI Builder and create a new UXML file or open an existing one.
- Select the visual element you want to apply the filter to.
- In the Inspector panel, select Inline Styles > Filter.
- Click the Add (+) button to add a filter function.
- Select a built-in filter function from the dropdown menu, such as
blur,grayscale, orinvert. - Set the parameters for the filter function, such as the blur radius or grayscale percentage.
- Repeat steps 4–6 to add more filter functions if needed.
Apply filters with USS
To apply a filter to a visual element, use the filter property in a USS file. USS filters follow the CSS filter syntax. For example:
.builtin-blur {
    filter: blur(20px);
}

.builtin-blur-invert {
    filter: blur(5px) invert(100%);
}
If you define multiple classes, and each class defines a filter, and apply them to an element: instead of combining the effects, the filter applied last takes precedence over the earlier ones.
For example, if you apply both of the following classes to an element:
.blur {
    filter: blur(20px);
}

.sepia {
    filter: sepia(100%);
}
And you apply both classes to an element like this: <engine:VisualElement class="blur sepia" />. The element only has the sepia effect applied.
For more information, refer to Selector precedence.
Apply filters in C# code
To apply filters to a visual element in C# code, create a list of FilterFunction objects and assign it to the visual element’s style.filter property. For example:
// Apply blur filter directly. This is equivalent to CSS: filter: blur(20px);.
var blur = new FilterFunction(FilterFunctionType.Blur);
blur.AddParameter(new FilterParameter(20.0f));
staticBlurButton.style.filter = new List<FilterFunction> { blur };
To animate filter parameters over time, you can use Unity’s scheduling system to update the filter parameters in a callback. For example, the following code animates the blur radius of a button’s filter. To avoid unnecessary allocations, cache the list for reuse as shown in the following example:
// Initialize cached filter list once.
var animatedBlurFilterList = new List<FilterFunction>(1);

// Animation variables.
float blurAmount = 1.0f;
float animationTime = 0f;
const float animationDuration = 2f;
const float maxBlur = 20f;
bool increasing = true;

// Use Unity's built-in scheduling system to animate the blur amount.
animatedBlurButton.schedule.Execute((timerState) => {
    float deltaTime = (timerState.deltaTime / 1000.0f);
    animationTime += deltaTime;

    // Calculate normalized time (0-1).
    float normalizedTime = (animationTime % animationDuration) / animationDuration;

    // Apply ease in-out sine curve and yoyo behavior.
    if (increasing)
    {
        blurAmount = 1f + (maxBlur - 1f) * Mathf.Sin(normalizedTime * Mathf.PI * 0.5f);
        if (normalizedTime >= 1f)
        {
            increasing = false;
            animationTime = 0f;
        }
    }
    else
    {
        blurAmount = maxBlur - (maxBlur - 1f) * Mathf.Sin(normalizedTime * Mathf.PI * 0.5f);
        if (normalizedTime >= 1f)
        {
            increasing = true;
            animationTime = 0f;
        }
    }

    // Create a new filter with the current blur value.
    var updatedBlur = new FilterFunction(FilterFunctionType.Blur);
    updatedBlur.AddParameter(new FilterParameter(blurAmount));

    // Clear and add the filter to reuse the cached list.
    animatedBlurFilterList.Clear();
    animatedBlurFilterList.Add(updatedBlur);
    animatedBlurButton.style.filter = animatedBlurFilterList;
}).Every(16); // ~60fps (16ms intervals)