Get started with text
UI Toolkit uses Advanced Text Generator to render text, a text rendering module that uses Harfbuzz, ICU, and FreeType to deliver comprehensive Unicode support and text shaping capabilities.
Advanced Text Generator has the following limitations:
- Doesn’t support static font assets. If your project uses static font assets, you must migrate them.
- Customization of glyph metrics isn’t available. The recommended best practice is to use the font editing tools to adjust the metrics or trim the font as needed.
This example demonstrates how to style text in UI Builder, create and apply dynamic font assets, use rich text tags and custom style sheets to style text, and create a UITK Text Settings asset to manage the text settings for a panel.
Note: For demonstration purposes, this guide uses a runtime UI. The instructions to create font assets and a style sheet also apply to the Editor UI. However, you can’t change the default UITK Text Settings for Editor UI in the current release.
Prerequisites
This guide is for developers familiar with the Unity Editor, UI Toolkit, and C# scripting. Before you start, get familiar with the following:
Create a UITK Text Settings asset
Start with a runtime UI and create a UITK Text Settings asset that manages text settings for the panel. You also create a Resources folder and sub-folders to store font assets and custom style sheets.
- Follow the steps in Get started with Runtime UI to create a simple runtime UI.
- In the
Assetsfolder, create aResourcesfolder. - Right-click in the
Assets\UI Toolkitfolder, and select Create > UI Toolkit > Text > Panel Text Settings to create aPanel Text Settings.asset. - In the
Resourcesfolder, create two folders namedFonts & MaterialsandText Style Sheets.
Style text with UI Builder
Use UI Builder to style the Toggle text to be bold and italic, and have a font size of 12px. For more information, refer to Style text with USS.
- Double-click
SimpleRuntimeUi.uxmlto open it in UI Builder. - In the Inspector window for the Toggle control, select Text.
- In the Font Style field, select B and I.
- In the Size field, enter 12.
Create a dynamic font asset
Create a dynamic font asset and apply it to the TextField control. For a dynamic font asset, you must include the source font file in the build. Import the source font file directly to the path set for the font.
Download the Roboto font package from Google Fonts.
Unzip the font package file and place
Roboto-Regular.ttfin your project’sAssets\Resources\Fonts & Materialsfolder.-
In the Inspector window for the font file, confirm the following:
- Include Font Data is enabled
- Character is set to Dynamic
Right-click
Roboto-Regular.ttfand select Create > UI Toolkit > Text > Font Asset > SDF. This creates a dynamic font asset calledRoboto-Regular SDF.asset.Double-click
SimpleRuntimeUi.uxmlto open it in UI Builder.In the TextField control’s Inspector window, select Text > Font Asset > Roboto-Regular SDF.
Style with rich text tags
Use rich text tags to style text in the Label control.
Note: In the current release, rich text tags aren’t supported for TextField.
- Double-click
SimpleRuntimeUi.uxmlto open it in UI Builder. - In the Inspector panel for the Label control, change Text to
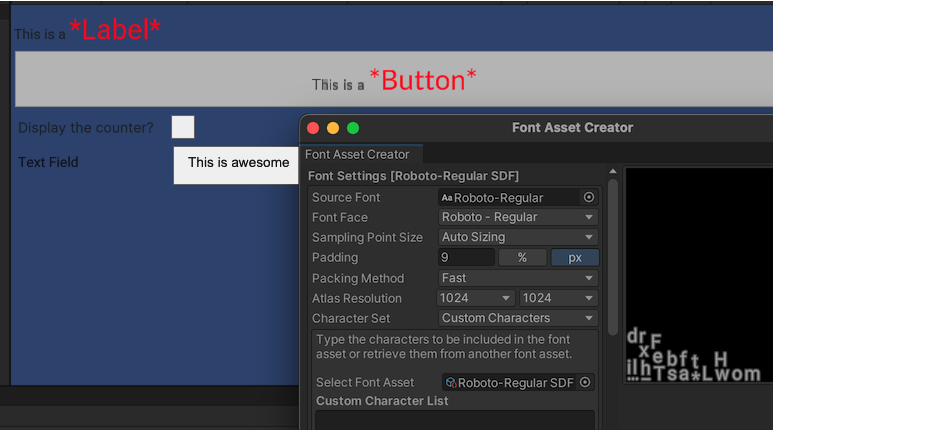
This is a <font-weight=700><size=2em><color=#FF0000>*Label*</color></size></font-weight>. This makes the wordLabelbig, red, bold, and with an asterisk on either side of it. - Make sure Enable Rich Text is selected.
The label text looks like the following in the Viewport window:

Style with style sheets
To apply the same style for Label to Button, create a custom style sheet, and apply the style to both words.
Right-click in the
Assets\Resources\Text Style Sheetsfolder and select Create > UI Toolkit > Text > Text StyleSheet. This creates aText StyleSheet.assetin the path you set in the UITK Text Settings asset.-
In the Inspector window for
Text StyleSheet.asset, do the following:- In Name, enter
ExampleStyle. - In Opening Tags, enter
<font-weight=700><size=2em><color=#FF0000>*. - In Closing Tags, enter
*</color></size></font-weight>.
- In Name, enter
In the Inspector window for
UITK Text Settings.asset, from the Default Style Sheet list, select Text StyleSheet.Double-click
SimpleRuntimeUi.uxmlto open it in UI Builder.In the Label control’s Inspector window, change Text to
<s>This is a <style="ExampleStyle">Label</style>.Make sure Enable Rich Text is selected.
In the Button control’s Inspector window, change Text to
<s>This is a <style="ExampleStyle">Button</style>.Make sure Enable Rich Text is selected.
Enter Play mode and check the text in the runtime UI.
In the text field, enter some random characters. For a dynamic font asset, the font atlas is dynamically generated as you enter text in the text field.
In your project’s
Assets\Resources\Fonts & Materialsfolder, selectRoboto-Regular SDF.asset.In the Inspector window for
Roboto-Regular SDF.asset, select Update Atlas Texture to open the Font Asset Creator window. If the atlas window is hidden, expand it. You can view the characters you entered in the atlas window.