Create a custom playable
This example demonstrates how to create a custom playable (PlayQueuePlayable) with the PlayableBehaviour public class. This example also demonstrate how to override the PrepareFrame() virtual method to control nodes on the PlayableGraph. You can use a custom playable to override other virtual methods in the PlayableBehaviour class.
In this example, the controlled nodes are a series of animation clips (clipsToPlay). The SetInputWeight() method modifies the blend weight of each animation clip to ensure that only one clip plays at a time. The SetTime() method adjusts the local time so playback starts when an animation clip is active.
Prerequisites
To use the CustomPlayableExample script in your project, your project must have the following:
- A GameObject, such as a cube or a capsule. You don’t need to manually add an Animator component to this GameObject. The
RequireComponentattribute adds this component if it’s not present. - At least two animation clips that animate the properties of the GameObject. For example, at least two animation clips that change the position or rotation of a GameObject.
Add and run the script
To use the CustomPlayableExample script in your project, follow these steps:
-
Add a script component to your GameObject. Name the script file
CustomPlayableExample.csand use the following code:using UnityEngine; using UnityEngine.Animations; using UnityEngine.Playables; public class PlayQueuePlayable : PlayableBehaviour { private int m_CurrentClipIndex = -1; private float m_TimeToNextClip; private Playable mixer; public void Initialize(AnimationClip[] clipsToPlay, Playable owner, PlayableGraph graph) { owner.SetInputCount(1); mixer = AnimationMixerPlayable.Create(graph, clipsToPlay.Length); graph.Connect(mixer, 0, owner, 0); owner.SetInputWeight(0, 1); for (int clipIndex = 0 ; clipIndex < mixer.GetInputCount() ; ++clipIndex) { graph.Connect(AnimationClipPlayable.Create(graph, clipsToPlay[clipIndex]), 0, mixer, clipIndex); mixer.SetInputWeight(clipIndex, 1.0f); } } override public void PrepareFrame(Playable owner, FrameData info) { if (mixer.GetInputCount() == 0) return; // Advance to next clip if necessary. m_TimeToNextClip -= (float)info.deltaTime; if (m_TimeToNextClip <= 0.0f) { m_CurrentClipIndex++; if (m_CurrentClipIndex >= mixer.GetInputCount()) m_CurrentClipIndex = 0; var currentClip = (AnimationClipPlayable)mixer.GetInput(m_CurrentClipIndex); // Reset the time so that the next clip starts at the correct position. currentClip.SetTime(0); m_TimeToNextClip = currentClip.GetAnimationClip().length; } // Adjust the weight of the inputs. for (int clipIndex = 0 ; clipIndex < mixer.GetInputCount(); ++clipIndex) { if (clipIndex == m_CurrentClipIndex) mixer.SetInputWeight(clipIndex, 1.0f); else mixer.SetInputWeight(clipIndex, 0.0f); } } } [RequireComponent(typeof (Animator))] public class CustomPlayableExample : MonoBehaviour { public AnimationClip[] clipsToPlay; PlayableGraph graph; void Start() { graph = PlayableGraph.Create("CustomPlayableExample"); var queuePlayable = ScriptPlayable<PlayQueuePlayable>.Create(graph); var playQueue = queuePlayable.GetBehaviour(); playQueue.Initialize(clipsToPlay, queuePlayable, graph); var output = AnimationPlayableOutput.Create(graph, "Animation", GetComponent<Animator>()); output.SetSourcePlayable(queuePlayable, 0); // Play the graph graph.Play(); } void OnDisable() { // Destroy all Playables and Outputs created by the graph. graph.Destroy(); } } In the Script component, add at least two animation clips to the Clips To Play list.
Select Play to switch the Editor to Play mode. The
CustomPlayableExamplescript cycles through the list of animation clips, adjusting the weight and time as each animation clip plays.If you have installed the PlayableGraph Visualizer package, select
CustomPlayableExampleto display the PlayableGraph.
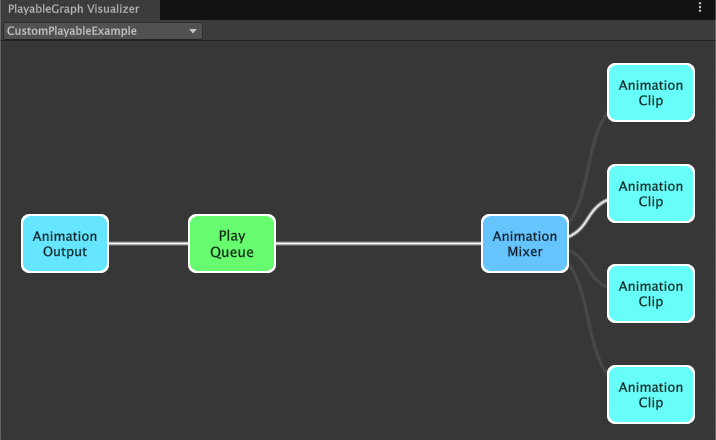
CustomPlayableExample script. The clipsToPlay list has four animation clips.Additional resources
- Animation clipsAnimation data that can be used for animated characters or simple animations. It is a simple “unit” piece of motion, such as (one specific instance of) “Idle”, “Walk” or “Run”. More info
See in Glossary - ScriptPlayable and PlayableBehaviour
- The PrepareFrame virtual method
- Creating scripts
- Play mode in the Game view