The Game view

The Game view is rendered from the Camera(s) in your application. It represents your final, published application. You need to use one or more CamerasA component which creates an image of a particular viewpoint in your scene. The output is either drawn to the screen or captured as a texture. More info
See in Glossary to control what the player sees when they are using your application. For more information about Cameras, see the Camera Component page.
Play mode

Use the buttons in the ToolbarA row of buttons and basic controls at the top of the Unity Editor that allows you to interact with the Editor in various ways (e.g. scaling, translation). More info
See in Glossary to control the Editor Play mode and see how your published application plays. In Play mode, any changes you make are temporary, and are reset when you exit the Play mode. The Editor UI(User Interface) Allows a user to interact with your application. Unity currently supports three UI systems. Glossary to control the Editor Play mode and see how your published application plays. In Play mode, any changes you make are temporary, and are reset when you exit the Play mode. The Editor UI(User Interface) Allows a user to interact with your application. Unity currently supports three UI systems. More info
See in Glossary darkens to remind you of this.
Using the Game view
To open the Game view, do one of the following:
- In the Game tab, on the top left corner, use the drop-down menu to click Game view if Simulator view is open.
- In the menu: Window > General > Game.
Game view Control Bar

| Button | Function | |
|---|---|---|
| Game/Simulator | Click to enable the Game or Simulator view from the drop-down menu. | |
| Display | Select this to choose from a list of Cameras if you have multiple Cameras in the SceneA Scene contains the environments and menus of your game. Think of each unique Scene file as a unique level. In each Scene, you place your environments, obstacles, and decorations, essentially designing and building your game in pieces. More info See in Glossary. This is set to Display 1 by default. You can assign Displays to Cameras in the Camera module, under the Target Display drop-down menu. |
|
| Aspect | Select different values to test how your game looks on monitors with different aspect ratiosThe relationship of an image’s proportional dimensions, such as its width and height. See in Glossary. This is set to Free Aspect by default. |
|
| Low Resolution Aspect Ratios | Enable Low Resolution Aspect Ratios to emulate the pixelThe smallest unit in a computer image. Pixel size depends on your screen resolution. Pixel lighting is calculated at every screen pixel. More info See in Glossary density of older displays: this reduces the resolution of the Game view when an aspect ratio is selected. It is always enabled when the Game view is on a non-Retina display. |
|
| VSync (Game view only) | Enable VSync (Game view only) to give priority to the Game view. This option might add some vertical sync, which is useful when recording a video, for example. Unity attempts to render the Game view at the monitor refresh rate, though this is not guaranteed. When this option is enabled, it is still useful to maximize the Game view in Play mode to hide other views and reduce the number of views that Unity renders. | |
| Scale slider | Scroll right to zoom in and examine areas of the Game screen in more detail. This slider lets you zoom out to see the entire screen where the device resolution is higher than the Game view window size. You can also use the scroll wheel and middle mouse button to do this while the application is stopped or paused. | |
| Maximize on Play | Click to enable: use this to maximize the Game view (100% of your Editor window) for a full-screen preview when you enter Play mode. | |
| Mute audio | Click to enable: use this to mute any in-application audio when you enter Play mode. | |
| Unity Shortcuts | Disable Editor keyboard shortcuts from triggering during Play mode when the Game view window is in focus. Shortcuts still trigger when the focus is on any other part of the Editor. | |
| Stats | Click this to toggle the Statistics overlay, which contains Rendering Statistics about your application’s audio and graphics. This is very useful for monitoring the performance of your application while in Play mode. | |
| GizmosA graphic overlay associated with a GameObject in a Scene, and displayed in the Scene View. Built-in scene tools such as the move tool are Gizmos, and you can create custom Gizmos using textures or scripting. Some Gizmos are only drawn when the GameObject is selected, while other Gizmos are drawn by the Editor regardless of which GameObjects are selected. More info See in Glossary |
Click this to toggle the visibility of Gizmos. To only see certain types of Gizmo during Play mode, click the drop-down arrow next to the word Gizmos and only enable the Gizmo types you want to see. | |
Gizmos menu
The Gizmos menu contains options for how Unity displays gizmos for GameObjectsThe fundamental object in Unity scenes, which can represent characters, props, scenery, cameras, waypoints, and more. A GameObject’s functionality is defined by the Components attached to it. More info
See in Glossary and other items in the Scene viewAn interactive view into the world you are creating. You use the Scene View to select and position scenery, characters, cameras, lights, and all other types of Game Object. Glossary and other items in the Scene viewAn interactive view into the world you are creating. You use the Scene View to select and position scenery, characters, cameras, lights, and all other types of Game Object. More info
See in Glossary and Game view. This menu is available in both the Scene view and the Game view. For more information see Gizmos Menu.
Advanced options
Right-click the Game tab to display advanced Game view options.
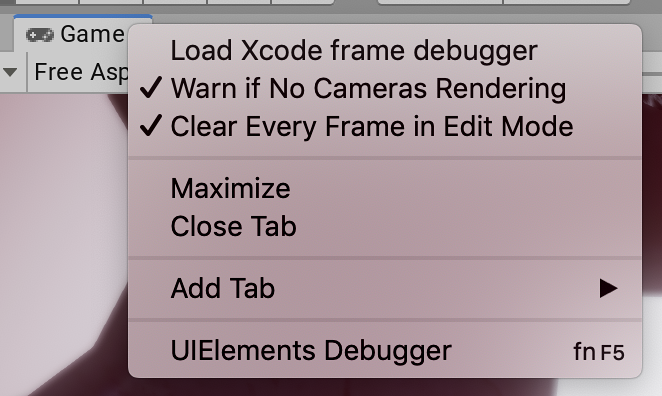
Warn if No Cameras Rendering: This option is enabled by default: it causes Unity to display a warning if no Cameras are rendering to the screen. This is useful for diagnosing problems such as accidentally deleting or disabling a Camera. Leave this enabled unless you are intentionally not using Cameras to render your application.
Clear Every Frame in Edit Mode: This option is enabled by default: it causes Unity to clear the Game view every frame when your application is not playing. This prevents smearing effects while you are configuring your application. Leave this enabled unless you are depending on the previous frame’s contents when not in Play mode.
- Low Resolution Aspect Ratios Game view option available on Windows from 2018.2 NewIn20182