Sprite エディター
Sometimes a Sprite Texture contains just a single graphic element but it is often more convenient to combine several related graphics together into a single image. For example, the image could contain component parts of a single character, as with a car whose wheels move independently of the body. Unity makes it easy to extract elements from a composite image by providing a Sprite Editor for the purpose.
Note: Make sure the graphic you want to edit has its Texture Type set to Sprite (2D and UI). Refer to the Sprites documentation for information on importing and setting up Sprites.
Sprite Textures with multiple elements need the Sprite Mode to be set to Multiple in the Inspector. (Texture Import Inspector image below.)
Opening the Sprite Editor
Sprite Editor (スプライトエディター) を開くには、以下を行います。
-
Select the 2D image you want to edit from the Project View (Fig 1: Project View).
Note that you can’t edit a Sprite by selecting it in the Scene View.
テクスチャインポート Inspector の Sprite Editor ボタンをクリックします (図 2: テクスチャインポート Inspector)。すると Sprite Editor が表示されます (図 3: Sprite Editor)。
ノート: Sprite Editor ボタンは画像の Texture Type を Sprite (2D and UI) に設定している場合にのみ表示されます。
ノート: 画像に複数の要素がある場合は、Texture Import Inspector で Sprite Mode を Multiple に設定してください。
Along with the composite image, you will see a number of controls in the bar at the top of the window. The slider at the top right controls the zoom, while the color bar button to its left chooses whether you view the image itself or its alpha levels. The right-most slider controls the pixilation (mipmap) of the Texture. Moving the slider to the left reduces the resolution of the Sprite Texture. The most important control is the Slice menu at the top left, which gives you options for separating the elements of the image automatically.
Select the Apply and Revert buttons to keep or discard any changes you have made in the Sprite Editor window respectively. You set these buttons to show a confirmation dialog box before applying their effects in Unity’s Preferences window (menu: Edit > Preferences…). In the Preferences window, go to 2D > Sprite Editor Window to open the Sprite Editor window options.
Select the respective option to have a dialog box appear after selecting Apply or Revert to confirm your selection, preventing accidental saving or discarding of changes made.
Using the Editor
手動で要素を識別するものとしてもっとも直接的な方法はエディターを使用することです。画像をクリックすると隅にハンドルが表示された矩形領域が表示されます。サイズ調整はハンドルかスプライトの矩形の端をドラッグすることで行うことができます。要素を分割したら、別のものを追加するには画像の別の部分の矩形をドラッグします。矩形を選択すると、ウィンドウの左下にパネルが表示されます。
The controls in the panel let you choose a name for the Sprite graphic and set the position and size of the SpriteRect by its coordinates. A border width, for left, top, right and bottom can be specified in pixels. The borders are useful when 9-Slicing Sprites. There are also settings for the Sprite’s pivot, which Unity uses as the coordinate origin and main “anchor point” of the graphic. You can choose from a number of default SpriteRect-relative positions (eg, Center, Top Right, etc) or use custom coordinates.
Slice メニューの隣にある Trim ボタンは、透明度に基づいて画像の端の周りにぴったり合うように、スプライトの矩形のサイズを変更します。
ノート: Border は 2D SpriteRenderer ではなく、UI システムでのみサポートされています。
Automatic Slicing
Select the Slice tool and set its Type to Automatic to have Unity automatically slice a Texture into multiple individual Sprites by generating boundaries based on the surrounding transparency of each potential Sprite. For example, you can use Automatic Slicing to isolate regularly spaced graphical elements in a Texture, such as individual Tiles in a tile sheet.
Sprite Editor のツールバーから Slice ツールを選択し、Type を Automatic に設定すると、以下のようなエディターパネルが表示されます。
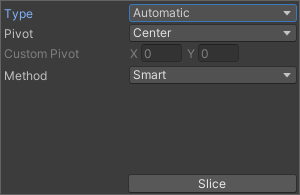
In this panel, you can set the default pivot for each sliced Sprite with the Pivot and Custom Pivot options. If there are existing selections in the editor window before applying the Automatic slicing, select from the following options in the Method menu to choose how Unity handles the existing selections:
| 方法 | 機能 |
|---|---|
| Delete Existing | テクスチャ内の全ての SpriteRect を削除し、新しくスライスされた SpriteRect を追加します。 |
| Smart | 新しくスライスされた SpriteRect が 1 つまたは複数の既存の SpriteRect と重なる場合、最もよく重なっている元の SpriteRect の位置とサイズが、新しくスライスされた SpriteRect の位置とサイズに更新されます。この新しくスライスされた SpriteRect は、その後破棄されます。 |
| Safe | 元の SpriteRect を全て維持します。新しくスライスされた SpriteRect が既存の SpriteRect と重なる場合、それは破棄されます。 |
Grid by Cell Size or Grid by Cell Count options are also available for the slicing type. This is very useful when the Sprites have already been laid out in a regular pattern during creation:
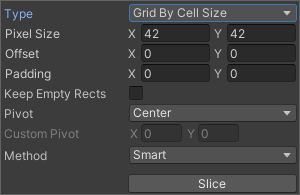

The Pixel Size values determine the height and width of the tiles in pixels. If you chose grid by cell count, Column & Row determines the number of columns and rows used for slicing. You can also use the Offset values to shift the grid position from the top-left of the image and the Padding values to inset the SpriteRects slightly from the grid. The Keep Empty Rects option lets you keep SpriteRects that do not have any pixels within them. This is useful for organising Sprites created from the texture based on their position in the texture. The Pivot can be set with one of nine preset locations or a Custom Pivot location can be set.
The Isometric Grid option attempts to slice the Sprite sheet which has its Sprites laid out in alternating rows of half height diamonds. When sliced, the resulting SpriteRects will have custom outlines and physics shapes corresponding to the half height diamonds.
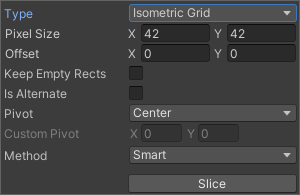
Is Alternate オプションは、アイソメトリックなひし形を列ごとに互い違いに並べるかどうか指定します。有効にすると、一番上の列の最初のひし形が、左端から半ピクセル分ずれた位置から開始することが想定されます。無効にすると、最初のひし形が、左端の位置から直接開始します。
Grid オプションを使用してスライスする場合は、スライスのガイドとして、SpriteRect のプレビューがテクスチャ上に表示されます。スライスの設定を調整すると、それに応じてプレビューが更新されます。既存の SpriteRect の処理に使用された方法や、プレビュー SpriteRect のピクセルの内容によっては、スライスを行っても、プレビューに表示された SpriteRect が生成されない場合があります。

なお、どの 自動スライス 方法で生成された SpriteRect も、手動編集によって形状の微調整が可能です。
Polygon Resizing
Sprite Editor (スプライトエディター) では形状、サイズ、ピボットの位置を変更することができます。
Polygon shape
ポリゴンに対して希望するサイズの値を Sides 入力し、 Change をクリックしてください。
Polygon size and pivot
Polygon size
ポリゴンのサイズを変更するために、スプライトをクリックして緑色の境界線とスプライトのインフォメーションボックスを表示してください。緑色のラインをクリックアンドドラッグして必要な境界線を作成すると、Border フィールドの値が変わります。
Polygon pivot
ポリゴンのピボット (つまり、ポリゴンの動作軸) を変更するには、画像をクリックし、スプライトインフォメーションボックスを表示してください。Pivot ドロップダウンメニューをクリックし、オプションを選択してください。これによりポリゴン上に青いピボットサークルが表示されます。この位置は選択したピボットオプションによります。より細かい変更を行いたい場合は Custom Pivot を選択し、青いピボットサークルをクリックアンドドラッグして位置を変更します。
- Isometic Grid slicing option added to Sprite Editor in 2021.1 NewIn20211