Building and running a WebGL project*
WebGL 프로젝트를 빌드하면 Unity에서 다음 파일이 있는 폴더를 만듭니다.
브라우저에서 탐색하여 콘텐츠에 로드할 수 있는 index.html 파일
A Development or Release folder containing your generated build output files (which folder depends on whether you do a development build or not).
A TemplateData folder (at least when building with the default template), containing the loading bar and other template assets. See the User Manual page on WebGL templates for more information.
The Development or Release folder contains the following files (the MyProject file name represents the name of your project). (Note that if you make a release build, files in this folder are compressed and have a .gz suffix. See the comments on Distribution size below.)
A MyProject.js JavaScript file containing the code for your player.
A MyProject.mem file containing a binary image to initialize the heap memory for your player.
A MyProject.data file containing the asset data and scenes.
A UnityLoader.js file containing the code needed to load up the Unity content in the web page.
You can view your WebGL player directly in most browsers by simply opening the index.html file. For security reasons, Chrome places restrictions on scripts opened from local file: URLs, so this technique will not work. If you use Unity’s Build & Run command (menu: File > Build & Run) then the file will be temporarily hosted in a local web server and opened from a localhost URL (this avoids the security restrictions). You can also run Chrome with the --allow-file-access-from-files command line option to enable it to load content from file: urls. This is required on a PC to allow execution of the build.
On some servers you need to make .mem and .data files accessible because the server needs to provide these files to clients.
빌드(Build) 플레이어 옵션
Build Settings 다이얼로그 상자(메뉴: File > Build Settings…)에서 WebGL 옵션에 액세스합니다. 다이얼로그 상자의 Platform 리스트에서 WebGL 을 선택한 다음 Player Settings… 를 선택합니다.
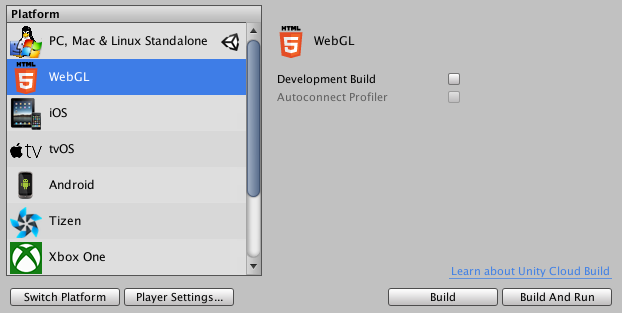
개발 빌드
Development Build 체크박스를 선택하면 Unity는 프로파일러 지원과 오류 확인을 위한 개발 콘솔이 포함된 개발 빌드를 생성합니다. 또한 개발 빌드는 콘텐츠를 압축하지 않습니다. 즉, 콘텐츠가 최소화되지 않습니다. 또한 JavaScript를 사람이 읽기 쉬운 형태로 유지하므로 오류에 대해 유용한 스택 추적을 얻을 수 있습니다. 하지만 이로 인해 개발 빌드의 용량이 아주 커지므로 배포하기 어려워집니다.
미리 빌드된 엔진 사용
This option only appears when you have the Development Build checkbox checked. Use the Use pre-built Engine option in the Build Settings dialog box to speed up build iteration time during development. When this option is enabled, Unity rebuilds only the managed code and then links dynamically with the pre-build Unity engine, so the project is rebuilt approximately 30–40% faster. Note that this type of build is only suited for development purposes, as it always produces unstripped engine code. Also, due to the dynamic linking overhead, the performance of this type of build is slower than a normal build.
프로파일러 자동 연결
이 옵션은 Development Build 체크박스가 선택된 경우에만 활성화할 수 있습니다. Unity WebGL 콘텐츠를 프로파일링하려면 Autoconnect Profiler 옵션을 선택해야 합니다. WebGL의 경우 프로파일러를 다른 플랫폼에서 실행 중인 빌드에 연결할 수 없으므로, 이 옵션을 사용하여 콘텐츠를 에디터에 연결해야 합니다. 프로파일러 연결은 WebGL의 WebSocket을 사용하여 처리되지만 웹 브라우저는 콘텐츠에서 발신 연결만 허용하기 때문입니다.
플레이어 설정
WebGL의 PlayerSettings 인스펙터 창(메뉴: Edit > Project Settings > Player)에 추가 옵션이 몇 개 있습니다.
기타 설정
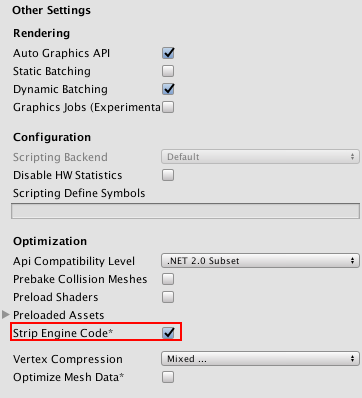
엔진 코드 스트립
Other Settings 를 열어 Strip Engine Code 옵션에 액세스합니다. 이 옵션은 기본적으로 선택되어 있어 WebGL에 대해 코드 스트리핑을 활성화합니다. 이 옵션이 선택되어 있으면 Unity는 사용되지 않은 클래스에 대한 코드를 포함시키지 않습니다. 예를 들어, 물리 컴포넌트 또는 함수를 사용하지 않으면 전체 물리 엔진이 빌드에서 제거됩니다. 세부 정보는 아래의 스크리핑 섹션을 참조하십시오.
퍼블리싱 설정
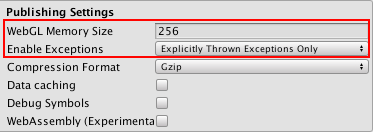
WebGL 메모리 크기(WebGL Memory Size)
Open Publishing Settings to access the WebGL Memory Size field. Here, you can specify how much memory (in MB) the content should allocate for its heap. If this value is too low, you will get “out of memory” errors. This means your loaded content and scenes cannot fit into the available memory. However if this value too high, your content might fail to load in some browsers or on some machines, because the browser might not have enough available memory to allocate the requested heap size. This value is written to a variable named TOTAL_MEMORY in the generated .html file, so if you want to experiment with this setting, you can edit the .html file to avoid the need to rebuild your project. See the User Manual page on WebGL memory usage for more details.
예외 활성화
Publishing Settings__를 열어 Enable Exceptions__에 접근합니다. __Enable Exceptions__를 통해 런타임에 예기치 않은 코드 동작(일반적으로 오류로 간주됨)을 처리하는 방법을 지정할 수 있습니다. 다음 세 가지 옵션이 있습니다.
- None: 예외 지원이 필요하지 않은 경우에 선택합니다. 성능이 극대화되고 빌드가 최소화됩니다. 이 옵션을 선택하면 폐기된 예외로 인해 해당 설정에 오류가 있는 경우 콘텐츠가 중지됩니다.
-
Explicitly Thrown Exceptions Only(기본값): 스크립트의
throw문에서 명시적으로 지정된 예외를 캡처하려면 이 옵션을 선택합니다. 이 옵션을 사용하면 스크립트의finally블록도 작동합니다. 이 옵션을 선택하면 스크립트에서 생성된 JavaScript 코드가 더 커지고 더 느려지지만, 스크립트가 프로젝트의 중요한 병목 지점인 경우를 제외하고 중요한 문제가 될 가능성은 크지 않습니다. -
Full: 다음을 캡처하려면 이 옵션을 선택합니다.
- 스크립트의
throw문에서 명시적으로 지정된 예외 - Null 레퍼런스
- 범위 이탈 배열 액세스
- 매니지드 스택 추적
- 스크립트의
Unity는 이런 예외에 대한 확인을 코드에 포함시켜서 예외를 생성하므로, 이 옵션을 선택하면 코드 크기가 커지고 성능이 둔화됩니다. 코드의 문제를 디버그해야 하는 경우에만 이 모드를 사용해야 합니다. 매우 크고 매우 느린 빌드가 생성되기 때문입니다.
Publishing Settings 를 선택하여 Data Caching 에 접근합니다. 플레이어 데이터 자동 로컬 캐싱을 사용하려면 선택합니다. 이 옵션을 사용하면 에셋 스토리지가 브라우저 IndexedDB 데이터베이스의 로컬 캐시로 설정되므로, 콘텐츠를 다시 실행할 때 에셋을 다시 다운로드하지 않아도 됩니다. IndexedDB 스토리지 허용에 대한 규칙은 브라우저마다 다릅니다. 브라우저에서 사용자에게 데이터 저장 권한을 요청할 수 있고, 빌드가 브라우저에서 정한 크기 제한을 초과할 수 있습니다.
배포 크기
WebGL용으로 퍼블리시하는 경우 콘텐츠가 시작되기 전에 사용자가 충분한 다운로드 시간을 얻을 수 있도록 빌드 크기를 작게 유지하는 것이 중요합니다. 에셋 크기를 줄일 수 있는 방법에 대한 일반적인 팁은 빌드 파일 크기 축소 문서를 참조하십시오.
WebGL 관련 힌트와 팁
텍스처 임포터에서 모든 압축된 텍스처를 Crunch 텍스처 압축 포맷으로 지정해야 합니다.
개발 빌드를 배포하지 말아야 합니다. 빌드는 압축되거나 최소화되지 않으므로 파일 크기가 훨씬 더 큽니다.
필드에 예외가 필요하지 않은 경우 PlayerSettings(메뉴: Edit > Project Settings > Player)로 이동하여 Publishing Settings 를 열고 Enable Exceptions 을 None 으로 설정해야 합니다.
PlayerSettings(메뉴: Edit > Project Settings > Player)로 이동하여 Other Settings 를 열고 Strip Engine Code 를 활성화하면 효율적인 빌드가 보장됩니다.
타사 관리 dll을 사용하는 경우 많은 종속성이 포함되어 있어 생성된 코드 크기가 매우 커질 수 있으므로 주의해야 합니다.
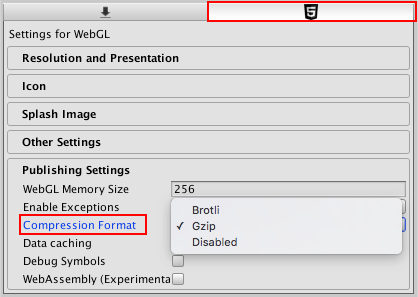
릴리스 빌드를 만들면 Unity는 WebGL PlayerSettings > Publishing Settings 창에서 선택된 Compression Format 에 따라 빌드 출력 파일을 압축합니다.
각 옵션과 옵션을 사용하여 빌드를 퍼블리시하는 방법에 대한 자세한 내용은 압축된 빌드 배포 문서를 참조하십시오.
에셋 번들
콘텐츠가 시작되기 전에 모든 에셋 데이터를 다운로드해야 하므로, 에셋을 주 데이터 파일에서 에셋 번들로 이동할지 고려해야 합니다. 이렇게 하면 빠르게 로드되는 콘텐츠를 위해 작은 로더 씬을 만들 수 있습니다. 그러면 사용자 콘텐츠를 이용하는 동안 에셋이 동적으로 로드됩니다. 또한 에셋 번들은 에셋 데이터 메모리를 관리하는 데도 도움이 됩니다. AssetBundle.Unload를 호출하여 더 이상 필요하지 않은 에셋의 에셋 데이터를 메모리에서 언로드할 수 있습니다.
WebGL 플랫폼에서 에셋 번들을 사용할 때 고려해야 할 사항이 몇 가지 있습니다.
When you use class types in your AssetBundle which are not used in your main build, Unity may strip the code for those classes from the build. This can cause a fail when trying to load Assets from the AssetBundle. See the section on Stripping, below, to learn how to fix that.
WebGL does not support threading, but http downloads only become available when they have finished downloading. Because of this, Unity WebGL builds need to decompress AssetBundle data on the main thread when the download is done, blocking the main thread. To avoid this interruption, LZMA AssetBundle compression is not available for AssetBundles on WebGL. AssetBundles are compressed using LZ4 instead, which is de-compressed very efficiently on-demand. If you need smaller compression sizes than LZ4 delivers, you can configure your web server to use gzip or Brotli compression (on top of LZ4 compression) on your AssetBundles. See documentation on Deploying compressed builds for more information on how to do this.
WWW.LoadFromCacheOrDownload를 사용한 에셋 번들 캐싱은 WebGL에서 브라우저의 IndexedDB API를 사용하여 지원됩니다. 캐싱은 사용자의 컴퓨터에서 구현됩니다. IndexedDB는 일부 브라우저에서 제한적으로 지원될 수 있으며, 해당 브라우저에서는 디스크에 데이터를 저장하기 위해 사용자에게 허가를 요청할 수 있습니다. 자세한 내용은 WebGL 브라우저 호환성 문서를 참조하십시오.
스트리핑
Unity는 사용되지 않은 모든 코드를 빌드에서 기본적으로 제거합니다. PlayerSettings 인스펙터 창(메뉴: Edit > Project Settings > Player)을 통해 이 설정을 변경할 수 있습니다. Other Settings 를 선택하여 Strip Engine Code 옵션에 액세스해야 합니다. 스트리핑을 활성화하여 빌드하는 것이 더 좋습니다.
코드 스트리핑을 사용하면 Unity는 스크립트 코드에서 레퍼런스되어 사용되거나 씬의 직렬화된 데이터에 사용되는 UnityObject 파생 클래스를 프로젝트에서 검색합니다. 그런 다음 사용되는 클래스가 없는 Unity 서브시스템을 빌드에서 제거합니다. 그러면 빌드의 코드가 감소하여 다운로드 크기가 작아지고 파싱할 코드도 감소합니다. 따라서 코드가 더 빨리 실행되고 메모리를 덜 사용합니다.
코드 스트리핑 관련 문제
실제로 필요한 코드가 코드 스트리핑 도중 제거되는 경우 프로젝트에 문제가 발생할 수 있습니다. 예를 들어, 메인 빌드에 포함되어 있지 않아 제거된 클래스를 포함하는 에셋 번들을 런타임 시점에 로드하면 문제가 발생합니다. 이러한 문제가 발생하면 아래와 같이, 브라우저의 JavaScript 콘솔에서 오류 메시지가 표시됩니다(추가 오류 역시 발생할 수 있습니다).
Could not produce class with ID XXX
이러한 오류를 해결하려면 위 예제에서의 XXX에 해당하는 ID를 클래스 ID 참조에서 조회해서 어떤 클래스가 인스턴스를 생성하려고 했는지 확인해야 합니다. 이 경우 해당 클래스에 대한 참조를 스크립트에 추가하거나 프로젝트에 _link.xml_파일을 추가하는 방법을 통해 Unity가 해당 클래스의 코드를 포함하도록 강제할 수 있습니다.
다음은 Collider 클래스(그리고 물리 모듈)가 프로젝트에서 보존되도록 하는 예제입니다. XML 코드를 link.xml 이라는 파일에 추가하고 이 파일을 Assets 폴더에 저장해야 합니다.
<linker>
    <assembly fullname="UnityEngine">
        <type fullname="UnityEngine.Collider" preserve="all"/>
    </assembly>
</linker>
스트리핑으로 인해 빌드에 문제가 발생한다고 의심될 경우 테스트 중에 Strip Engine Code 옵션을 비활성화하는 방법도 시도해 볼 수 있습니다.
Unity에는 어떤 모듈 및 클래스가 빌드에 포함되어 있는지 확인하여 프로젝트를 스트리핑에 적합하게 최적화할 수 있는 편리한 방법이 없습니다. 하지만 빌드를 만든 후에 생성되는 Temp/StagingArea/Data/il2cppOutput/UnityClassRegistration.cpp 파일을 확인하여 포함된 클래스와 모듈의 개요를 얻을 수 있습니다.
Strip Engine Code 옵션은 Unity 엔진 코드에만 영향을 미칩니다. IL2CPP는 항상 관리 dll 및 스크립트에서 바이트 코드를 스트리핑하므로, 관리되는 타입을 코드에서 정적으로 레퍼런스하지 않고 반사를 통해 레퍼런스해야 하는 경우 문제가 될 수 있습니다. 반사를 통해 타입에 액세스해야 하는 경우, 해당 타입을 유지하기 위해 link.xml 파일도 설정해야 할 수 있습니다. link.xml 파일에 대한 자세한 내용은 iOS 빌드 크기 최적화에 대한 문서 페이지를 참조하십시오.
빌드 출력 파일 이동
If you want to change the location of your output files relative to the index.html file, you can do so by editing the dataUrl, codeUrl, and memUrl fields and the UnityLoader.js script tag in the index.html file. You can specify URLs on external servers for these if you want to host your files on a content distribution network (CDN), but you need to make sure that the hosting server has enabled Cross Origin Resource Sharing (CORS) for this to work. See the manual page on WebGL networking for more information about CORS.
인크리먼트 빌드
IL2CPP를 통해 프로젝트에 생성되는 C++ 코드는 인크리먼트로 컴파일됩니다. 즉, 마지막 빌드 이후에 변경되고 생성된 C++ 코드만 다시 컴파일됩니다. 변경되지 않은 소스 코드에는 이전 빌드를 위해 생성된 것과 동일한 오브젝트 파일이 다시 사용됩니다. 인트리먼트 C++ 빌드에 사용되는 오브젝트 파일은 Unity 프로젝트의 Library/il2cpp_cache 디렉토리에 저장됩니다.
인크리먼트 컴파일을 사용하지 않는 생성된 C++ 코드의 완전히 새로운 클린 빌드를 수행하려면 Unity 프로젝트의 Library/il2cpp_cache 디렉토리를 삭제해야 합니다. Unity 에디터 버전이 이전 WebGL 빌드에 사용된 버전과 다르면 Unity가 완전히 새로운 클린 빌드를 자동으로 수행합니다.