Specular Mode: Specular Parameter

스페큘러 파라미터
The specular parameter is only visible when using the specular workflow, as shown above. Specular effects are essentially the direct reflections of light sources in your scene which typically show up as bright highlights or shines on the surface of objects (although specular highlights can be subtle or diffuse too).

Both the specular and metallic workflow will produce specular highlights, so the choice as to which to use is more a matter of workflow and artistic preference. In the specular workflow you have direct control over the brightness and tint colour of specular highlights, wheras in the metallic workflow you control other parameters and the intensity and colour of the specular highlights emerge as an natural result of the other parameter settings.
When working in Specular mode, the RGB colour in the specular parameter controls the strength and colour tint of the specular reflectivity. This includes shines from light sources and reflections from the environment. The Smoothness parameter controls the clarity of the specular effect. With a low smoothness value, even strong specular reflections appear blurred and diffuse. With a high smoothness value, specular reflections are crisper and clearer.

Often you will want to vary the specular values across the surface of your material - for instance if your texture contains a character’s clothing including some shiny buttons. You would want the buttons to have a higher specular value than the fabric of the clothes. To achieve this, instead of using a single slider value, a texture map can be assigned. This allows greater control - you can vary the strength and colour of the specular light reflections across the surface of the material according to the pixel colours of your specular map.
With a texture assigned to the Specular parameter, both the Specular and Smoothness sliders will disappear. Instead, the Specular levels for the material are controlled by the values in the Red, Green & Blue channels of the texture, and the Smoothness levels for the material are controlled by the Alpha channel of the same texture. This means you have a single texture which can define areas as being rough or smooth, and have varying levels and colors of specularity. This is very useful when working texture maps that cover many areas of a model with varying requirement: For example a single character texture map often includes multiple surface requirements - leather shoes, fabric of the clothes, skin for the hands and face and metal buckles.
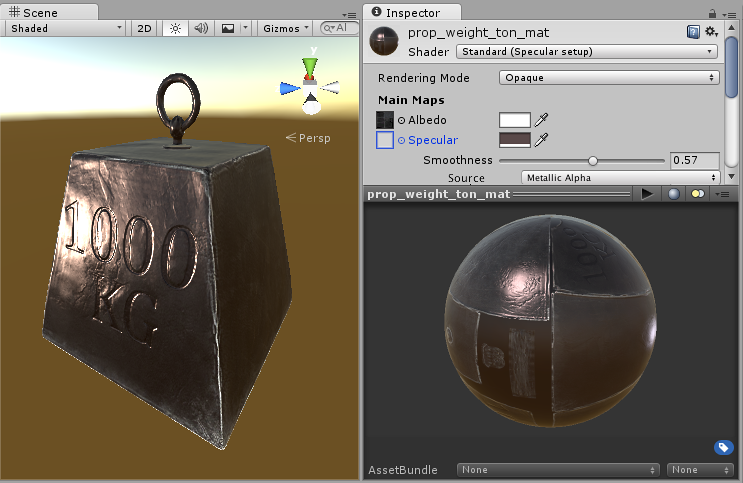
Here an example of a 1000kg weight with a strong specular reflection from a directional light. The specular reflection and smoothness values are defined by a colour and slider, no texture has been assigned - so the specular and smoothness level is constant across the whole surface. This is not always desirable, particularly in the case where your albedo texture maps to a variety of different areas on your model (also known as a texture atlas).
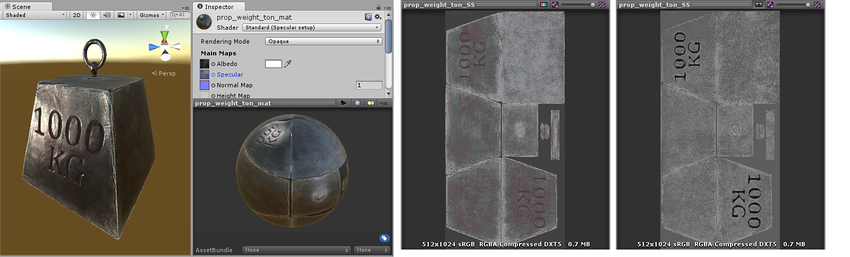
Here a texture map controls the specularity and smoothness. This allows the specularity to vary across the surface of the model. Notice the edges have a higher specular effect than the centre, there are some subtle colour responses to the light, and area inside the lettering no longer has specular highlights. Pictured to the right are the RGB channels controlling the specular colour and strength, and the Alpha channel controlling the smoothness.
Note: A black specular color (0,0,0) results in nulling out the specular effect.