パラメーター
| label | プロパティーのラベル |
| prop | 編集するプロパティー |
| position | レンジスライダーコントロールの位置とサイズ |
説明
レンジシェーダープロパティーのためのレンジスライダーを描画します
カスタムマテリアルエディターを作成するには、最初に CustomEditor クラスを作って Assets/Editor フォルダーに保存する必要があります。それから、シェーダーでそのクラス名を参照します。例えば、
CustomEditor "MaterialRangePropertyExample"
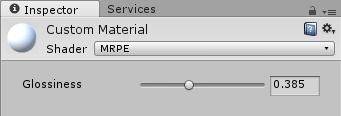
こちらは、Range スライダーを示しています。シェーダーの Glossiness プロパティーを反映している例です。
using UnityEngine;
using UnityEditor;

public class MaterialRangePropertyExample : MaterialEditor
{
	public override void OnInspectorGUI( )
	{
		serializedObject.Update( );
		SerializedProperty matShader = serializedObject.FindProperty( "m_Shader" );

		if( !isVisible )
			return;

		Material mat = target as Material;
		MaterialProperty Glossiness = GetMaterialProperty( new Object[] { mat }, "_Glossiness" );

		if( Glossiness == null )
			return;

		EditorGUI.BeginChangeCheck( );

		RangeProperty( Glossiness, "Glossiness" );

		if( EditorGUI.EndChangeCheck( ) )
			PropertiesChanged( );
	}
}
こちらは似た例で、Rect パラメーターを使って、カスタムマテリアルエディターウィンドウ内のスライダーコントロールの配置とサイズを制御しています。
using UnityEngine;
using UnityEditor;

public class MaterialRangePropertyWithRectExample : MaterialEditor
{
	public override void OnInspectorGUI( )
	{
		serializedObject.Update( );
		SerializedProperty matShader = serializedObject.FindProperty( "m_Shader" );

		if( !isVisible )
			return;

		Material mat = target as Material;
		MaterialProperty Glossiness = GetMaterialProperty( new Object[] { mat }, "_Glossiness" );

		if( Glossiness == null )
			return;

		EditorGUI.BeginChangeCheck( );

		RangeProperty( new Rect( 20, 60, 300, 20 ), Glossiness, "Glossiness" );

		if( EditorGUI.EndChangeCheck( ) )
			PropertiesChanged( );
	}
}
上の例のエディターウィンドウはこのように表示されます。
Example material editor in Inspector.