Using UDP with other services
Google Play games services in UDP builds
Overview
Implementing Google Play games services in your Android games lets you leverage Google’s service layer for features such as achievements and leaderboards. If your game implements Google Play game services, additional configuration is required to support the builds that UDP creates for different stores.
When your game invokes Google Play games services, Google Play games services checks that the following details match the information registered on the Google Play Console:
- The application’s package name
- The certificate the application was signed with
If they don’t match, the player can’t log into the application with Google Play games services.
For certain stores that you publish your game to via UDP, UDP adds a store-specific suffix to the package name. Additionally, if you don’t use your own private key to generate the certificate, UDP generates a certificate for each repacked build. These events would cause your certificate and/or package name to no longer match the information on the Google Play Console. This would prevent users from logging into the game with Google Play game services.
The following section explains how to resolve this issue.
Configuring Google Play games services for UDP builds
This section explains how to link your UDP versions to a Google Play application so that Google Play game services can work on all of them.
- In the Google Play Console, go to the target app.
- Go to Play Games Services > Setup and management > Configuration.
- If your Google Play game has Google Play games services implemented, your game will already be linked to a Google Play games services project. In this case:
- Select Use an existing Play Games Services project.
- Select your game project and select Use.
- Follow the steps in Link the UDP apps to your game service.
- If your Google Play game doesn’t have Google Play games services implemented:
- In the Play Games Services setup page, select Yes, my game already uses Google APIs or No, my game doesn’t use Google APIs.
- Follow the steps in Creating and linking a Google Play games services project.
- If your Google Play game has Google Play games services implemented, your game will already be linked to a Google Play games services project. In this case:
Creating and linking a Google Play games services project
This section explains how to create a Google Play games services project and link it to a new or existing cloud project.
If you selected Yes, my game already uses Google APIs in the Play Games Services setup page:
- Select a cloud project.
- Select Use to create a new Play Games Services project and link it to your existing cloud project.
If you selected No, my game doesn’t use Google APIs in the Play Games Services setup page:
- Enter a game name.
- Select Create to create a new Play Games Services project and link it to a new cloud project.
When you create a new Play Games Services project, the Add credential link is disabled.
- Select Configure OAuth consent screen.
- In the Play Games Services configuration screen, select Refresh.
The Add credential option is now enabled. - Select Add credential.
This opens the Add credential page. - In the Add credential page:
- Select Android as the Type.
- Set Enable anti-piracy to Off. This lets users access your game if they have installed it from a different app store than Google Play.
- In the Authorization section, select Create OAuth client. This opens a popup.
- Select Create OAuth Client ID and use the details from the popup to complete the form.
When you’ve completed the above steps, your Google Play game is linked to its Google Play games services. The next step is to link your UDP builds to the games services.
Linking UDP apps to your games services
When you have linked your app to Google Play games services you can link the other (UDP) apps to the games services.
- In the Google Play Console, select Play Games Services > Setup and management > Configuration.
- In the Play Games Services configuration page, select Add credential.
- In the Add credential page:
- Select Android.
- Set Enable anti-piracy to off. This lets users access your game if they have installed it from a different app store than Google Play.
- In the Authorization section, select Create OAuth client. This opens a popup.
- Select Create OAuth Client ID and use the details from the popup to complete the form.
- In the Create OAuth client ID form, enter the required details to create an entry for one of your UDP builds.
- In the Name field, name the build after the corresponding store, for example “Samsung version”.
- In the Package name field, specify the package name for the build registered with the corresponding store via the UDP console.
The store-specific package name is displayed in the UDP console:- Go to My Games > Publish tab.
- Select Advanced for the corresponding store.
The package name is displayed in the Basic Information section.
- In the certificate field, use the certificate used for the corresponding UDP store. UDP signs the app with the new certificate after the Repack operation.
The store-specific certificate is displayed in the UDP console:- Go to My Games > Publish tab.
- Select Advanced for the corresponding store.
The certificate is displayed in the Basic Information section.
Note: You can also download the APK Certificate and get the fingerprint information via the command:openssl x509 -in [downloaded-pem-filepath] -fingerprint -noout - Copy the SHA–1 from the UDP console into the certificate field.
- When you’ve completed the form, select Create and return to Google Play Console.
- Select Refresh OAuth clients.
- Select your new OAuth client.
- Select Save changes to save the credential.
- Repeat the above steps for each store-specific UDP build that you want to link to your Google Play application.
You can view the UDP builds you’ve linked to your Google Play application in the Google Cloud Platform > Google API & Services dashboard, under Credentials.
These steps enable Google Play games services to work successfully on all the UDP store versions that are linked that way, excluding Mi GetApps (whose SDK integrates an old version of Google Mobile Services, which creates conflicts).
Note: Any changes to Google’s systems could impact the solution described above. For more information on Google’s troubleshooting information, see the Google documentation.
Using Cloud Build with UDP
可通过以下方式使用 Cloud Build 将游戏部署到 UDP 控制台:
- 将 APK 上传到 Cloud Build,然后从那里部署到 UDP
- 使用 Cloud Build 构建你的游戏,然后从那里部署到 UDP
通过 Cloud Build 将构建版本推送到 UDP 控制台
This section explains how to use Cloud Build to push your game to UDP. In the Unity Editor, enable Cloud Build in the Project Settings window.
在编辑器中使用 Cloud Build 将游戏部署到 UDP
要通过 Unity 编辑器中的 Cloud Build 功能将游戏部署到 UDP,你需要上传 UDP 构建版本并将其推送到 UDP。
- In the Cloud Build tab of the Project Settings window, if you haven’t uploaded any build before, select Upload Build.
1.在 FILE 中:
- 选择 UDP 构建版本的 APK
- 在 LABEL 中输入有用的标签
- 将 PLATFORM 字段设置为 Android。
1.选择 UPLOAD,然后等待完成上传过程。
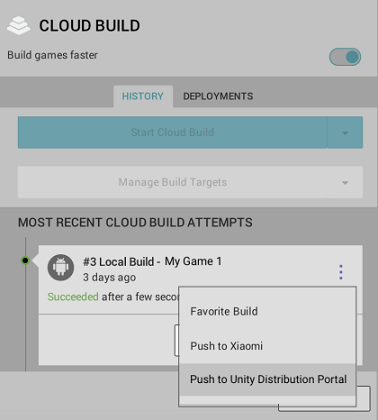
- In the Cloud Build tab of the Project Settings window, locate the desired build from the build History timeline and select Push to Unity Distribution Portal.
1.确认想要推送,然后确认操作完成。
使用 Unity Dashboard 将游戏部署到 UDP
要通过 Unity Dashboard 中的 Cloud Build 功能将游戏部署到 UDP,你需要将 UDP 构建版本上传到 Unity Dashboard 并从其中推送到 UDP。
1.在 Unity 开发者控制面板 (Developer Dashboard) 中,导航到项目的 Cloud Build > History。 1.选择 Upload,然后选择 APK 文件。 1.在 Platform 字段中,选择 Android。 1.选择 Upload。 1.选择构建版本旁边的 More 菜单以展开下拉菜单。 1.选择 Push to Unity Distribution Portal。
通过 Cloud Build 进行构建和部署
如果使用的是 Unity Teams Advanced,你可以自动生成构建版本。
In the Cloud Build tab of the Project Settings window:
1.选择 Manage Build Targets > Add new build target 1.在 TARGET SETUP 窗口中,将 PLATFORM 字段设置为 Android 并输入有用的 TARGET LABEL。 1.选择 Next: Save。 1.选择 Start Cloud Build,然后选择刚才创建的目标构建版本。
通过 Unity Cloud Build 开发者控制面板 (Developer Dashboard) 将构建版本直接推送到 UDP(如上所示)。
服务互操作性
UDP 可以让游戏使用的其他服务了解该游戏是从哪个商店下载的。
Unity 服务以及第三方服务或你自己的服务可以多种方式使用这一信息。
例如,在使用 Unity Remote Config 时,你可以根据定义的规则(例如,从哪个商店下载的游戏)来调整游戏设置。
本节介绍如何让其他服务访问此信息,并提供了一个示例。
How does it work?
当游戏首次在玩家的设备上启动时,UDP 将创建 udp.json 文件并将其放入游戏的“持久数据路径”(Persistent Data Path) 中。此文件包含的字段 udpStore 会显示游戏是从哪个商店下载的。可获取该信息以按预期方式使用它。
注意:这不会在游戏清单中添加任何新的权限。
Locating udp.json
udp.json 文件保存在:
Application.PersistentDataPath + '/Unity' + /Application.CloudProjectID + /udp/udp.json
其中:
-
Application.PersistentDataPath是游戏的持久数据路径 -
Application.CloudProjectID是游戏的 Unity 项目 ID
以下是一个 udp.json 文件路径示例:
path/storage/emulated/0/Android/data/com.mystudio.mygame/files/Unity/c83d2de2-de74-4b75-83fc-ade948bda064/udp/udp.json
其中:
-
Application.PersistentDataPath=path/storage/emulated/0/Android/data/com.mystudio.mygame -
Application.CloudProjectID=c83d2de2-de74-4b75-83fc-ade948bda064
Reading udp.json
udp.json 文件包含以下信息:
{"key":"UDP","udpStore":"StoreName","udpClientId":"value_of_udpClientId","CloudProjectId":"value_of_CloudProjectId"}
udpStore 字段包含的值就是下载游戏的 UDP 商店。
以下是一个 udp.json 文件示例:
{"key":"UDP","udpStore":"Huawei","udpClientId":"icjaB7wmu_q7AOjrSLH8yw","cloudProjectId":"bc2be074-09f3-450f-8e98-a0f79c9746f7"}
In this example, the game was downloaded from the HUAWEI AppGallery.
提示:使用 JSONUtility.FromJsonOverwrite 可将文件内容作为文本资源读取。
udpStore values
下表列出了 UDP 商店可能的 udpStore 值。
这些值区分大小写。
| 商店(UDP 上的通道名称) | udpStore 的值 |
|---|---|
| UDP Sandbox(适用于通用 UDP 构建版本) | UdpSandbox |
| ONE store | OneStore |
| APPTUTTi | Apptutti |
| Mi GetApps (Xiaomi) | XiaomiStore |
| HUAWEI AppGallery | Huawei |
| QooApp Game Store | QooApp |
| Uptodown | Uptodown |
| SHAREit | ShareIt |
| JioGames | JioGames |
| Legion Store | Legion |
Using udpStore with Remote Config
使用 Unity Remote Config 可以在不部署应用程序新版本的情况下优化游戏设置。当玩家启动游戏时,Remote Config 会检测用作规则条件的上下文属性(基于 Unity、应用程序、用户或你定义的自定义条件)。然后,相应服务会根据适用于每个玩家的规则为玩家返回自定义设置。
在规则条件中使用 udpStore 作为属性,就可以根据游戏是从哪个 UDP 商店下载的来确定游戏设置。
要使用 Remote Config 实现 udpStore,请遵循以下步骤。
1.下载并安装 UDP 包。
1.下载并安装 Unity Remote Config 包。请参阅 Remote Config 文档。
1.创建一个 AppAttributes 结构,其中至少包含参数“udpStore”:
    public struct AppAttributes
    {
      public string udpStore;
    }
1.在游戏代码中,实现 Remote Config ConfigManager.FetchConfigs 调用。
1.调用 FetchConfigs 时,创建 AppAttributes 结构的新实例,从以下位置读取 UDP 商店数据文件:
Application.PersistentDataPath + ‘/Unity’ + /Application.CloudProjectId + /udp/udp.json
使用 JSONUtility.FromJsonOverwrite 可将文件内容作为文本资源读取。
    {
        string udpFilePath = System.IO.Path.Combine(Application.persistentDataPath, "Unity", Application.cloudProjectId, "udp", "udp.json");
        string udpFileContents = System.IO.File.ReadAllText(udpFilePath);
        var appAttr = JsonUtility.FromJson<AppAttributes>(udpFileContents);
        Unity.RemoteConfig.ConfigManager.FetchCompleted += ConfigManager_FetchCompleted;
        Unity.RemoteConfig.ConfigManager.FetchConfigs(null, appAttr);
    }
1.确保在 ConfigManager.FetchConfigs 中使用 AppAttributes 结构。
1. Open the Remote Config settings (Services > Remote Config > Configure), and create the parameters that you’d want to change based on the UDP store.
1.设置好参数并插入到游戏代码中后,请在 Remote Config 窗口中为每个商店创建一个规则。
1.在每个规则的条件中,放入:app.udpStore == “[storeName]”
* 请参阅 udpStore 的值
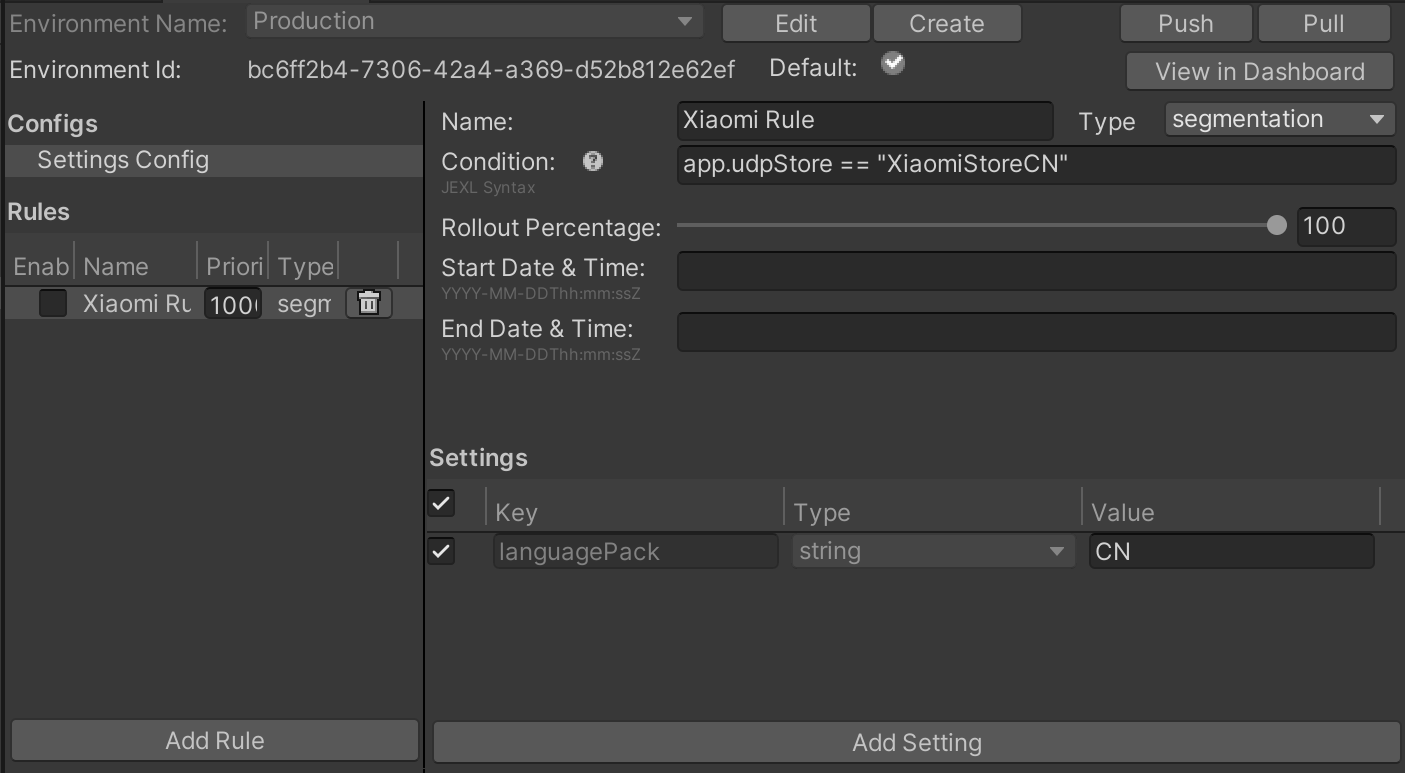 1. To enable the setting, select the checkbox next to the name of the rule on the left panel in the Remote Config settings.
1.针对设备构建应用程序,并确保正确应用规则,然后发布。
1. To enable the setting, select the checkbox next to the name of the rule on the left panel in the Remote Config settings.
1.针对设备构建应用程序,并确保正确应用规则,然后发布。
使用 Unity IAP 实现用于 UDP 的 IAP 商品
如果要使用 Unity IAP 实现 UDP,请首先设置 Unity IAP。
注意:如果选择使用 Unity IAP 版本 1.22.0–1.23.5 来实现 UDP(而不是使用 UDP 包),则仅通过 Unity IAP 实现即可。
Unity IAP 自动进行以下处理:
- 初始化 UDP
- 查询商店的 IAP 商品库存
- 请求购买某个商品
- 消耗所购买的商品
但是,你的游戏必须根据 Unity IAP 文档正确使用 Unity IAP 的类似功能(例如初始化和购买)。
使用 Unity IAP 实现游戏的应用内购后,请按照以下步骤使用 Unity IAP 设置 UDP。
查询 IAP 库存
使用 Unity IAP(代码实现)
获取编辑器中定义的 IAP 商品
When fetching the IAP products to pass to the queryInventory method, invoke ProductCatalog.LoadDefaultCatalog(). This returns the IAP products defined in the Editor’s IAP Catalog (Services > Unity IAP > IAP Catalog).
例如:
var catalog = ProductCatalog.LoadDefaultCatalog();

foreach (var product in catalog.allValidProducts)
{
   if (product.allStoreIDs.Count > 0)
   {
       var ids = new IDs();
       foreach (var storeID in product.allStoreIDs)
       {
           ids.Add(storeID.id, storeID.store);
       }
       builder.AddProduct(product.id, product.type, ids);
   }
   else
   {
       builder.AddProduct(product.id, product.type);
   }
}
从 UDP 控制台获取 IAP 商品信息
如果你打算在 UDP 控制台上修改游戏的 IAP 目录,请准备好游戏以便从 UDP 控制台获取 IAP 商品信息。
在获取 IAP 商品以便传递给 queryInventory 方法时,请调用 builder.AddProduct 以获取 UDP 控制台上定义的特定 IAP 商品:
builder.AddProduct(product.id, product.type, new IDs{})
要显示带有货币格式的商品价格,请使用 productInfo.Value.Price。
从 UDP 控制台获取 IAP 目录
要获取在 UDP 控制台上定义的所有 IAP 商品,请不要调用任何 IAP 商品检索方法。你的游戏随后将从 UDP 控制台获取整个 IAP 目录。
注意:将 IAP 商品的 CSV 文件上传到 UDP 控制台上会完全覆盖你的 IAP 目录。
使用 Unity IAP 包填充 IAP 目录
在 IAP 目录中添加和配置 UDP 应用内购。
注意:如果未在游戏客户端中使用 IAP 目录(例如,如果仅在游戏服务器上维护 IAP 商品),仍必须在 UDP 控制台上创建 IAP 目录。
- In the Unity Editor, select Services > Unity IAP > IAP Catalog.
1.选择 Add Product,然后输入每个 IAP 商品的详细信息。
1.在 Unity Distribution Portal Configuration 下添加 IAP 商品的价格。
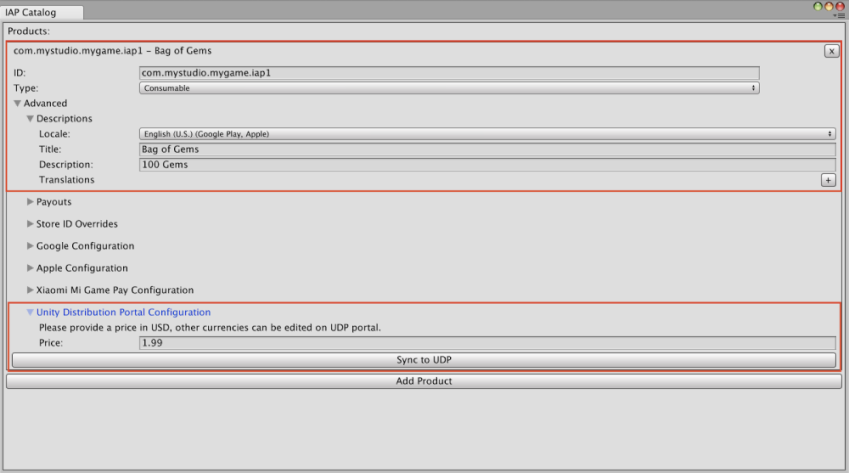 1.要将 IAP 商品保存到 UDP 控制台,请选择 Sync to UDP。对你创建的每个 IAP 商品执行此操作。
为了确保正确保存了 IAP 目录,请检查 UDP 控制台中是否显示了所添加的商品。