异步着色器编译
异步着色器编译可以在编译新的着色器变体时渲染虚拟着色器,从而防止 Unity Editor 停顿。默认情况下,在 Editor 设置(菜单:__Edit > Project Settings…> Editor > Shader Compilation__)中已启用异步着色器编译。
着色器可以包含成百上千个变体,这些变体涵盖具有不同关键字组合的不同使用场景。如果在加载着色器时 Editor 必须编译所有变体,则着色器导入过程将非常缓慢。 为了处理此问题,Unity 在默认情况下使用_按需着色器编译。这意味着 Editor 在场景中首次遇到着色器变体时会编译这些着色器变体。 这种情况下会使 Editor 中的渲染停顿,因为完整的着色器编译可能需要数毫秒到数秒的时间。编译着色器变体所需的时间取决于所选的图形 API 和着色器的复杂性。要克服这些停顿问题,请使用__异步着色器编译_。
在 Game 视图和 Scene 视图中禁用异步着色器编译
默认情况下已启用异步着色器编译。可以针对 Game 视图和 Scene 视图禁用此功能。如果不知道渲染解决方案的哪些部分导致了问题,这样做将很有用。但是,在着色器编译期间,可能仍然会在 Editor 中遇到渲染停顿的情况。
要禁用异步着色器编译,请执行以下操作:
1) 在项目中,选择 Edit > Project Settings…> Editor。
2) 在 Editor 设置底部的 Shader Compilation 下,取消选中 Asynchronous Shader Compilation 复选框。

注意:禁用异步着色器编译后,该设置仅影响 Game 视图和 Scene 视图。该设置不会影响显式启用异步着色器编译的系统和自定义脚本。
异步着色器编译的工作原理
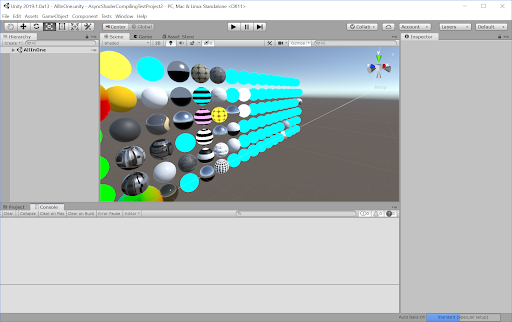
通过异步着色器编译,Editor 可以将着色器变体添加到编译队列中,并在作业线程中完成这些着色器变体,而不会立即编译这些变体。.为了避免渲染停顿,Editor 在编译着色器变体的同时继续进行渲染。然后,Editor 使用纯青色的虚拟着色器来填充着色器变体的位置(偶尔会短暂看到青色虚拟着色器,显示后台正在进行的操作)。这样可避免因为 Editor 仍在编译某些对象而未在场景中渲染这些对象。编译完成后,Editor 将换入真实着色器。Editor 右下角的进度条会显示编译队列的状态。
该功能对独立平台播放器没有任何影响,因为 Editor 会在构建过程中编译播放器所需的所有着色器变体。
注意:默认情况下,异步着色器编译功能在 Game 视图和 Scene 视图中有效。如果希望将此功能用于其他情况,请参阅在自定义 Editor 工具中使用异步着色器编译。
注意:如果使用了 DrawProcedural 或 CommandBuffer.DrawProcedural,Editor 不会换入虚拟着色器。Editor 只是跳过对此着色器变体的渲染,直到此着色器变体的编译完成为止。
注意:Blit 操作不会使用异步着色器编译。这是为了保证在最常见的用例中获得正确输出。
Editor 中的高级渲染
默认情况下,异步着色器编译功能在 Scene 视图和 Game 视图中有效。高级渲染解决方案依赖于一次生成数据并在以后的帧中进行复用,这可能会导致虚拟着色器污染已生成的数据。如果发生此情况,即使在着色器完成编译后,也可能会在场景中看到青色或其他渲染瑕疵。只有在 Editor 第一次遇到生成数据的着色器变体时才会发生此问题。但是,为了避免这些问题,可以针对渲染的某些部分禁用异步着色器编译,对某些着色器强制进行同步着色器编译,或者在编译完成后检测特定的数据污染情况并重新生成数据。
在特定渲染调用中禁用异步着色器编译
如果要使用异步着色器编译,但又不希望虚拟着色器在特定渲染调用中影响渲染结果,则可以在 C# 脚本中针对这些调用禁用此功能。以下说明展示了如何在直接作用域和 CommandBuffer 作用域中禁用该功能。在这两种情况下,实际上就是在不想让 Unity 异步编译的渲染调用周围注入钳制。
在直接作用域中
在_直接作用域_中,必须使用 ShaderUtil.allowAsyncCompilation;。
将 ShaderUtil.allowAsyncCompilation 的当前状态保存到变量。
在调用要禁用异步编译的渲染命令之前,立即将ShaderUtil.allowAsyncCompilation 设置为 false。
在希望影响的渲染调用之后,将 ShaderUtil.allowAsyncCompilation 恢复到步骤 1 中保存的前一个状态。
下面是一个伪代码示例:
// 存储当前状态并禁用异步编译
bool oldState = ShaderUtil.allowAsyncCompilation;
ShaderUtil.allowAsyncCompilation = false;

// 输入绝不应使用虚拟着色器的渲染代码
Graphics.DrawMesh(...);

// 恢复旧状态
ShaderUtil.allowAsyncCompilation = oldState;
在 CommandBuffer 作用域中
在 CommandBuffer 作用域中,必须使用 ShaderUtil.SetAsyncCompilation 和 ShaderUtil.RestoreAsyncCompilation。
在调用要禁用异步编译的渲染命令之前,立即调用 ShaderUtil.SetAsyncCompilation 并将其设置为 false。缓冲区中所有紧随其后的命令不会允许异步编译。
在希望影响的渲染命令之后,使用 Shader.Util.RestoreAsyncCompilation。
下面是一个伪代码示例:
// 禁用随后命令的异步编译
ShaderUtil.SetAsyncCompilation(cmd, false);

/// 输入绝不应使用虚拟着色器的渲染命令
cmd.DrawMesh(...);

// 恢复旧状态
ShaderUtil.RestoreAsyncCompilation(cmd);
针对特定着色器强制进行同步编译
可以针对特定着色器强制进行同步编译。如果生成数据的着色器在渲染开始时始终存在且编译速度相对较快,这是一个很好的选择。
要针对特定着色器强制进行同步编译,请执行以下操作:
在着色器代码中,添加此指令:
#pragma editor_sync_compilation
注意:对于在渲染过程中会遇到新变体的复杂着色器,不要强制进行同步编译。对复杂着色器进行强制同步编译可能会使 Editor 中的渲染停顿。
检测编译和刷新日期
如果虚拟着色器污染了生成的数据,必须丢弃污染的数据,并使用正确编译的着色器来重新生成一组新数据。
如果已经知道 Unity 用于生成数据的材质:
请使用 ShaderUtil.IsPassCompiled 检查由材质当前状态指定的着色器变体编译状态。
该状态从 Uncompiled 变为 Compiled 时,请刷新所生成的数据。
如果不知道哪个具体材质会生成污染的数据,或者污染数据的生成并非与单个材质相关:
请使用 ShaderUtil.anythingCompiling 检测 Unity 是否正在异步编译任何着色器。
任何异步编译完成后,请刷新数据。
在自定义 Editor 工具中使用异步着色器编译
默认情况下,异步着色器编译功能在 Game 视图和 Scene 视图中有效。如果要在自定义 Editor 工具中使用该功能,可以通过 C# 为自定义工具启用该功能。
在直接作用域中
在_直接作用域_中,必须使用 ShaderUtil.allowAsyncCompilation;。
将 ShaderUtil.allowAsyncCompilation 的当前状态保存到变量。
在调用要启用异步编译的渲染命令之前,立即将ShaderUtil.allowAsyncCompilation 设置为 true。
在希望影响的渲染调用之后,将 ShaderUtil.allowAsyncCompilation 恢复到步骤 1 中保存的前一个状态。
下面是一个伪代码示例:
// 存储当前状态并启用异步编译
bool oldState = ShaderUtil.allowAsyncCompilation;
ShaderUtil.allowAsyncCompilation = true;

// 输入希望使用异步编译的渲染代码
Graphics.DrawMesh(...);

// 恢复旧状态
ShaderUtil.allowAsyncCompilation = oldState;
在 CommandBuffer 作用域中
在基于 CommandBuffer 的作用域中,必须使用 ShaderUtil.SetAsyncCompilation 和 ShaderUtil.RestoreAsyncCompilation。
在调用要启用异步编译的渲染命令之前,立即调用 ShaderUtil.SetAsyncCompilation 并将其设置为 true。缓冲区中所有紧随其后的命令随后会允许异步编译。
在希望影响的渲染命令之后,使用 Shader.Util.RestoreAsyncCompilation。
下面是一个伪代码示例:
// 启用随后命令的异步编译
ShaderUtil.SetAsyncCompilation(cmd, true);

/// 输入希望使用异步编译的渲染命令
cmd.DrawMesh(...);

// 恢复旧状态
ShaderUtil.RestoreAsyncCompilation(cmd);

Graphics.ExecuteCommandBuffer(cmd);
自定义编译时间渲染
可以使自定义工具为每种材质绘制非虚拟着色器的内容。这样就可以避免使用会变为青色的着色器变体来进行渲染,而是在着色器编译时绘制其他内容。
要检查是否已编译特定着色器变体,请使用 ShaderUtil.IsPassCompiled。
要手动触发编译,请使用 ShaderUtil.CompilePass。这样就可以避免使用会变为青色的着色器变体来进行渲染,而是在着色器编译时绘制其他内容。
- 2019–03–07 页面已发布
- 在 2019.1 中添加了异步着色器编译 NewIn20191