Using the Network Manager
| Note: UNet is deprecated, and will be removed from Unity in the future. A new system is under development. For more information and next steps see this blog post and the FAQ. |
The Network Manager is a component for managing the networking aspects of a multiplayer game.
The Network Manager features include:
Game state management
Spawn management
Scene management
Debugging information
Matchmaking
Customization
Getting Started with the Network Manager
The Network Manager is the core controlling component of a multiplayer game. To get started, create an empty GameObject in your starting Scene, and add the NetworkManager component. The newly added Network Manager component looks like this:
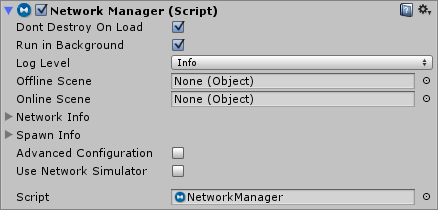
The Inspector for the Network Manager in the Editor allows you to configure and control many things related to networking.
Note: You should only ever have one active Network Manager in each Scene. Do not place the Network Manager component on a networked GameObject (one which has a Network Identity component), because Unity disables these when the Scene loads.
If you are already familiar with multiplayer game development, you might find it useful to know that the Network Manager component is implemented entirely using the High-level API (HLAPI), so everything it does is also available to you through scripting. For advanced users, if you find that you need to expand on the Network Manager component’s features, you can use scripting to derive your own class from NetworkManager and customize its behaviour by overriding any of the virtual function hooks that it provides. However, the Network Manager component wraps up a lot of useful functionality into a single place, and makes creating, running and debugging multiplayer games as simple as possible.
Game state management
A Networking multiplayer game can run in three modes - as a client, as a dedicated server, or as a “Host” which is both a client and a server at the same time.
If you’re using the Network Manager HUD, it automatically tells the Network Manager which mode to start in, based on which options the player selects. If you’re writing your own UI that allows the player to start the game, you’ll need to call these from your own code. These methods are:

Whichever mode the game starts in (client, server, or host), the Network Address and Network Port properties are used. In client mode, the game attempts to connect to the address and port specified. In server or host mode, the game listens for incoming connections on the port specified.
During development of your game, it can be useful to put a fixed address and port setting into these properties. However, eventually you might want your players to be able to choose the host they to connect to. When you get to that stage, the Network Discovery component (see Local Discovery) can be used for broadcasting and finding addresses and ports on a local area network (LAN), and the Matchmaker service can be used for players to find internet matches to connect to (see Multiplayer Service).
Spawn management
Use the Network Manager to manage the spawning (networked instantiation) of networked GameObjects from Prefabs.

Most games have a Prefab which represents the player, so the Network Manager has a Player Prefab slot. You should assign this slot with your player Prefab. When you have a player Prefab set, a player GameObject is automatically spawned from that Prefab for each user in the game. This applies to the local player on a hosted server, and remote players on remote clients. You must attach a Network Identity component to the Player Prefab.
Once you have assigned a player Prefab, you can start the game as a host and see the player GameObject spawn. Stopping the game destroys the player GameObject. If you build and run another copy of the game and connect it as a client to localhost, the Network Manager makes another player GameObject appear. When you stop that client, it destroys that player’s GameObject.
In addition to the player Prefab, you must also register other Prefabs that you want to dynamically spawn during gameplay with the Network Manager.
You can add Prefabs to the list shown in the inspector labelled Registered Spawnable Prefabs. You can also can register prefabs via code, with the ClientScene.RegisterPrefab() method.
If you have only one Network Manager, you need to register to it all prefabs which might be spawned in any Scene. If you have a separate Network Manager in each Scene, you only need to register the prefabs relevant for that Scene.
Customizing Player Instantiation
The Network Manager spawns player GameObjects using its implementation of NetworkManager.OnServerAddPlayer(). If you want to customize the way player GameObjects are created, you can override that virtual function. This code shows an example of the default implementation:
public virtual void OnServerAddPlayer(NetworkConnection conn, short playerControllerId)
{
    var player = (GameObject)GameObject.Instantiate(playerPrefab, playerSpawnPos, Quaternion.identity);
    NetworkServer.AddPlayerForConnection(conn, player, playerControllerId);
}
Note: If you are implementing a custom version of OnServerAddPlayer, the method NetworkServer.AddPlayerForConnection() must be called for the newly created player GameObject, so that it is spawned and associated with the client’s connection. AddPlayerForConnection spawns the GameObject, so you do not need to use NetworkServer.Spawn().
Start positions
To control where players are spawned, you can use the Network Start Position component. To use these, attach a Network Start Position component to a GameObject in the Scene, and position the GameObject where you would like one of the players to start. You can add as many start positions to your Scene as you like. The Network Manager detects all start positions in your Scene, and when it spawns each player instance, it uses the position and orientation of one of them.
The Network Manager has a Player Spawn Method property, which allows you to configure how start positions are chosen.
Choose Random to spawn players at randomly chosen startPosition options.
Choose Round Robin to cycle through startPosition options in a set list.
If the Random or Round Robin modes don’t suit your game, you can customize how the start positions are selected by using code. You can access the available Network Start Position components by the list NetworkManager.startPositions, and you can use the helper method GetStartPosition() on the Network Manager that can be used in implementation of OnServerAddPlayer to find a start position.
Scene management
Most games have more than one Scene. At the very least, there is usually a title screen or starting menu Scene in addition to the Scene where the game is actually played. The Network Manager is designed to automatically manage Scene state and Scene transitions in a way that works for a multiplayer game.
There are two slots on the NetworkManager Inspector for scenes: the Offline Scene and the Online Scene. Dragging Scene assets into these slots activates networked Scene management.
When a server or host is started, the Online Scene is loaded. This then becomes the current network Scene. Any clients that connect to that server are instructed to also load that Scene. The name of this Scene is stored in the networkSceneName property.
When the network is stopped, by stopping the server or host or by a client disconnecting, the offline Scene is loaded. This allows the game to automatically return to a menu Scene when disconnected from a multiplayer game.
You can also change Scenes while the game is active by calling NetworkManager.ServerChangeScene(). This makes all the currently connected clients change Scene too, and updates networkSceneName so that new clients also load the new Scene.
While networked Scene management is active, any calls to game state management functions such NetworkManager.StartHost() or NetworkManager.StopClient() can cause Scene changes. This applies to the runtime control UI. By setting up Scenes and calling these methods, you can control the flow of your multiplayer game.
Note that Scene changes cause all the GameObjects in the previous Scene to be destroyed.
You should normally make sure the Network Manager persists between Scenes, otherwise the network connection is broken upon a Scene change. To do this, ensure the Don’t Destroy On Load box is checked in the Inspector. However it is also possible to have a separate Network Manager in each Scene with different settings, which may be helpful if you wish to control incremental Prefab loading, or different Scene transitions.
Customization
There are virtual functions on the NetworkManager class that you can customize by creating your own derived class that inherits from NetworkManager. When implementing these functions, be sure to take care of the functionality that the default implementations provide. For example, in OnServerAddPlayer(), the function NetworkServer.AddPlayer must be called to activate the player GameObject for the connection.
These are all the callbacks that can happen for host/server and clients, in some cases it’s important to invoke the base class function to maintain default behaviour. To see the implementation itself you can view it in the networking bitbucket repository.
using UnityEngine;

using UnityEngine.Networking;

using UnityEngine.Networking.Match;

public class CustomManager : NetworkManager {

    // Server callbacks

    public override void OnServerConnect(NetworkConnection conn) {

        Debug.Log("A client connected to the server: " + conn);

    }

    public override void OnServerDisconnect(NetworkConnection conn) {

        NetworkServer.DestroyPlayersForConnection(conn);

        if (conn.lastError != NetworkError.Ok) {

            if (LogFilter.logError) { Debug.LogError("ServerDisconnected due to error: " + conn.lastError); }

        }

        Debug.Log("A client disconnected from the server: " + conn);

    }

    public override void OnServerReady(NetworkConnection conn) {

        NetworkServer.SetClientReady(conn);

        Debug.Log("Client is set to the ready state (ready to receive state updates): " + conn);

    }

    public override void OnServerAddPlayer(NetworkConnection conn, short playerControllerId) {

        var player = (GameObject)GameObject.Instantiate(playerPrefab, Vector3.zero, Quaternion.identity);

        NetworkServer.AddPlayerForConnection(conn, player, playerControllerId);

        Debug.Log("Client has requested to get his player added to the game");

    }

    public override void OnServerRemovePlayer(NetworkConnection conn, PlayerController player) {

        if (player.gameObject != null)

            NetworkServer.Destroy(player.gameObject);

    }

    public override void OnServerError(NetworkConnection conn, int errorCode) {

        Debug.Log("Server network error occurred: " + (NetworkError)errorCode);

    }

    public override void OnStartHost() {

        Debug.Log("Host has started");

    }

    public override void OnStartServer() {

        Debug.Log("Server has started");

    }

    public override void OnStopServer() {

        Debug.Log("Server has stopped");

    }

    public override void OnStopHost() {

        Debug.Log("Host has stopped");

    }

    // Client callbacks

    public override void OnClientConnect(NetworkConnection conn)

    {

        base.OnClientConnect(conn);

        Debug.Log("Connected successfully to server, now to set up other stuff for the client...");

    }

    public override void OnClientDisconnect(NetworkConnection conn) {

        StopClient();

        if (conn.lastError != NetworkError.Ok)

        {

            if (LogFilter.logError) { Debug.LogError("ClientDisconnected due to error: " + conn.lastError); }

        }

        Debug.Log("Client disconnected from server: " + conn);

    }

    public override void OnClientError(NetworkConnection conn, int errorCode) {

        Debug.Log("Client network error occurred: " + (NetworkError)errorCode);

    }

    public override void OnClientNotReady(NetworkConnection conn) {

        Debug.Log("Server has set client to be not-ready (stop getting state updates)");

    }

    public override void OnStartClient(NetworkClient client) {

        Debug.Log("Client has started");

    }

    public override void OnStopClient() {

        Debug.Log("Client has stopped");

    }

    public override void OnClientSceneChanged(NetworkConnection conn) {

        base.OnClientSceneChanged(conn);

        Debug.Log("Server triggered scene change and we've done the same, do any extra work here for the client...");

    }

}
The inspector for the NetworkManager provides the ability to change some connection parameters and timeouts. Some parameters have not been exposed here but can be changed through code.
using UnityEngine;

using UnityEngine.Networking;

public class CustomManager : NetworkManager {

    // Set custom connection parameters early, so they are not too late to be enforced

    void Start()

    {

        customConfig = true;

        connectionConfig.MaxCombinedReliableMessageCount = 40;

        connectionConfig.MaxCombinedReliableMessageSize = 800;

        connectionConfig.MaxSentMessageQueueSize = 2048;

        connectionConfig.IsAcksLong = true;

        globalConfig.ThreadAwakeTimeout = 1;

    }

}