Camera (Passthrough)
The Meta Quest Camera (Passthrough) feature controls Meta Passthrough, a device capability that captures real-time images of the physical environment and renders them to screen. Your app can use Passthrough to give the user a view of their surroundings while wearing a headset, enabling them to safely move through their space while using your app.
As an AR Foundation provider plug-in, this package implements Passthrough via AR Foundation's camera subsystem, and this page is a supplement to the AR Foundation Camera manual. The following sections only contain information about Meta Quest-specific behavior.
Tip
When developing an AR app, refer to both the AR Foundation documentation as well as the required packages for each platform you support.
Enable Passthrough
To enable the Passthrough capability in your app:
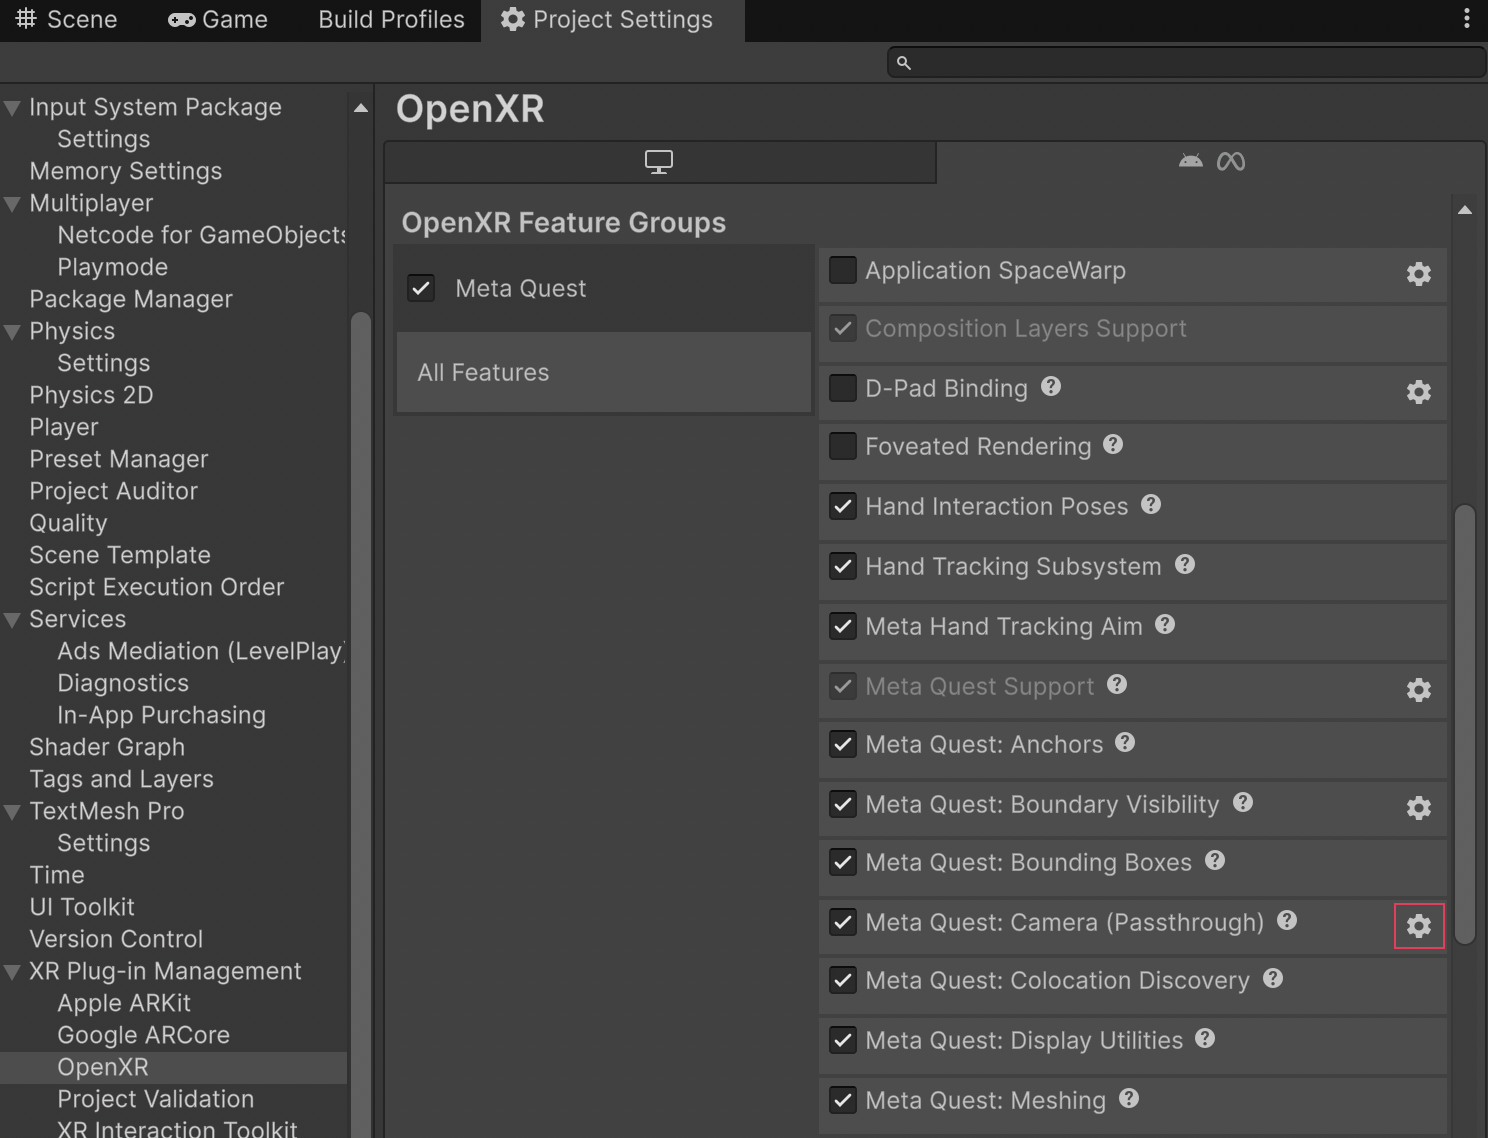
- Go to Project Settings > XR Plug-in Management > OpenXR.
- Select either the Windows, Mac, Linux settings tab to configure Quest Link on Windows, or the Android settings tab to configure builds.
- Under the OpenXR Feature Groups heading, select the Meta Quest feature group.
- If disabled, enable the Meta Quest: Camera (Passthrough) OpenXR feature.
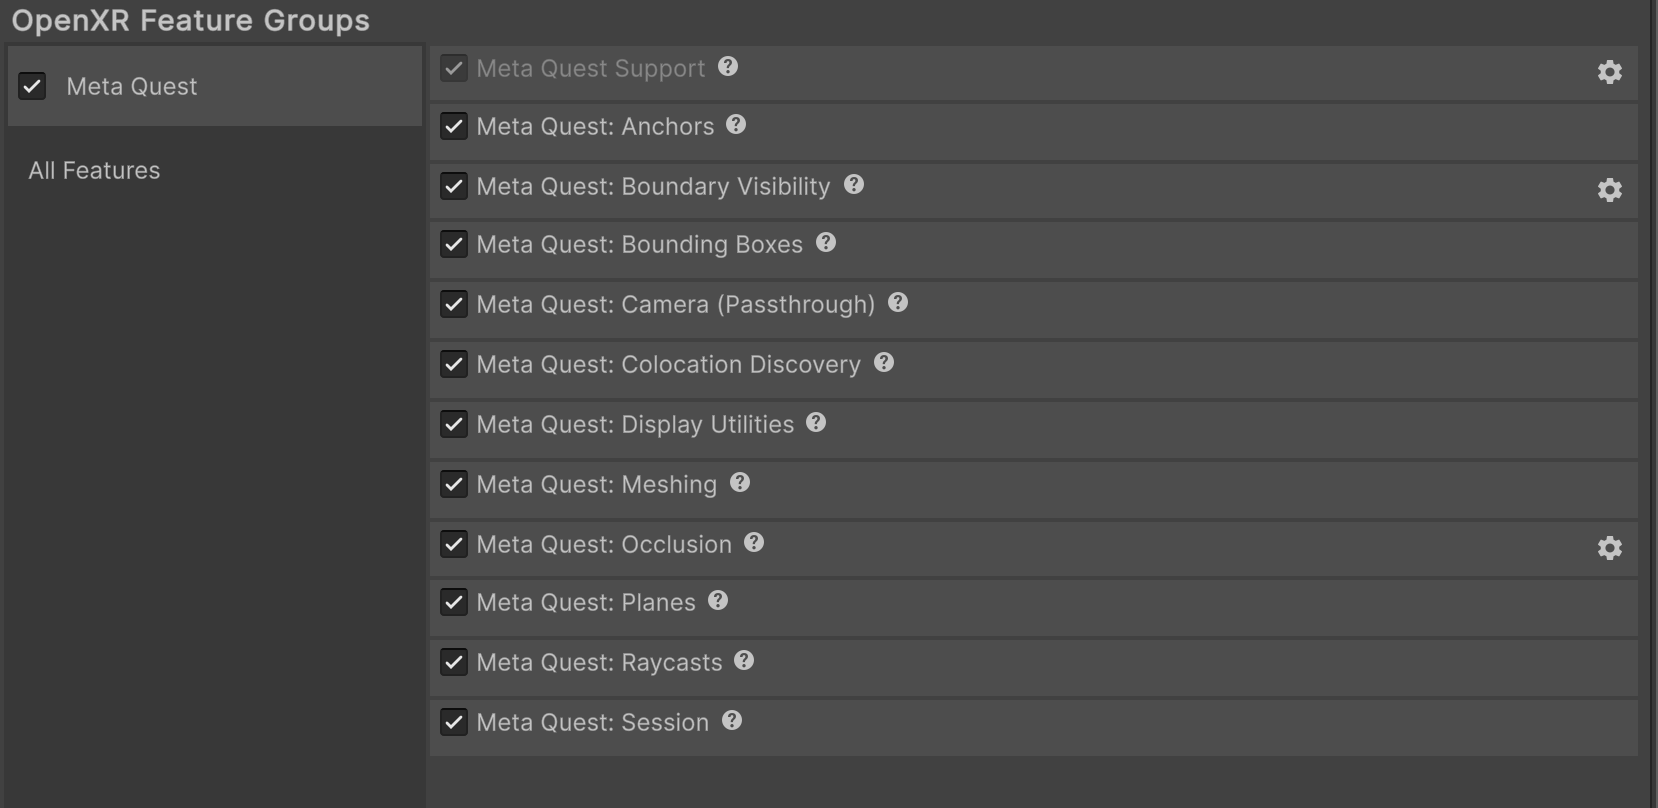
The Meta Quest feature group, shown with all features enabled.
Enable Passthrough splash screen
If your app uses Passthrough, you can replace the default splash screen with a Passthrough splash screen when your app launches to enable a seamless Passthrough experience.
For more information, refer to Composition Layer Splash Screen.
Enable Passthrough pre-splash screen
If your app uses Passthrough, you can enable Passthrough before the splash screen is displayed to enable a seamless Passthrough experience. This will override the default opaque startup screen, with a Passthrough background. For more information, visit Passthrough Loading Screen (Meta developer documentation).
To do this, enable Passthrough Pre Splash Screen as follows:
- Select the gear icon next to the Meta Quest: Camera (Passthrough) feature to configure Passthrough settings.
- Enable Passthrough Pre Splash Screen.
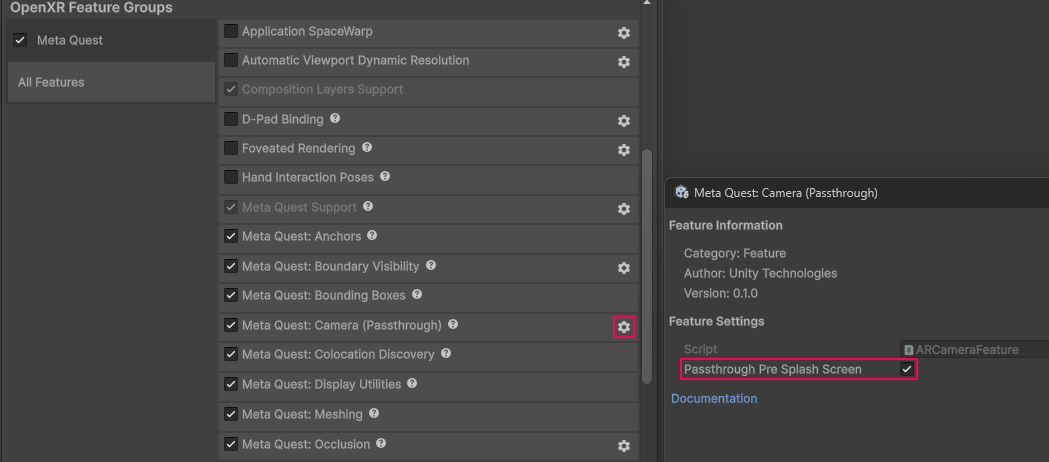
Passthrough Pre Splash Screen setting.
Scene setup
To use Passthrough in your scene, you must have an AR Camera Manager component attached to your camera. Enable the AR Camera Manager component to enable Passthrough, and disable it to disable Passthrough.
Camera background color
Passthrough requires that your Camera has a transparent background. To do this, set your Background Color (Universal Render Pipeline) or Clear Flags (Built-In Render Pipeline) to Solid Color, with the Background alpha channel value set to 0.
Important
In Unity 6.5 and newer, the Built-In Render Pipeline is deprecated and will be made obsolete in a future release. For more information, refer to Migrating from the Built-In Render Pipeline to URP and Render pipeline feature comparison.
Refer to Configure camera background for Passthrough for step-by-step instructions.
Tip
If Passthrough isn't working in your project after setting the alpha channel value to 0, ensure your URP settings are correctly configured, as described in Optimize graphics settings.
Composition layers
Unity doesn't have access to pixels or other image data associated with Meta Passthrough images. Instead, Meta's OpenXR runtime submits the images directly to the OpenXR compositor as composition layers. Unity's XR Composition Layers package provides an interface for authoring your app's composition layers. The Unity OpenXR: Meta Passthrough layer is a custom layer type that you can use to control how Passthrough is composited in your app.
For more information about composition layers, refer to the Composition layers package documentation.
Meta Passthrough layer
If your scene uses Passthrough, by default the camera subsystem will create a GameObject at runtime that enables the Meta Passthrough layer. This Passthrough GameObject appears at the root of your scene hierarchy.
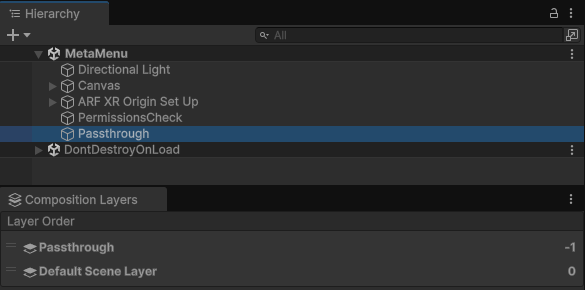
Passthrough GameObject created at runtime.
The Passthrough GameObject contains a Composition Layer component that controls the Passthrough layer. Its default Layer Order is -1, and it uses the Alpha blend type.
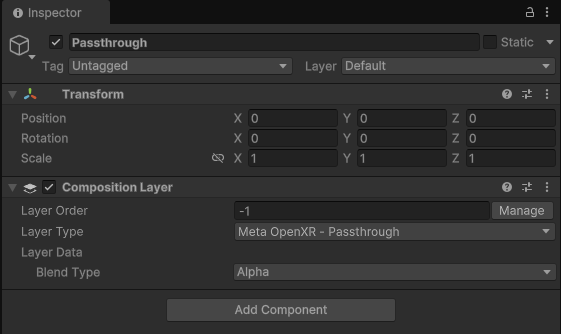
Passthrough GameObject shown in the Inspector window.
Customize your composition layers
If you prefer to author your app's composition layers in the Editor, you can Add a layer in the Editor as you normally would when working with the XR Composition Layers package. For your Passthrough layer, choose the Meta OpenXR - Passthrough layer type, and Set the layer sort order in the Editor to your desired value.
AR Camera Background component
Meta Passthrough does not require the AR Camera Background component. If ARCameraBackground is in your scene, it will have no effect on Meta Quest devices. If your scene only targets Meta Quest devices, you can safely delete the AR Camera Background component from your XR Origin's Main Camera GameObject.
Image capture
This package supports AR Foundation Image capture for both CPU and GPU images. The method you choose to access device camera images depends on how you intend to process the image. There are tradeoffs to either a GPU-based or a CPU-based approach.
- CPU: Use CPU if you will access the image's pixel data in a C# script. This is more resource-intensive, but allows you to perform operations such as save the image to a file or pass it to a CPU-based computer vision system.
- GPU: GPU provides best performance if you will simply render the image or process it with a shader. GPU images provide zero-copy access to camera data, making them ideal for real-time rendering and shader-based processing.
Enable camera image support
To enable CPU and GPU image support in your app, enable the Camera Image Support option as follows:
- Go to Project Settings > XR Plug-in Management > OpenXR.
- Select the Android settings tab.
- Under the OpenXR Feature Groups heading, select the Meta Quest feature group.
- Click the gear icon next to the Meta Quest: Camera (Passthrough) feature.
- Enable the Camera Image Support option.
Camera feature settings.
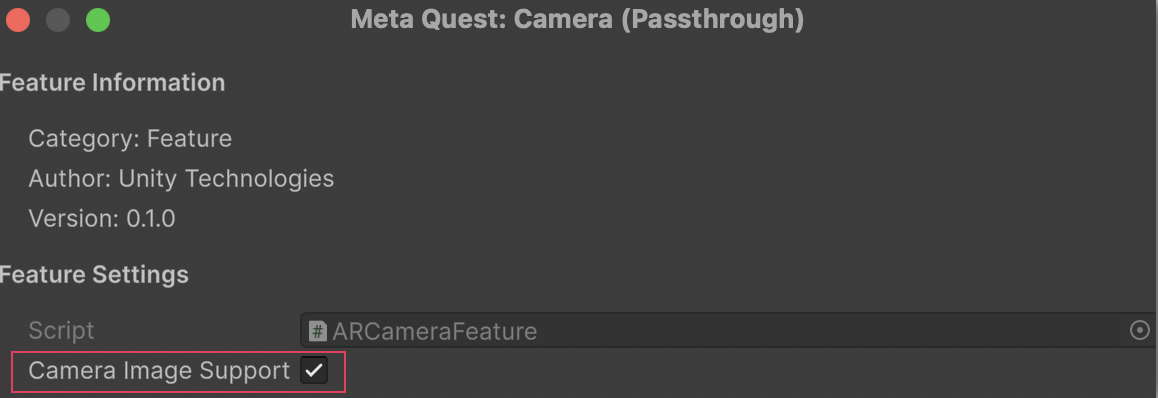
Enable the Camera Image Support setting.
Access images via CPU
For information about accessing camera images on the CPU, including synchronous and asynchronous conversion, refer to AR Foundation's Image capture documentation.
On Meta Quest, the camera subsystem supports the following CPU image acquisition options:
| Option | Description |
|---|---|
| Mono (default) | Use MetaOpenXRCameraSubsystem.TryAcquireLatestCpuImage to obtain a single left eye camera image. |
| Left or right eye Camera (single) | Use MetaOpenXRCameraSubsystem.TryAcquireLatestCpuImageForPosition with CameraPosition.LeftEye or CameraPosition.RightEye to acquire the latest image from one specific camera. |
| Stereo pair (synchronized) | Use MetaOpenXRCameraSubsystem.TryAcquireLatestStereoCpuImagePair to acquire a left and right image from the same capture request. This returns an XRCpuImagePair with leftEyeImageCinfo and rightEyeImageCinfo. |
The following code samples demonstrate each CPU acquisition option. Dispose each XRCpuImage when done (e.g. with using).
Mono (default)
The following code sample demonstrates mono (single left eye) CPU image acquisition:
MetaOpenXRCameraSubsystem cameraSubsystem = cameraManager.subsystem as MetaOpenXRCameraSubsystem;

if (!cameraSubsystem.TryAcquireLatestCpuImage(out XRCpuImage image))
    return;

using (image)
{
    // Use image (e.g. image.dimensions, image.GetPlane(), image.Convert(), image.ConvertAsync())
}
Left or right eye (single)
The following code sample demonstrates single eye (left or right) CPU image acquisition:
MetaOpenXRCameraSubsystem cameraSubsystem = cameraManager.subsystem as MetaOpenXRCameraSubsystem;

if (cameraSubsystem == null || !cameraSubsystem.TryAcquireLatestCpuImageForPosition(position, out XRCpuImage.Cinfo cinfo))
    return;

using (var image = new XRCpuImage(cameraSubsystem.cpuImageApi, cinfo))
{
    // Use image (e.g. image.dimensions, image.GetPlane(), image.Convert(), image.ConvertAsync())
}
Stereo pair
The following code sample demonstrates stereo eye CPU image acquisition:
MetaOpenXRCameraSubsystem cameraSubsystem = cameraManager.subsystem as MetaOpenXRCameraSubsystem;

if (cameraSubsystem == null || !cameraSubsystem.TryAcquireLatestStereoCpuImagePair(out MetaOpenXRCameraSubsystem.XRCpuImagePair pair))
    return;

using (var leftImage = new XRCpuImage(cameraSubsystem.cpuImageApi, pair.leftEyeImageCinfo))
using (var rightImage = new XRCpuImage(cameraSubsystem.cpuImageApi, pair.rightEyeImageCinfo))
{
    // Use leftImage and rightImage (e.g. dimensions, GetPlane(), Convert(), ConvertAsync())
}
Note
CPU image capture for Meta Quest requires a minimum Android API level 32. You can set the Minimum API Level to Android 12L (API level 32) in your project's Player settings. Refer to Android Player settings for more information.
Access images via GPU
The following sections describe how to access camera images on the GPU for Meta Quest.
Requirements
- Graphics API: GPU image capture requires you to set your graphics API to Vulkan as outlined in Vulkan Graphics API.
TryAcquireLatestGpuImagewill returnfalseif any other graphics API is selected. - Rendering callbacks: GPU images must be acquired and released during Unity's rendering callbacks (RenderPipelineManager.beginCameraRendering and RenderPipelineManager.endCameraRendering), respectively, to ensure proper synchronization with the graphics pipeline.
Note
GPU image capture is not supported on Quest Link.
Acquire and Release GPU images
Note
Only one GPU acquisition is active at a time: either one single image (default), one per-camera image, or one stereo pair. Release the current acquisition before switching to another mode or acquiring again.
On Meta Quest, the camera subsystem supports the following GPU image acquisition methods to obtain an XRTextureDescriptor. The descriptor contains a native Vulkan image handle that you can use to create a Unity texture. The acquisition options are:
| Option | Description |
|---|---|
| Mono (default) | Use MetaOpenXRCameraSubsystem.TryAcquireLatestGpuImage to acquire a single XRTextureDescriptor. Release with ReleaseGpuImage. |
| Left or right eye (single) | Use MetaOpenXRCameraSubsystem.TryAcquireLatestGpuImageForPosition with CameraPosition.LeftEye or CameraPosition.RightEye to acquire the latest image from one camera. Release with ReleaseGpuImageForPosition. Note: Right eye requires stereo image capture support. |
| Stereo pair (synchronized) | Use MetaOpenXRCameraSubsystem.TryAcquireLatestStereoGpuImagePair to acquire a left and right XRTextureDescriptorPair from the same capture request. Release with ReleaseStereoGpuImagePair. Returns false if images are not synchronized. |
The following code samples demonstrate each GPU acquisition option. Each are acquired and released within the same frame.
Mono (default)
The following code sample demonstrates mono (single left eye) GPU image acquisition:
MetaOpenXRCameraSubsystem cameraSubsystem = cameraManager.subsystem as MetaOpenXRCameraSubsystem;
if (cameraSubsystem != null && cameraSubsystem.TryAcquireLatestGpuImage(out XRTextureDescriptor descriptor))
{
    // Create a new texture
    if (m_ExternalTexture == null)
    {
        m_ExternalTexture = Texture2D.CreateExternalTexture(
            descriptor.width,
            descriptor.height,
            descriptor.format,
            false, // mipmaps
            false, // linear
            descriptor.nativeTexture // VkImage handle
        );
    }
    else
    {
        // Update the existing texture with the new native handle
        m_ExternalTexture.UpdateExternalTexture(descriptor.nativeTexture);
    }
    // Use the texture in your materials or shaders
    cameraSubsystem.ReleaseGpuImage(descriptor);
}
Left or right eye (single)
The following code sample demonstrates single eye (left or right) GPU image acquisition:
MetaOpenXRCameraSubsystem cameraSubsystem = cameraManager.subsystem as MetaOpenXRCameraSubsystem;
if (cameraSubsystem == null || !cameraSubsystem.TryAcquireLatestGpuImageForPosition(position, out XRTextureDescriptor descriptor))
    return;

bool isLeft = position == MetaOpenXRCameraSubsystem.CameraPosition.LeftEye;
ref Texture2D targetTexture = ref isLeft ? ref m_LeftEyeTexture : ref m_RightEyeTexture;
if (targetTexture == null)
{
    targetTexture = Texture2D.CreateExternalTexture(
        descriptor.width,
        descriptor.height,
        descriptor.format,
        false,
        false,
        descriptor.nativeTexture
    );
}
else
{
    targetTexture.UpdateExternalTexture(descriptor.nativeTexture);
}
// Use targetTexture in your materials or shaders
cameraSubsystem.ReleaseGpuImageForPosition(position, descriptor);
Stereo pair
The following code sample demonstrates stereo eye CPU image acquisition:
MetaOpenXRCameraSubsystem cameraSubsystem = cameraManager.subsystem as MetaOpenXRCameraSubsystem;
if (cameraSubsystem == null || !cameraSubsystem.TryAcquireLatestStereoGpuImagePair(out MetaOpenXRCameraSubsystem.XRTextureDescriptorPair pair))
    return;

var left = pair.leftEyeDescriptor;
var right = pair.rightEyeDescriptor;

if (m_LeftEyeTexture == null)
    m_LeftEyeTexture = Texture2D.CreateExternalTexture(left.width, left.height, left.format, false, false, left.nativeTexture);
else
    m_LeftEyeTexture.UpdateExternalTexture(left.nativeTexture);

if (m_RightEyeTexture == null)
    m_RightEyeTexture = Texture2D.CreateExternalTexture(right.width, right.height, right.format, false, false, right.nativeTexture);
else
    m_RightEyeTexture.UpdateExternalTexture(right.nativeTexture);

// Use m_LeftEyeTexture and m_RightEyeTexture in your materials or shaders
cameraSubsystem.ReleaseStereoGpuImagePair(pair);
Important
GPU images are valid only for the current frame. Do not hold references to GPU images across frames. Failure to release images will prevent acquiring new images and might cause resource leaks.
Stereo sync API
When acquiring a stereo image pair, the subsystem tries to match left and right image timestamps so both images come from the same capture. MetaOpenXRCameraSubsystem.SetMaxStereoSyncAttempts sets how many times the subsystem will attempt to find a synchronized pair. The value is clamped to 1–10; the default is 3. If stereo capture fails to find a synced pair, it will return the last acquired pair. You can call this method before or after the subsystem starts.