Systems
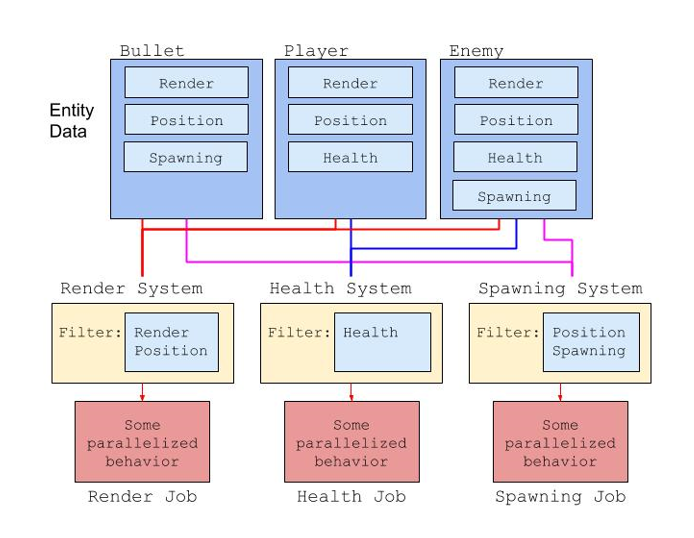
In Tiny Mode, a System is a function that processes entity data.

In the example above, the Bullet entity is processed by the Render System since it contains both the Render and Position components. It is also processed by the Spawning System since it contains the Position and Spawning components.
Creating a System
First, make sure you have a Tiny project open. Then, click on the Tiny > Create > TypeScript System menu item to create a new script in your project's Scripts folder.
The Scripts folder is created for you by default. You can rename or move it in the Project window. You can also set it using the Tiny section of the Settings window and edit the Script Root Directory property.
// Scripts/NewSystem.ts

namespace game {

    /** New System */
    export class NewSystem extends ut.ComponentSystem {

        OnUpdate(): void {

        }
    }
}
Let's break this script down and explain every part.
namespace game is your Tiny project Default Namespace property. You can change it as needed in the main settings.
export class NewSystem means you're exposing the NewSystem class in the game namespace. You can change the class name as needed, but you must add the export modifier when declaring a system, otherwise it won't be considered.
extends ut.ComponentSystem means you're extending the built-in ut.ComponentSystem class, which is the base class for all user-defined systems in Tiny. ut is the default namespace in Tiny, and exposes every class and module of the scripting API.
OnUpdate(): void is a function you need to implement when extending the ut.ComponentSystem class. It is called exactly once per frame. This method takes no parameters, and returns nothing.
Processing Entity Data
Once you have created a new empty system as above, you can add code to it so that it processes Entity data in a useful way.
Systems can process data by iterating over entities with a specific component specification.
Components are data objects defined in the Editor. Use the Tiny > Create > Component menu to create a new custom Component.
Note: you can only define Tiny Mode components in the Editor. You cannot define a component in TypeScript.
When you create a component in the Editor, you automatically and immediately get TypeScript support for it in your IDE. Unity automatically creates a component class named after your component in your project's default namespace, which extends the base ut.Component class.
Here's a simple System example.
// Scripts/LogPosition.ts

namespace game {

  /** Logs the 2D world position of every entity to the console. */
  @ut.executeAfter(ut.Shared.PlatformRenderingFence)
  export class LogPosition extends ut.ComponentSystem {

    static onlyOnce: boolean = false;

    OnUpdate(): void {
      if (LogPosition.onlyOnce)
        return;
      LogPosition.onlyOnce = true;

      this.world.forEach([ut.Entity, ut.Core2D.TransformNode], (entity, transformNode) => {
        let worldPos = ut.Core2D.TransformService.computeWorldPosition(this.world, entity);

        console.log(`${this.world.getEntityName(entity)} is at (${worldPos.x}, ${worldPos.y})`);
      });
    }
  }
}
this.world.forEach(filter, callback) is how you iterate over each entity matching the given set of components in that world. Internally, Unity optimizes this loop to make it run as fast as possible.
[ut.Entity, ut.Core2D.TransformNode] is a simple component type array filter that means "give me all entities with at least the ut.Core2D.TransformNode component". Adding ut.Entity in a filter allows you to access the entity handle within the loop.
(entity, transformNode) => { ... } is the function called once for each entity returned by the filter.
In this example, the LogPosition system uses the TransformService to get the world position of an entity and log it. You can see the output in the Console section of your browser's Developer Tools.
Let's consider another example.
// Defined in the Editor

game.Thing:
    radius: Int32
    time: Float32
    speed: Float32


// Scripts/CircleMovement.ts

namespace game {

  /** Moves things in circle */
  @ut.executeAfter(ut.Shared.UserCodeStart)
  @ut.executeBefore(ut.Shared.UserCodeEnd)
  export class CircleMovement extends ut.ComponentSystem {

    static readonly twoPi: number = 2 * Math.PI;

    OnUpdate(): void {
      let dt = this.scheduler.deltaTime();

      this.world.forEach([ut.Entity, game.Thing], (entity, thing) => {
        let r = thing.radius;
        let t = thing.time + dt;

        let angle = t * CircleMovement.twoPi * thing.speed;

        let x = r * Math.cos(angle);
        let y = r * Math.sin(angle);

        // the iteration doesn't include the `ut.Core2D.TransformLocalPosition` component,
        // you must get and set its component data explicitly, or use the `usingComponentData` helper method

        this.world.usingComponentData(entity, [ut.Core2D.TransformLocalPosition], (position) => {
          position.position = new Vector3(x, y, 0);
        });

        // `thing` is a component view - that is, you can write directly to it
        thing.time = t;
      });
    }
  }
}
The CircleMovement system operates on every entity with a game.Thing component. Within the OnUpdate method, it first reads the frame delta time from the scheduler (in seconds), and then sets the local position of every entity returned by the filter as a function of the time, radius, and speed properties.
The system itself also stores a constant, 2 times Pi, to model a full rotation per second (at a speed of 1.0). Systems shouldn't store entity data outside the OnUpdate function, but constants like this one are fine.
The animation state is stored in the time property, updated every frame.
Scheduling Systems
The CircleMovement example above will run each frame, but it could run anytime during a frame. That is, it could be the first system to be executed, or the last...
If you need systems to execute before or after other systems, you need to instrument your code with decorators.
@ut.executeAfter and @ut.executeBefore are two decorators you can use to schedule your systems. They take any number of system types as parameters, and create an edge in the system execution graph.
ut.Shared.UserCodeStart is a special system, called a Fence.