VR Multiplayer Template Quick Start Guide
Unity’s VR Multiplayer Project Template serves as a starting point for virtual reality development leveraging Unity Cloud Gaming Services to provide online connectivity and multiplayer features.
The template configures project settings, pre-installs the necessary packages, and includes various Samples that demonstrate how to set up a project that is ready for a variety of Multiplayer VR use cases. Refer to the XR Project Setup and VR Project Development in Unity documentation for additional information.
This template supports the following Unity editor versions:
- Unity 2022 LTS
- Unity 6 Preview and later
Unity directly supports the following VR platforms:
- Meta Quest (2, 3, and Pro)
- OpenXR compliant devices
The VR Multiplayer Project Template uses the following Unity packages:
- XR Hands - Defines an API that allows you to access hand tracking data from devices that support hand tracking.
- XR Interaction Toolkit - A high-level, component-based, interaction system for creating XR experiences. It provides a framework that makes 3D and UI interactions available from Unity input events.
- XR Plugin Management - Used to streamline XR plug-in lifecycle management and, optionally, provides a build time UI through the Unity Unified Settings system.
- Netcode for GameObjects - Provides networking capabilities to GameObject and MonoBehaviour workflows.
- OpenXR - An open, royalty-free standard developed by Khronos that aims to simplify AR/VR development by allowing developers to seamlessly target a wide range of AR/VR devices.
- Unity Cloud Multiplayer Services
- Authentication - Provides anonymous and platform-specific authentication solutions for supported platforms.
- Lobby - Provides a way for players to discover and connect to each other to accomplish a variety of multiplayer gaming scenarios.
- Relay - Exposes a way to securely offer increased connectivity between players by using a join code style workflow without needing to invest in a third-party solution, maintain dedicated game servers (DGS), or worry about the network complexities of a peer-to-peer game.
- Vivox - Voice and Text Chat (Vivox) service for multiplayer enables better cooperative and competitive multiplayer experiences by letting your players talk through in-game voice or text chat.
Connect to Unity Cloud
Verify Connect to Unity Cloud is selected during the project creation process. This will automate your project’s gaming services set up. You can manage access and other settings for your new Cloud Project on the Projects section of the Unity Cloud.
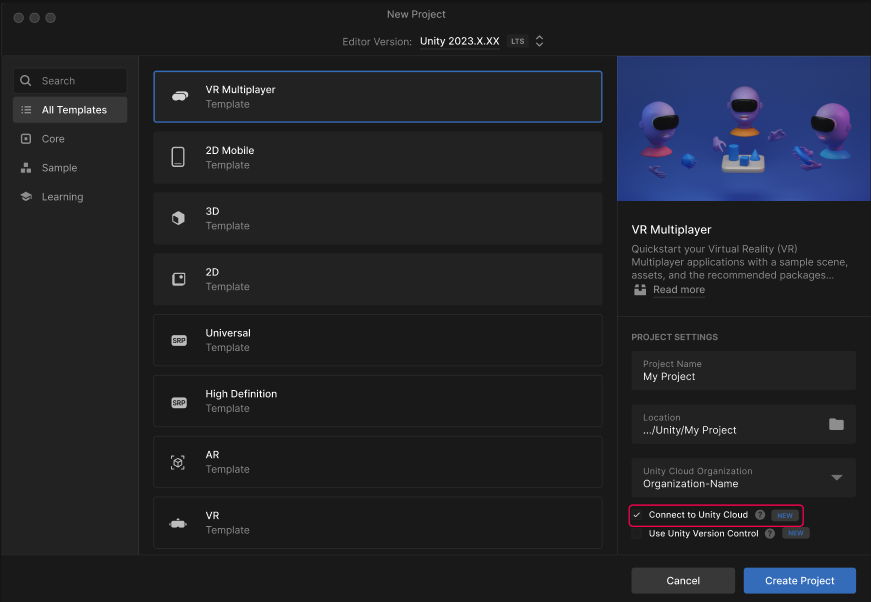
In the Unity Hub, select New Project > VR Multiplayer. Enable Connect to Unity Cloud.
Use the Sample Scene
The VR Multiplayer Project Template contains a scene named SampleScene located in Assets\Scenes. This scene’s Hierarchy is pre-configured with GameObjects that allow your application to manage controller, hands, and head tracking, locomotion, and interactions with networked spatial UI and virtual objects.
You can use this scene as a reference, or you can remove the example assets from it and use it as a starting point for your own project.
Sample Scene Hierarchy Overview
The following image shows the Hierarchy window of the SampleScene, expanded to display the GameObjects the scene is pre-configured with.
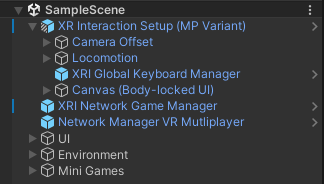
The VR Multiplayer template Sample Scene in the Hierarchy window.
XR Interaction Setup
In the Sample Scene, XR Interaction Setup (MP Variant) is the main GameObject for configuring the Camera and origin point of the XR experience in Unity.
The XR Interaction Setup (MP Variant) includes the following additional configurations nested within the Camera Offset gameObject:
- Input and visualization systems for Controllers, Hands, and Offline Player Avatar.
- Support for Poke, Near-Far, and Teleport interactors.
The Locomotion GameObject contains providers for Turn, Move, Teleportation, and Climb locomotion.
XRI Spatial Keyboard
The XR Interaction Setup (MP Variant) contains an XRI Global Keyboard Manager prefab, which provides a customizable, movable and scalable instance of the referenced Keyboard Prefab to enable text input in the project.
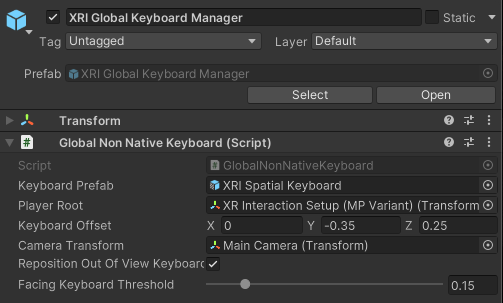
The XRI Global Keyboard Manager prefab in the Inspector window.
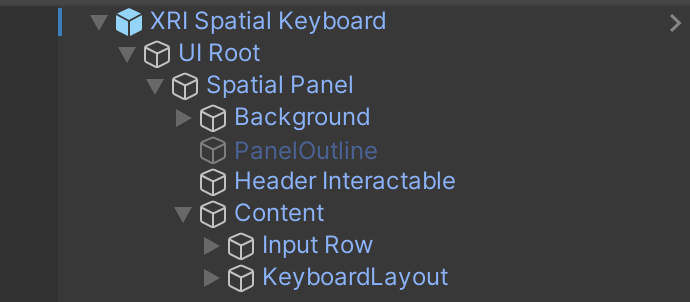
The XRI Spatial Keyboard shown in the Hierarchy window.
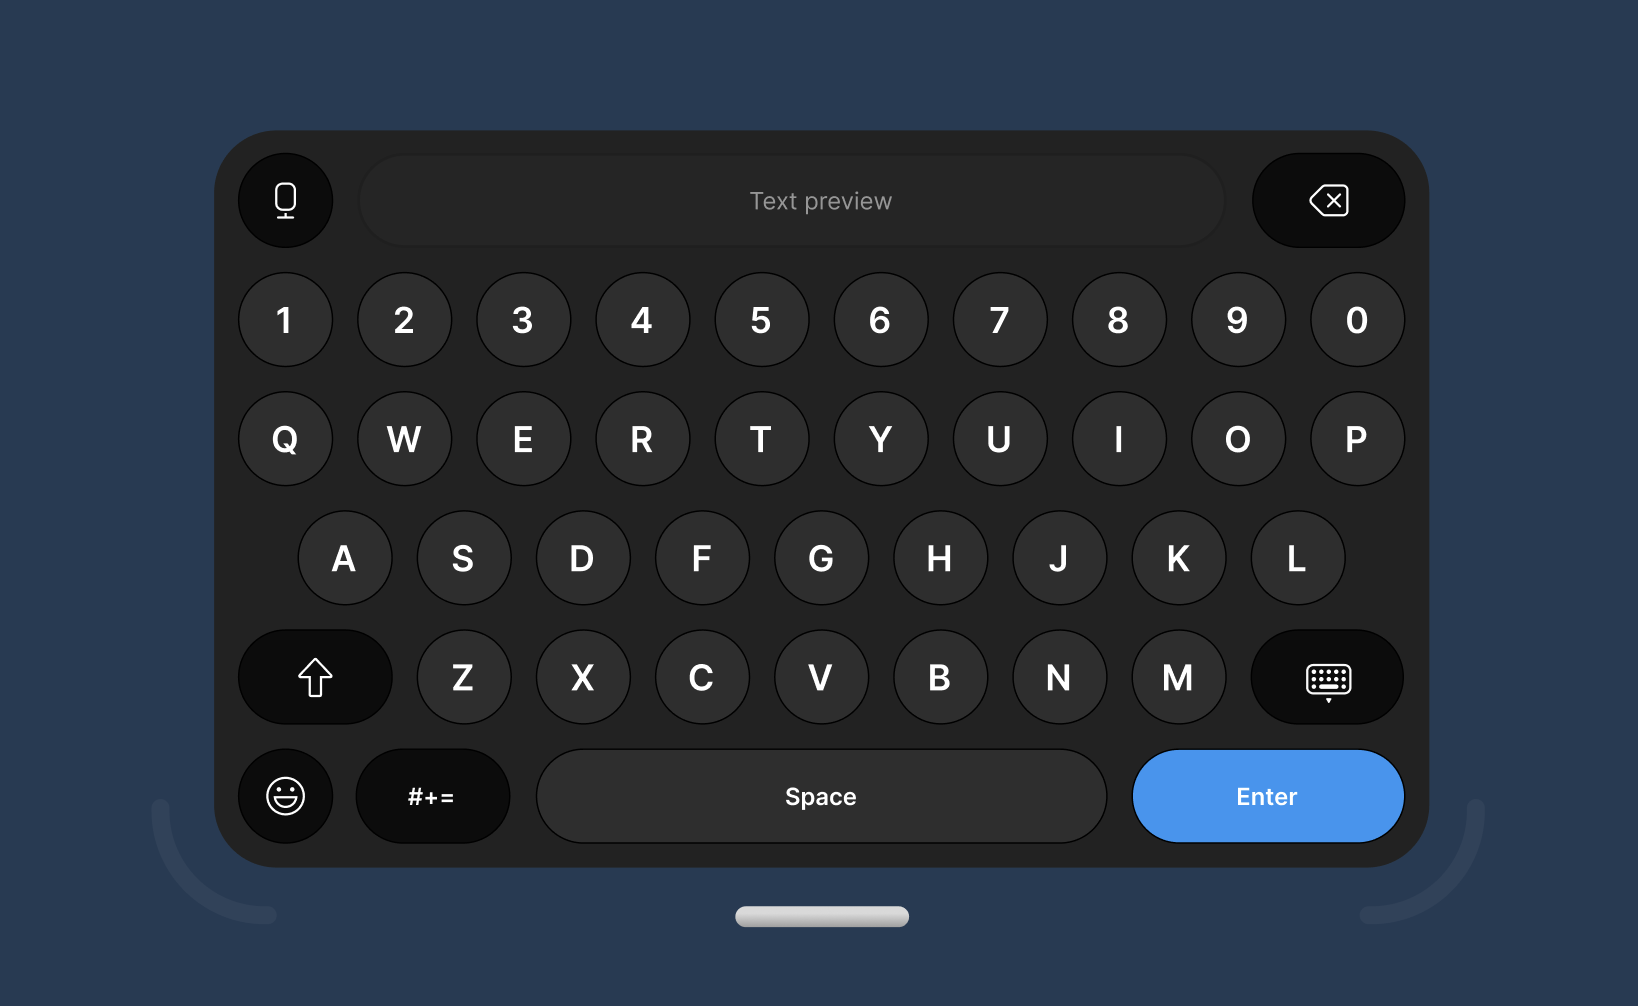
The Keyboard prefab in the Game view.
Network Manager
The NetworkManager is a required Netcode for GameObjects (Netcode) component that has all of your project's netcode related settings. Think of it as the "central netcode hub" for your netcode enabled project.
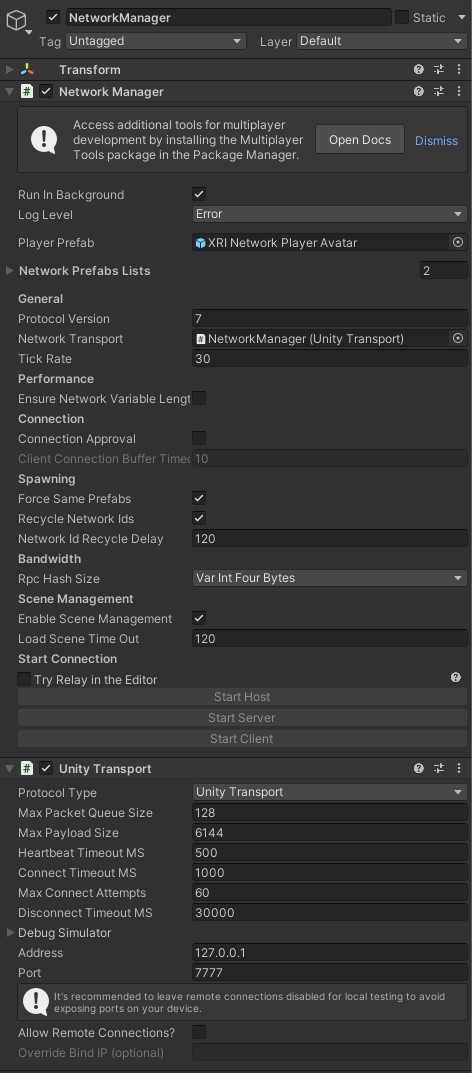
The Network Manager component in the Inspector window.
Networking
XRI Network Game Manager
The XRI Network Game Manager prefab is responsible for tying together the connection functionality between Netcode for GameObjects (NGO) and Unity Cloud’s Multiplayer Solutions (Lobby, Authentication, Relay, and Vivox.)
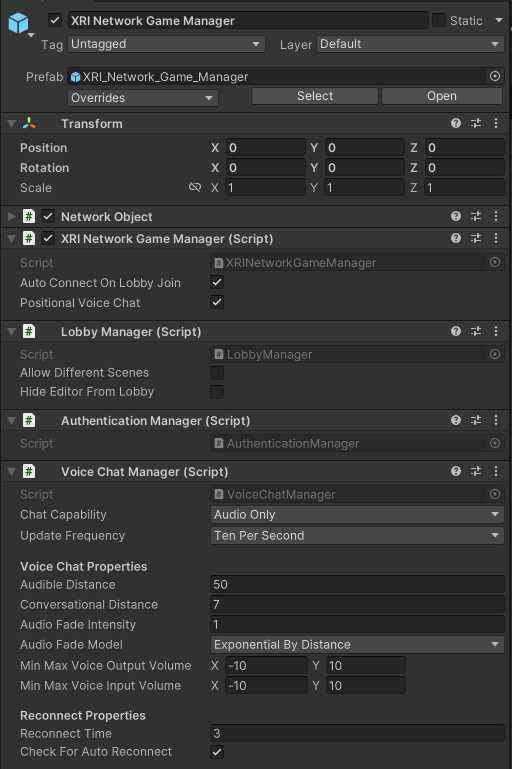
The XRI Network Game Manager prefab.
Player Avatars
Player Avatars are virtual representations of participants (players) whose position and movement are replicated in real time to facilitate interactions as well as verbal and/or non-verbal communication with others sharing a virtual space.
![]()
The VR Multiplayer Template project includes an XRI Network Player Avatar prefab to get you started. It provides a stylized model with mouth articulation and support for both tracked controllers and/or hands, via the XRI and XR Hands Packages respectively. In addition, avatars utilize the Player Name Tag prefab to display individuals’ names, as well as microphone status indicators.
XRI Networked Player Avatar Example
The following image shows an example Networked Player Avatar.
![]()
Example Networked Player Avatar in the Inspector.
Networked Interactables
There are various objects within the scene that the user is able to interact with. In a multiplayer context, these are called Network Interactables, which require an additional set of components to facilitate multiplayer interactivity and feedback.
Networked Interactable Example
The following image shows an example Networked Interactable.
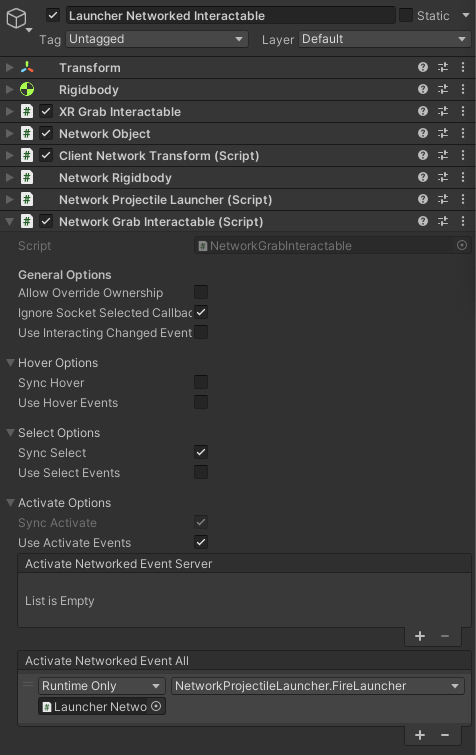
An example Networked Interactable.
Teleportation Setup
Teleportation allows users to move within the sample scene without experiencing the discomfort common while walking in VR. There are teleportation areas and anchors already set up in the scene Hierarchy, located in Environment > Teleport Area Setup.
Teleportation Areas
Teleportation Areas designate specific surfaces for the user to move upon. The SampleScene’s Teleportation Areas are configured using the Teleportation Area component, which references the GameObject’s Mesh Collider component to define areas to teleport to.
Teleportation Area Example
The Floor GameObject in the Hierarchy provides an example for a Teleportation Area, it is located under Environment > Level > Geometry > MainHallArea > MP_Level > Floor.
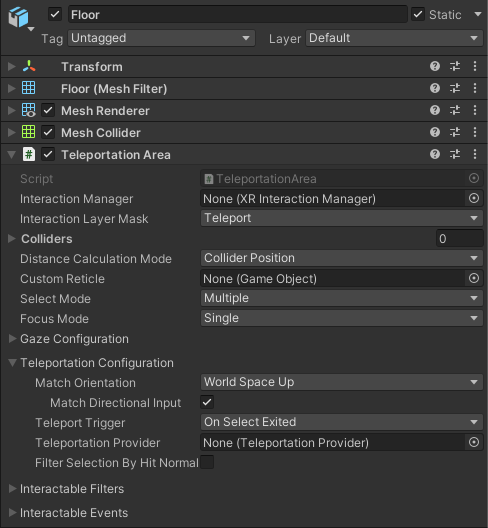
Floor GameObject in the Inspector window.
Teleportation Anchors
Teleportation Anchors, on the other hand, constrain the user’s view in terms of position and rotation while teleporting. You can find multiple of these in the sample scene, which are already set up for you.
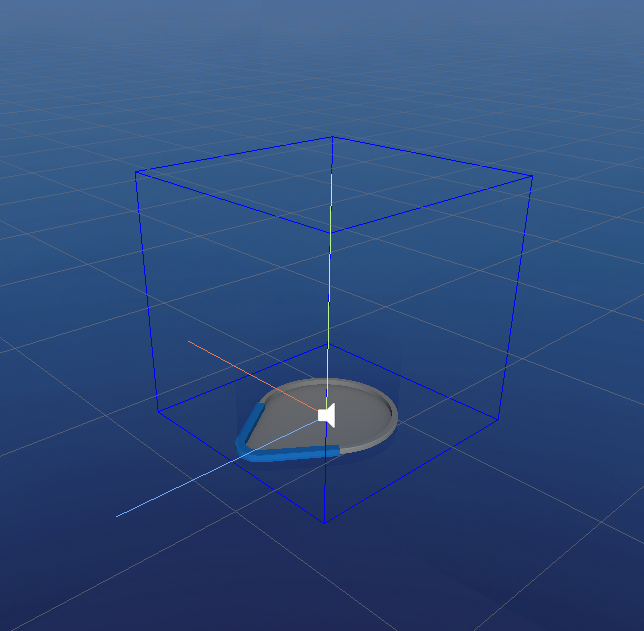
A teleportation anchor in the Scene view.
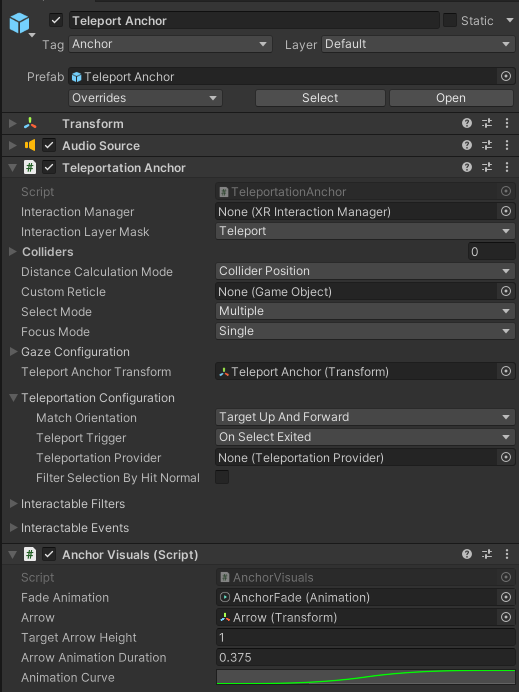
A teleportation anchor in the Inspector window.
UI
The sample scene contains various world space UI examples which allow for both near and far interactions with UI elements such as sliders, dropdown menus, toggles, and buttons.
There are multiple UI prefabs in the Hierarchy, located under UI > World Space Canvas, which demonstrate how you can combine UI elements for different use cases such as message boards, media players, object spawners, informational panels, notifications, and leader boards
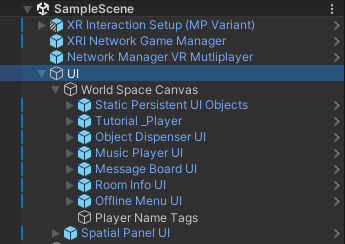
UI prefabs from the Sample Scene in the Hierarchy window.
Spatial UI
Users have the ability to move the canvas in space with the Spatial Panel UI prefab by leveraging the XR Grab Interactable component, which provides the ability to grab the canvas by either the header or handle at the bottom of the canvas via the direct or ray interactor.
Additionally, the UI will reorient itself to face the user (billboard) with the Turn To Face component, which is on the prefab by default. The Network Billboard and Client Network Transform components allow for other participants to have a shared view of the Spatial UI transforms as it is being manipulated by someone else.
Spatial Panel UI Example
The following image shows the Spatial Panel UI prefab in the Inspector window.
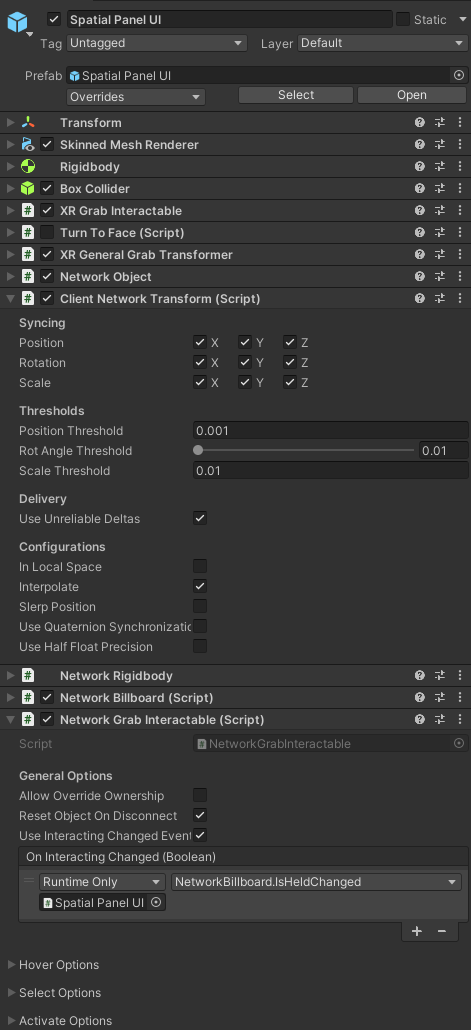
Spatial Panel UI prefab.
Mini Games
The VR Multiplayer Template project contains multiple Mini Game examples, leveraging a collection of assets that demonstrate how to best utilize the VR Multiplayer Template’s features.
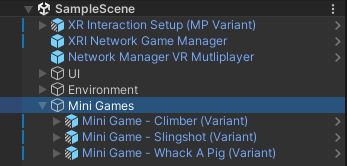
The VR Multiplayer Template Mini Games shown in the Hierarchy window.
Multiplayer Testing and XR Simulation Tools
Multiplayer Play Mode Setup
Multiplayer Play Mode is a Unity Package that allows users to test multiplayer gameplay without building the project. It creates virtual players all within the same editor instance.
Recommended Installation
- Backup your project folder or use a version control system such as Git or SVN.
- Navigate to Window > Package Manager > Unity Registry > Multiplayer Play Mode. Then select Install
- Multiplayer Play Mode should now be installed.
Refer to the Multiplayer Play Mode Documentation for in depth details.
NOTE: When creating Virtual Players, make sure you have unique tags for each virtual player created, otherwise authentication will have issues.
XR Device Simulator
The XR Device Simulator converts mouse and keyboard input and uses it to drive simulated XR controllers and head mounted display (HMD).
Installation
To install the XR Device Simulator:
- Go to the Package Manager (Window > Package Manager).
- Select the XR Interaction Toolkit package.
- Open the **Samples **tab.
- Click on the Import button next to XR Device Simulator.
Upon clicking the Import (Or Reimport to have the latest version) button, you will see a Samples\XR Device Simulator folder added to the Project window. The XR Device Simulator prefab in this folder is the asset that you will add to the scenes where you want to simulate XR input.
Refer to XR Device Simulator for more information.
XR Project Configuration
Various presets are used to accommodate graphics & rendering requirements for different platforms. By selecting the target platform from Build Settings (File > Build Settings), i.e. Windows, Mac, Linux or Android, different URP Config Settings are automatically updated.
In addition, by selecting the target platform in Build Settings, OpenXR feature groups and interaction profiles are preconfigured. By default, the Android build target updates the settings for Meta Quest support.
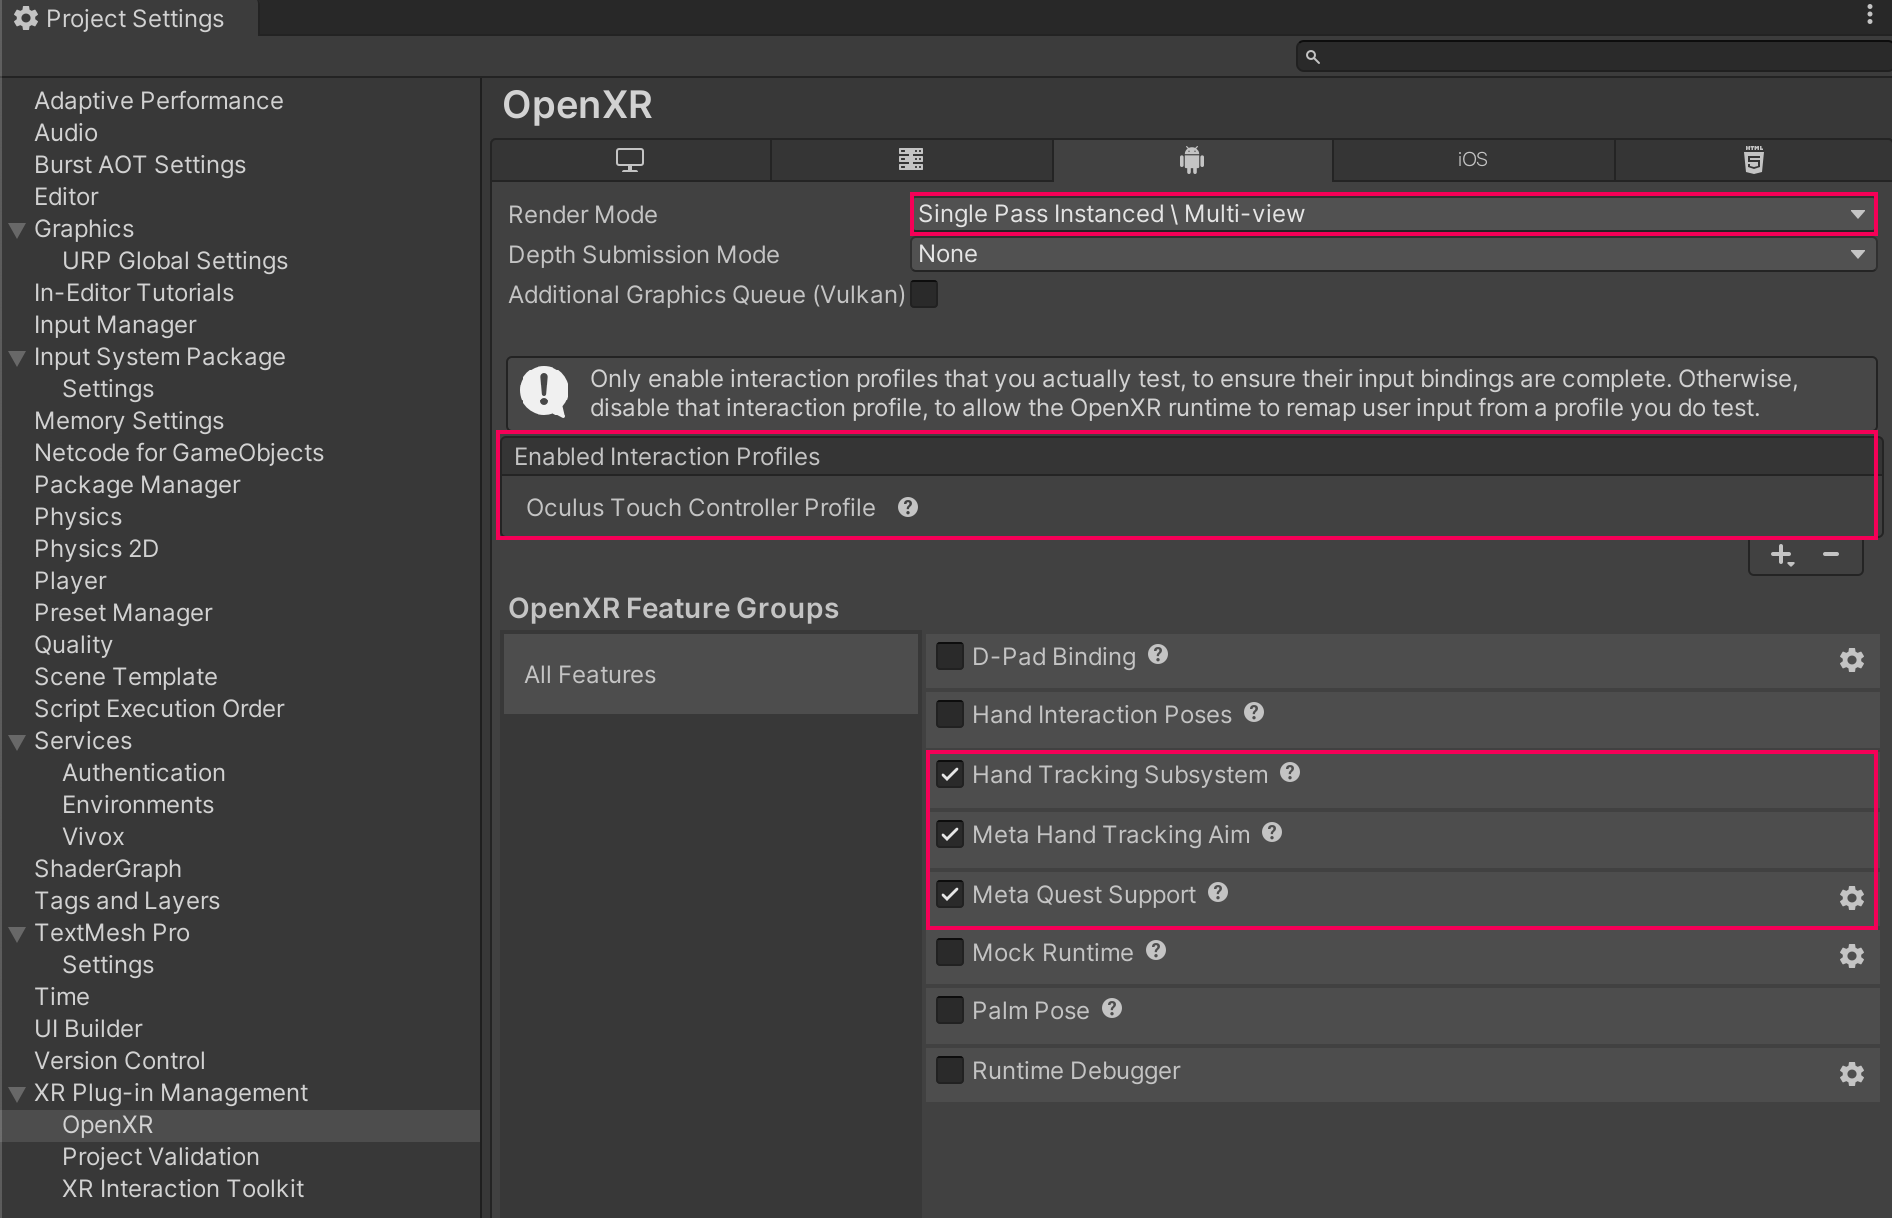
Project Settings configured for Meta Quest.
For standalone PC VR, numerous interaction profiles are already configured. If you don't see your platform listed, add your interaction profile manually by clicking the + button.
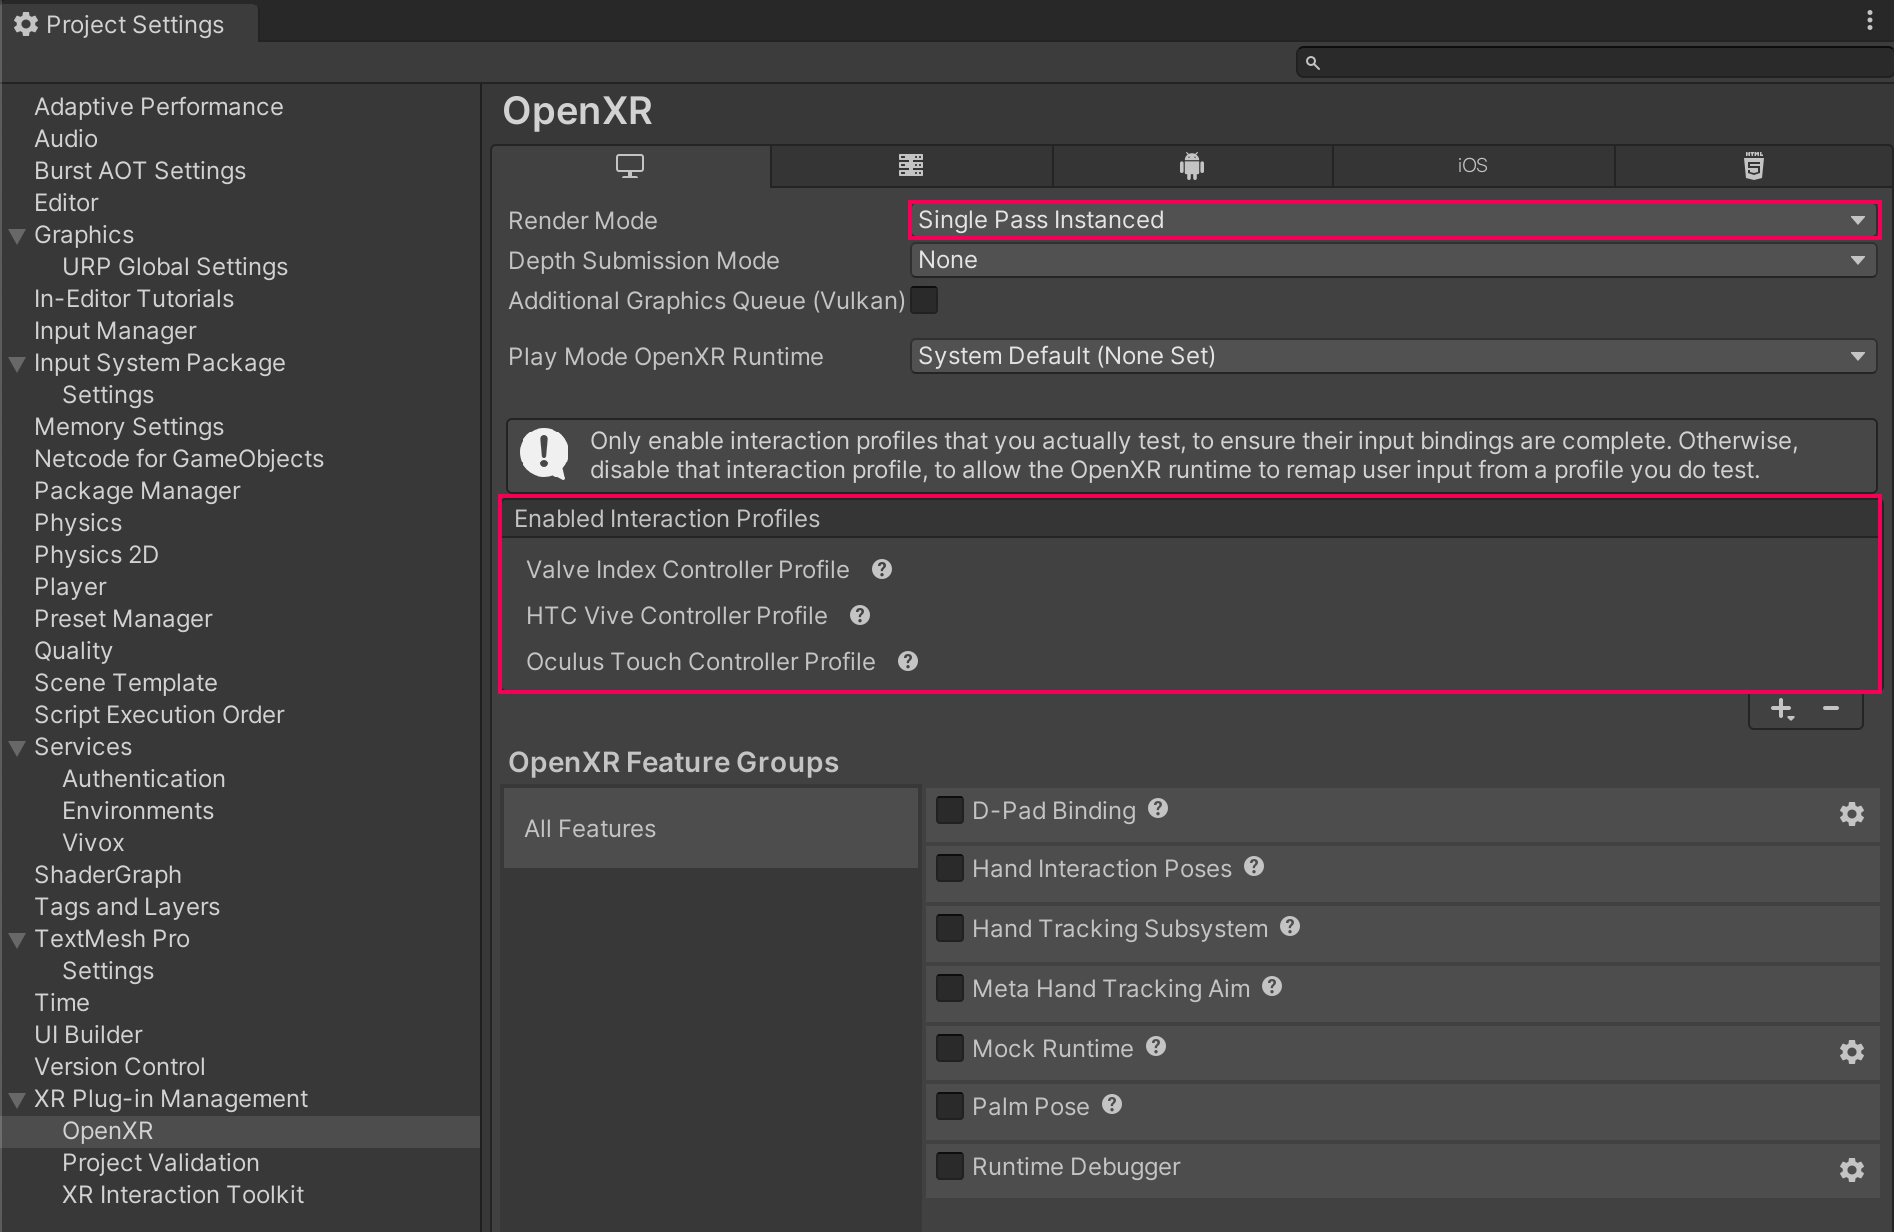
Project Settings configured for PC VR.
Remove example assets from the scene
To remove example assets from your project:
- In the Project window, open the
Assetsfolder. - Right click the VRMPAssets folder.
- Click Delete.
- In the pop-up that appears, click Delete.
Standalone builds
When running the build multiple times on the same PC simultaneously, players will need to launch the executable while passing in the command line argument -playerArg:<UNIQUE_ID> where <UNIQUE_ID> is any unique string.
Known Issues
Known issues:
- Multiplayer Play Mode and ParrelSync cannot be used together. If you encounter errors with MPPM, exit the editor and delete the library folder.
- Resetting objects after throwing them over the edge will cause them to occasionally get stuck in a kinematic state.
- On certain PCVR setups users may encounter
xrLocateSpace: XR_ERROR_TIME_INVALIDresulting in poor performance and frame stuttering.