PlayMode Tool window
Use the PlayMode Tools window (menu: Window > Multiplayer > PlayMode Tools) to do the following:
- Select the behaviour of the Netcode for Entities bootstrapping flow (assuming it's enabled) when you enter Play Mode. This controls whether the
ClientServerBootstrapcreates a client world, a server world, or both client and server worlds, and whether they connect automatically. - Enable and configure the network simulator.
- Configure the number of thin-clients to use.
- Change the current logging level, and control whether or not Unity creates packet dumps.
- View, control, and debug Netcode for Entities client and server worlds and their transport data (only available after entering Play Mode).
- Display bounding box gizmos for all ghosts.
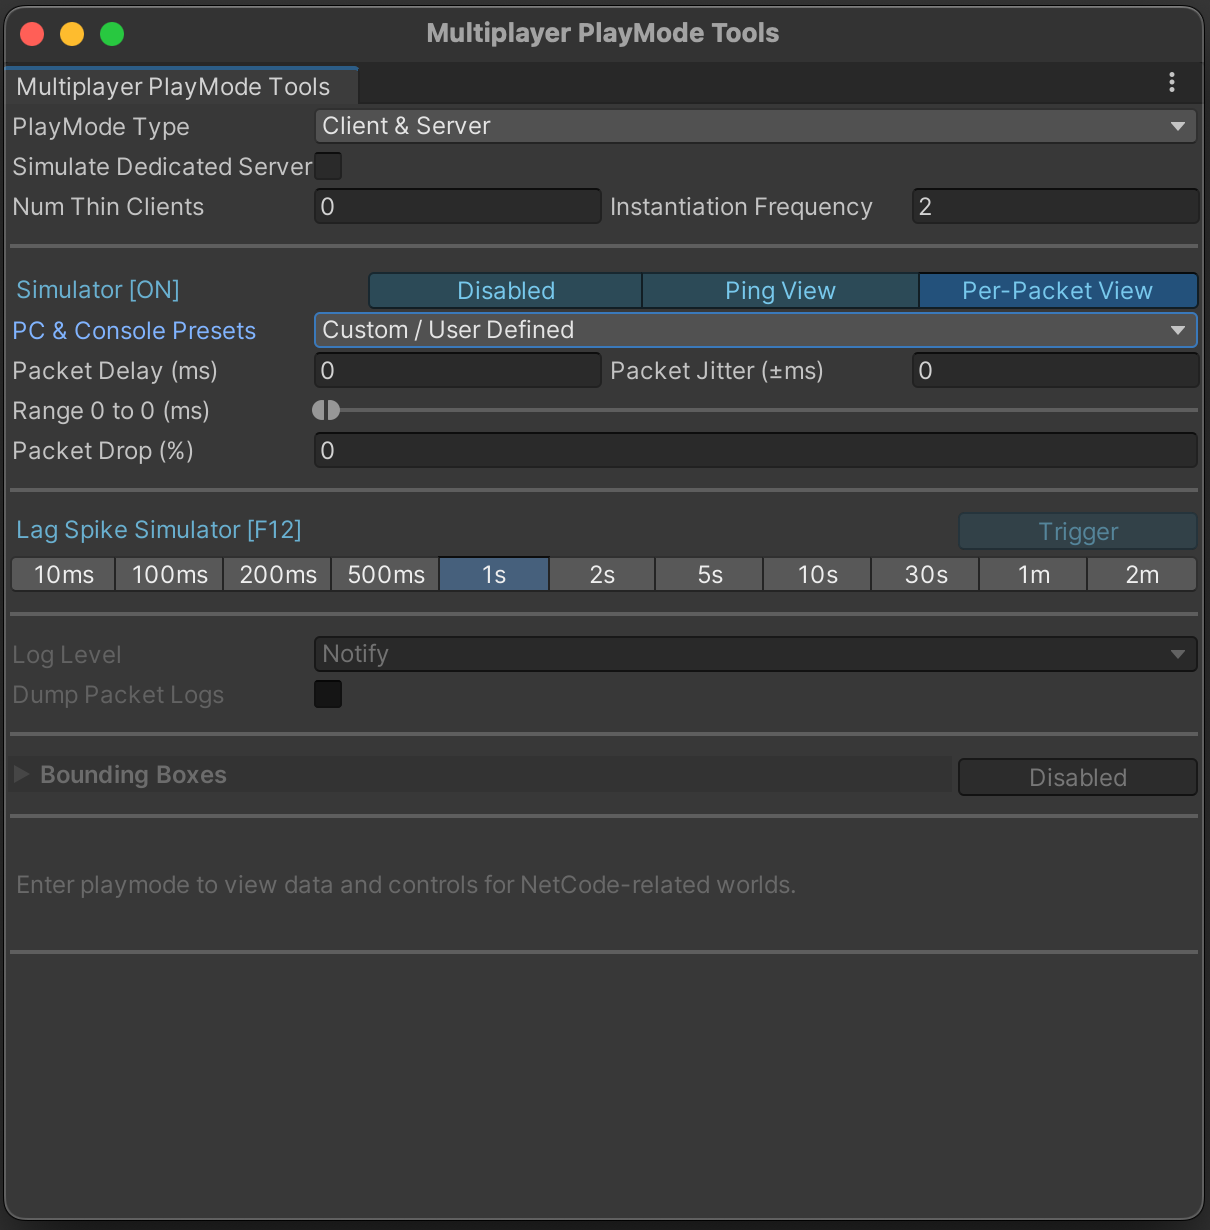
Properties
| Property | Description | |
|---|---|---|
| PlayMode Type | Determines the behaviour of the Netcode for Entities bootstrapping flow (assuming it's enabled) when entering Play Mode. Client spawns only the client world, Server spawns only the server world, and Client & Server spawns one of each. | |
| Simulate Dedicated Server | Denotes the build environment that Netcode for Entities emulates when it bakes the ServerWorld version of the sub scenes. For example, a client-hosted game server might have some additional assemblies which are unavailable on a Dedicated Game Server (DGS) build, so with this toggle unchecked, types in those assemblies would show up on the entities within the ServerWorld. This option is only visible when Client Hosted Builds are enabled in the Project Settings, because it defaults to emulating a DGS if your client can't support hosting a game server. | |
| Num Thin Clients | Set the number of thin clients spawned and automatically maintained in-Editor by the package. You can use these clients to test multiplayer PvP interactions. Thin clients can't present and don't spawn any ghosts they receive from the server. However, they can generate fake input, and simulate a realistic load on the server. |
Note
Be aware that this window, when open, adheres strictly to the target Num Thin Clients value at runtime. If you've spawned any thin clients yourself that take the total number of thin clients over Num Thin Clients, then those thin clients will be destroyed. This is a known issue.
Emulate client network conditions
Use the network emulator to replicate specific network conditions while your game is running in the Unity Editor. When you enable network emulation, you can set the packet delay and packet loss in the following ways:
- Manually set the packet delay and drop values.
- Select a
preset. For example, '4G' or 'Broadband'.
Frequently test your gameplay with the emulator enabled to get a more accurate picture of how real-world network latency impacts gameplay quality. Gameplay test also demonstrate the performance implications of the rollback and re-simulate logic involved in client prediction. For example, a higher ping requires the client to perform more prediction ticks which uses higher CPU resources on the client's side.
To manually specify network conditions, enter custom values in the following fields:
- RTT Delay
- RTT Jitter
- Packet Drop
If you use Packet View, enter custom values in the following fields:
- Packet Delay
- Packet Jitter
- Packet Drop
Unity runs the network emulation via a Unity Transport Pipeline Stage. This stage is only added to the client driver and so Unity applies these settings to incoming and outgoing packets. To view the combined impact on the ping, open the dropdown and select Ping View.
| Property | Description |
|---|---|
| RTT Delay (ms) | Use this property to emulate round trip time. This property delays the incoming and outgoing packet (in ms) such that the sum of the delays equals the specified value. |
| RTT Jitter (ms) | Use this property to add (or subtract) a random value to the delay, which makes the delay a value between the delay you have set plus or minus the jitter value. For example, if you set RTTDelay to 45 and RTTJitter to 5, you will get a random value between 40 and 50. |
| Packet Drop (%) | Use this property to simulate bad connections where not all packets arrive. Specify a value (as a percentage) and Netcode for Entities discards that percentage of packets from the total it receives. For example, set the value to 5 and Netcode for Entities discards 5% of all incoming and outgoing packets. |
| Packet Fuzz (%) | Use this property to simulate security-related person-in-the-middle (PITM) attacks, where malicious clients attempt to bring down your server (or other clients) by intentionally serializing bad data. |
| Auto Connect Address (Client only) | Specify which server address a client connects to. This field only appears if you set PlayMode Type to Client. If you're not using auto connect functionality, your user code needs to read this value (via ClientServerBootstrap.IsEditorInputtedAddressValidForConnect), and manually connect to the outputted NetworkEndpoint. |
| Auto Connect Port (Client only) | Override and/or specify which port to use for both listening (server) and connecting (client) |
Note
When you enable network emulation, Unity forces the Unity Transport's network interface to be a full UDP socket. Otherwise, Unity uses an IPC (Inter-Process Communication) connection when both client and server worlds exist in the same process.
Refer to DefaultDriverConstructor
Note
Unity uses AutoConnectAddress and AutoConnectPort when it automatically connects the client to a server in client-only mode, and overrides the values set in the ClientServerBootstrap. However, Unity ignores these fields when the bootstrap sets AutoConnectPort to 0. You can use the Connect button in the Playmode Tools window to force the connection to the target AutoConnectAddress and AutoConnectPort.
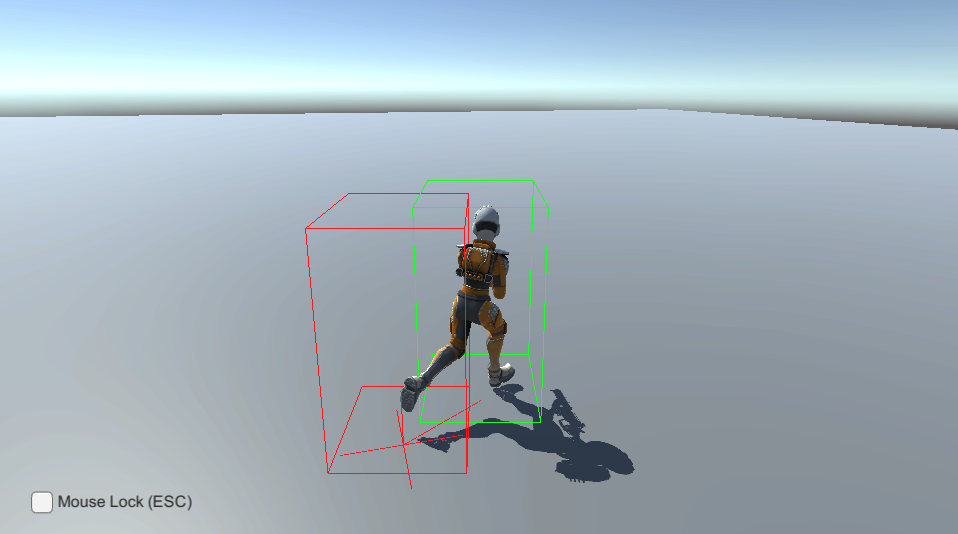
Visualize bounding boxes on GameObjects
Entities that use Entities Graphics automatically draw bounding boxes. To draw bounding boxes around objects that don't use entities graphics, add the GhostDebugMeshBounds component to the GameObject's supporting entity. You can call Initialize for convenience to set it up.
Refer to GhostPresentationGameObjectEntityOwner for an example.
Visualize importance of ghosts
When using ghost importance, you can visualize the importance of ghosts in the Scene and Game view by enabling the Importance Visualizer in the PlayMode Tool window.
| Property | Description |
|---|---|
| Connection entity | Select the connection to visualize importance for. |
| Draw entity mode | Select which mode to use when visualizing importance. Per entity importance heatmap colors each entity with its importance value. Per chunk groups entities into chunks and colors based on the importance value of the chunk. |
| Tile draw mode | Selects whether to draw a grid or not, and which axis to draw it on. The grid is based on GhostDistanceData, and needs to be present for this to work. |
| Heatmap Gradient | Allows you to customize the gradient used for the heatmap visualization. |
| Render Distance | How many tiles to render. Increases from (0, 0, 0). |
The data for importance visualization is gathered from the server world. A line is drawn between each ghost's position to the first entity found in the same chunk of that ghost (the first entity in the chunk is arbitrary and has no specific meaning). When using the per entity mode, each line is colored based on the gradient, where high priority is the first color (green by default), and low priority is the last color (red by default). When using the per chunk mode, each line is colored the same for all ghosts in the same chunk.
The tile draw mode is only applicable when using the built-in distance-based importance scaling. It is based on the tiles from GhostDistanceData. If you aren't using distance-based importance scaling, then grid mode is not applicable.
The following image shows an example importance visualization from the Asteroids sample project using the per entity importance heatmap mode, with a grid on the XZ plane. All asteroids have a line, and each origin point where many lines start from signifies that ghosts belong to that specific chunk. To interpret this, we can see that in the middle of the screen is our ship. This ship is inside a tile. That tile, and the immediate surrounding tiles, all have the same green color. The color is relative, so the more green the color, the higher priority that chunk has. Further away tiles have lower priority and show up as more red. Also note that there can be multiple chunks within the same tile. You can also see that only the closest tiles have asteroids rendered. This is because of relevancy, not importance. This indicates that the system works as intended: the closest asteroids are updated more often than the asteroids that are further away. With a custom importance scaling function that is not based on distance, the lines might be more interwoven and not as clear as this example.
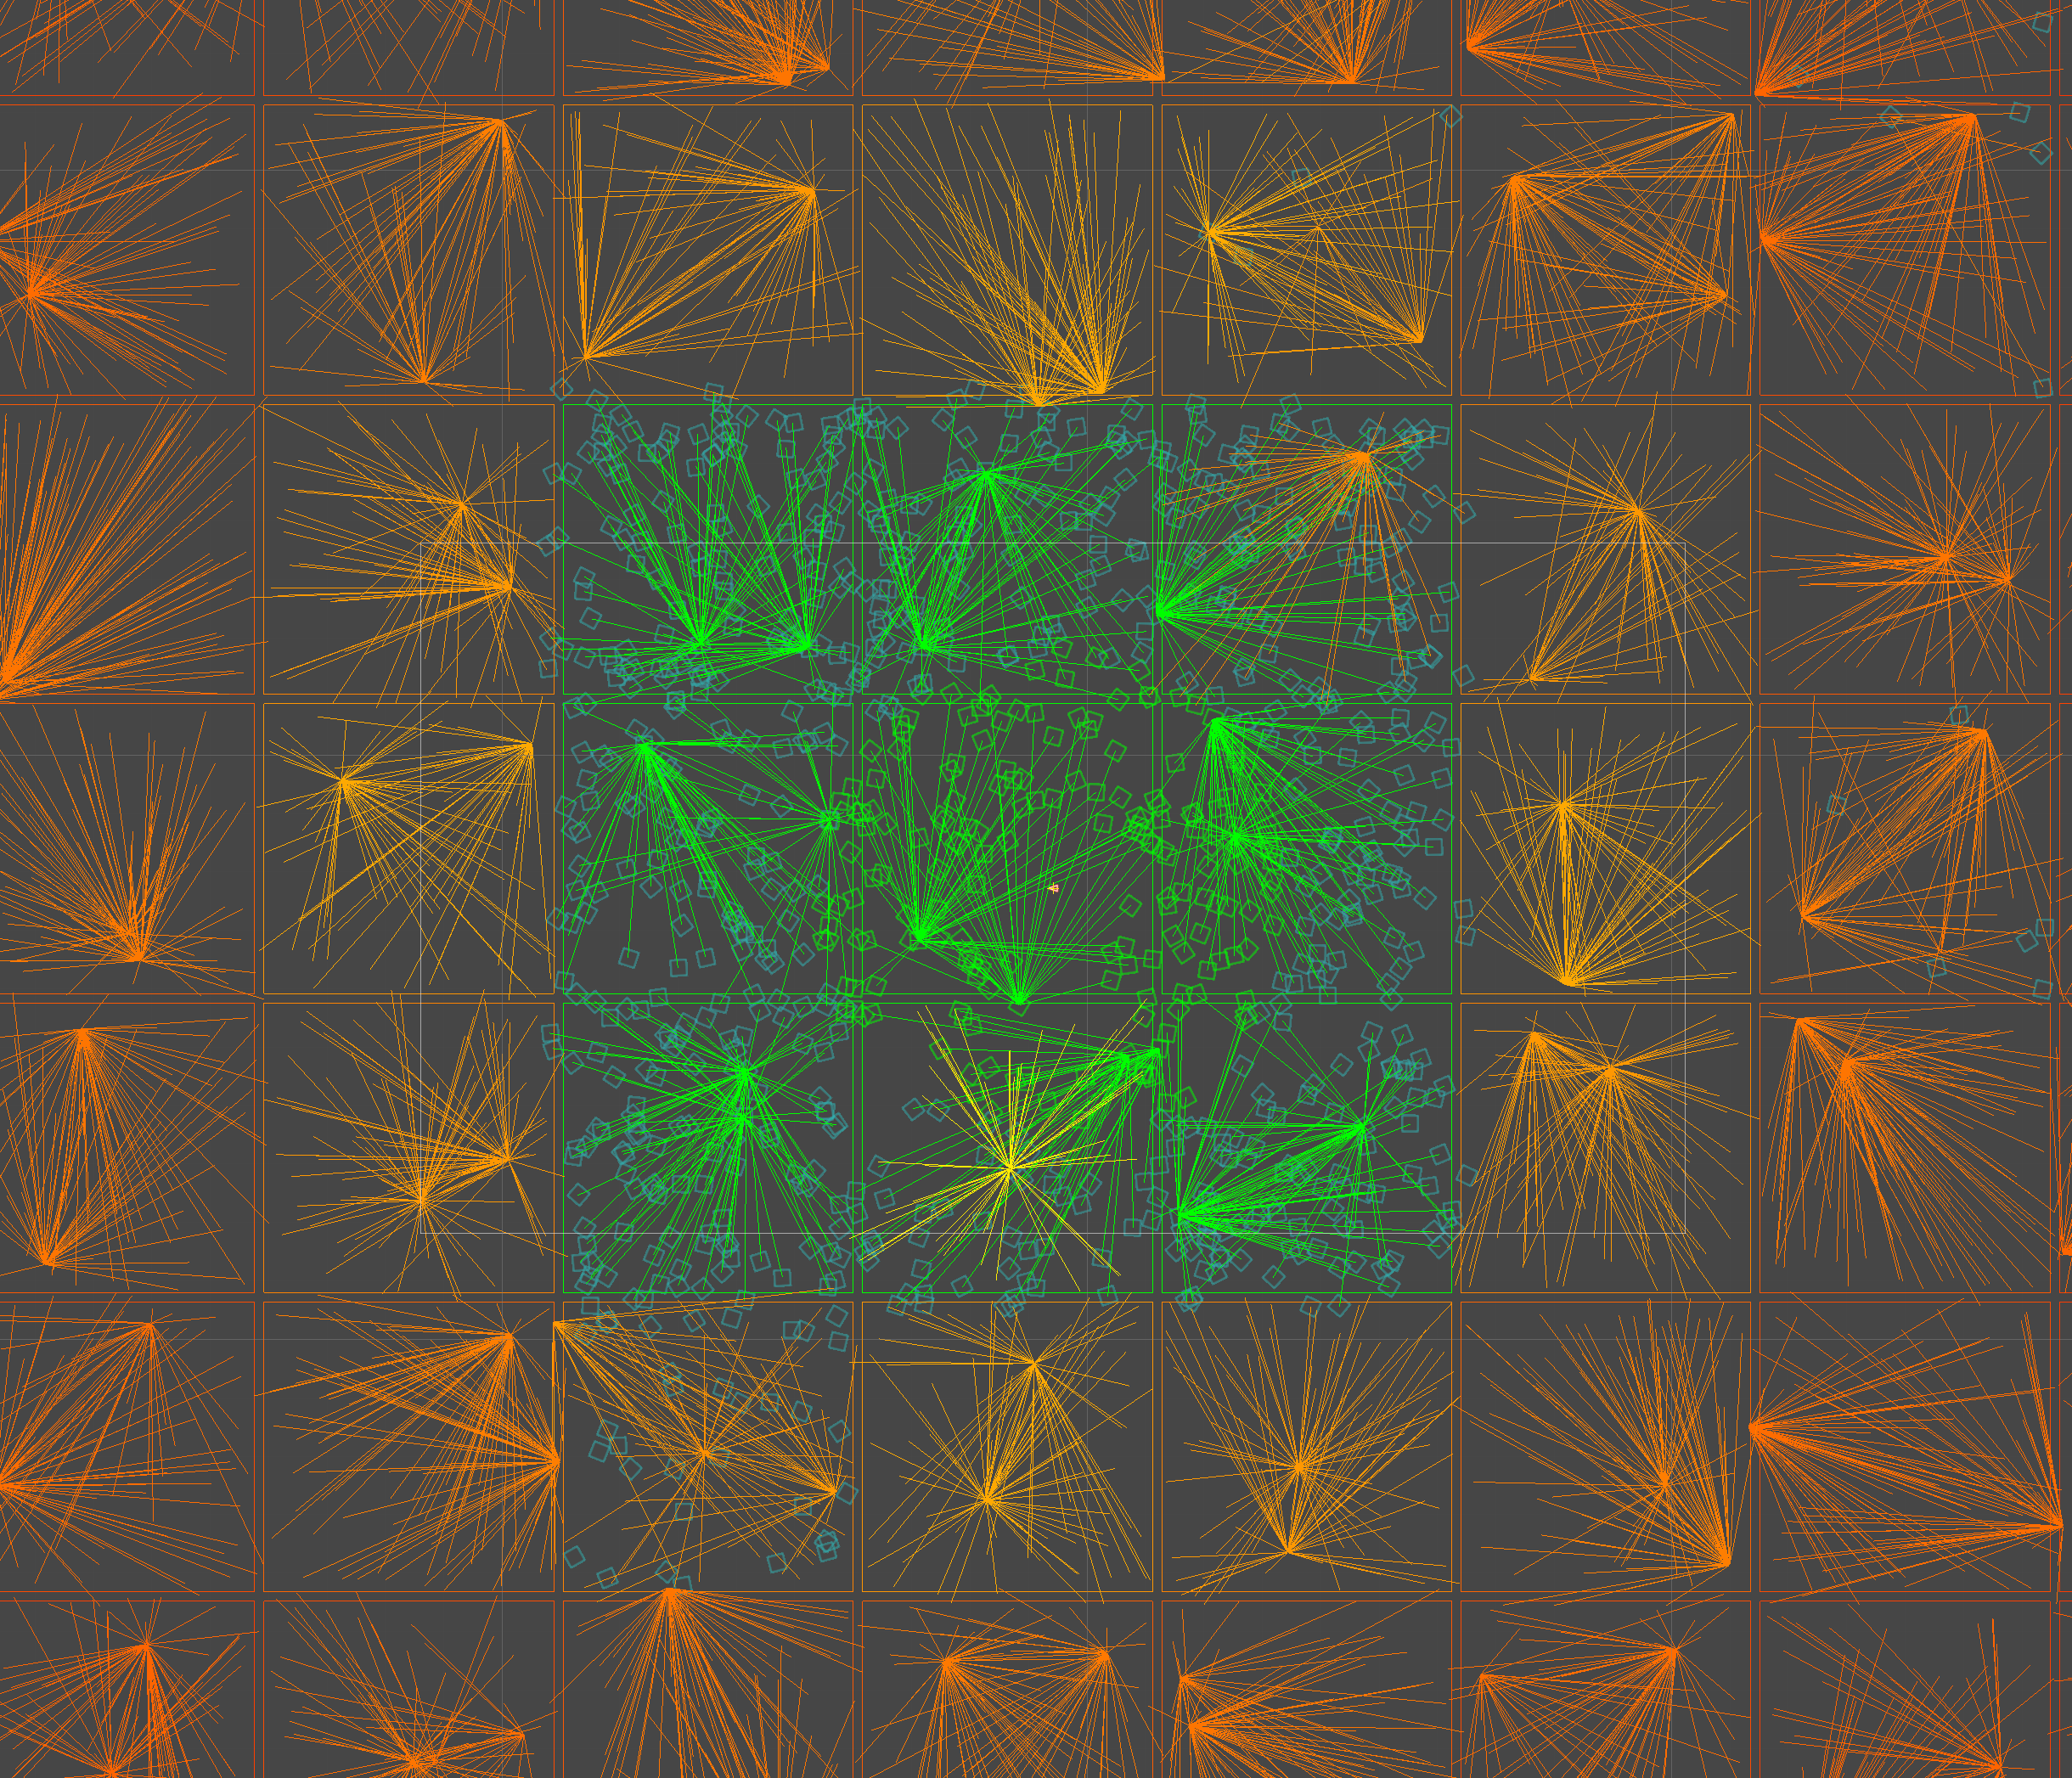
Note
The importance visualizer only works when the server world is present, and requires Entities Graphics to function correctly.
Initialize the network emulator from the command line
Use the command line arguments --loadNetworkSimulatorJsonFile [optionalJsonFilePath] to load an existing JSON (.json) SimulatorUtility.Parameters preset. If the file isn't found, unity throws an error.
Alternatively; use --createNetworkSimulatorJsonFile [optionalJsonFilePath] to generate a default JSON file automatically. The default file name (if unspecified) is NetworkSimulatorProfile.json.
Passing in either parameter always enables a simulator profile, even in the error case. If the file isn't found or generated, it uses the NetworkSimulatorSettings.DefaultSimulatorParameters.
Note
You can only enable Network emulation in development builds.
Use the Playmode Tool window with Multiplayer Play Mode
To use the Playmode Tool window in Multiplayer Play Mode to test a virtual player in a project that uses netcode for Entities, perform the following actions:
- Install the Multiplayer Play Mode package.
- Open the Multiplayer Play Mode window (Window > Multiplayer Play Mode).
- Activate a virtual player.
- IN a virtual player's Play Mode window, navigate to Layout and select Playmode Tool.
- Set the Play Mode Type to make this clone act as a Client, a Server, or both a Client & Server.
Note
If the Dedicated Server package exists in your project, the Multiplayer Role you select overrides the PlayMode Type.