Installation
PackageManager
First, get MeshSync DCC Plugins package.
- Open Package Manager.
- Click the + button, and choose Add package from git URL.
- Type in
com.unity.meshsync.dcc-plugins.
DCC Tools Setup
Maya
- Open
Packages/MeshSync DCC Plugins/Editor/Plugins~folder using a file explorer and uncompress the appropriate zip file for Maya. Copy the uncompressed files:
- Windows:
IfMAYA_APP_DIRenvironment variable is setup, copy the modules directory there.
If not, go to%USERPROFILE%\Documents\mayain Windows Explorer, and copy the modules directory there. - Mac:
Copy the UnityMeshSync directory and UnityMeshSync.mod file to/Users/Shared/Autodesk/modules/maya. - Linux:
Copy the modules directory to~/maya/<maya_version)
- Windows:
Start Maya, then go to Windows -> Settings/Preferences -> Plug-in Manager.
- Activate MeshSync DCC plugin by checking Loaded under MeshSyncClient.
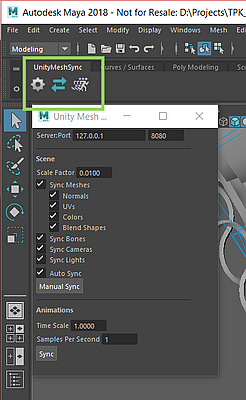
- Notice that UnityMeshSync should now be available on the shelf UI.
Click on the gear icon to open the settings menu and start playing around with MeshSync.
3ds Max
- Open
Packages/MeshSync DCC Plugins/Editor/Plugins~folder using a file explorer and uncompress the appropriate zip file for 3ds Max. - Start 3ds Max
- Copy MeshSyncClient3dsMax.dlu that corresponds to the used version of 3ds Max into
one of the following directories:
- (Recommended) A custom directory for plugins that has been added in 3ds Max by the following menu:
- 3ds Max 2019 and earlier: Customize -> Configure System Paths. Then select 3rd Party Plug-Ins tab.
- 3ds Max 2020: Customize -> Configure User and System Paths. Then select 3rd Party Plug-Ins tab.
- The plugin path under the installation directory, e.g:
C:\Program Files\Autodesk\3ds Max 2019\Plugins
- (Recommended) A custom directory for plugins that has been added in 3ds Max by the following menu:
- Restart 3ds Max
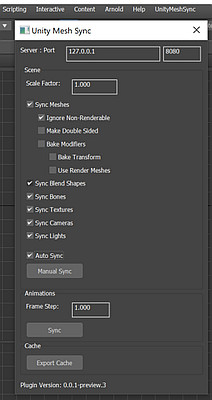
- Confirm that "UnityMeshSync" has been added to the main menu bar. The settings window can be opened by clicking "Window". > If we change the menu bar, "UnityMeshSync" will be added under Action, which > still allows us to access MeshSync features.
MotionBuilder
- Open
Packages/MeshSync DCC Plugins/Editor/Plugins~folder using a file explorer and uncompress the appropriate zip file for MotionBuilder. - Start MotionBuilder.
- Add a path for custom plugins by clicking on Settings -> Preferences -> SDK menu.
- Copy MeshSyncClientMotionBuilder.dll that corresponds to the used version of MotionBuilder into the custom plugin path.
- Restart MotionBuilder.
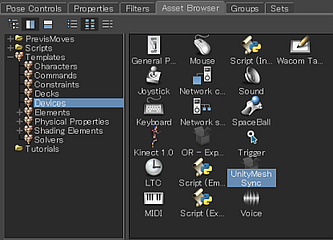
- Confirm that "UnityMeshSync" is added in the AssetBrowser under Templates -> Devices folder.
- Add "UnityMeshSync" to the scene.
- Start playing around with various MeshSync settings and features by selecting Devices -> UnityMeshSync in the Navigator.
Blender
- Open
Packages/MeshSync DCC Plugins/Editor/Plugins~folder using a file explorer and uncompress the appropriate zip file for Blender. - Start Blender
Depending on the Blender version, the installation is a bit different.
- Blender 2.79:
- Go to File -> User Preferences -> Add-ons
- Click "Install Add-on from file" at the bottom of the window, and select blender-2.79.zip file.
- Confirm that "Import-Export: Unity Mesh Sync" is added to the menu.
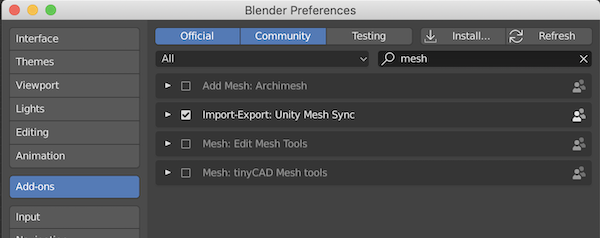
Blender 2.80 or after:
- Go to Edit -> User Preferences
- Click "Install" at the top right of the window, and select the appropriate blender-2.xx.zip file.
- Confirm that "Import-Export: Unity Mesh Sync" is added to the Add-ons tab.
- Blender 2.79:
Check "Import-Export: Unity Mesh Sync" to enable it.
- Confirm that MeshSync panel is added.

Caveat
When installing a Blender plugin, the older version has to be uninstalled first if it exists.
Steps to uninstall:
- Select "Import-Export: Unity Mesh Sync" from the Add-ons menu.
- Click "Remove" button.
- Restart Blender.
- On Mac OSX, delete the installed plugin files in the following folder:
~/Library/ApplicationSupport/Blender/2.xx/scripts/addons/MeshSyncClientBlender
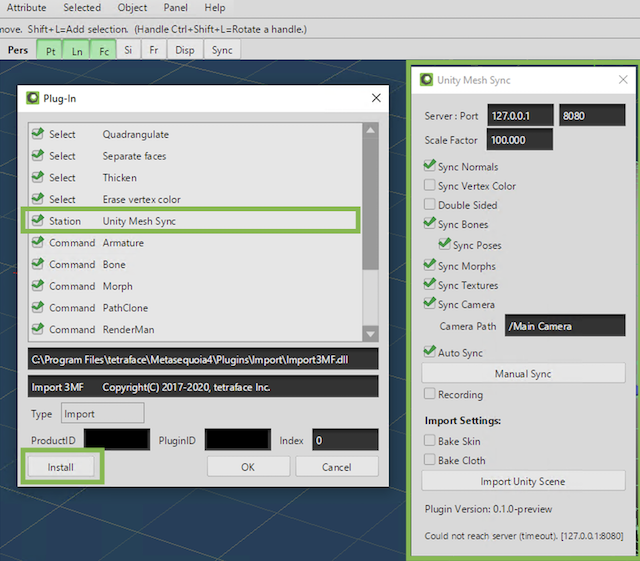
Metasequoia
- Open
Packages/MeshSync DCC Plugins/Editor/Plugins~folder using a file explorer and uncompress the appropriate zip file for Metasequoia. - Start Metasequoia.
- Go to Help -> About Plug-ins, and click "Install" at the lower left of the Plug-win window.
- Select the plugin file from the extracted zip file that corresponds to the version of Metasequoia.
For example: MeshSyncClientMQ472.plugin - Go to Panel -> Unity Mesh Sync.
If this menu doesn't exist, confirm that "Unity Mesh Sync" is checked in the Plug-in window.
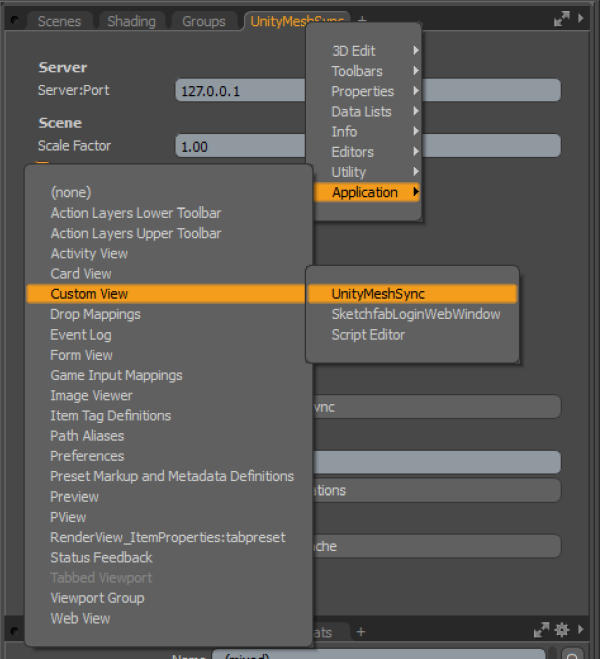
Modo
- Follow the instructions in Building Plugins
to build MeshSync plugin for Modo.
Due to Modo's licensing, manual building is required at the moment. - Start Modo.
- Go to System -> Add Plug-in, and select MeshSyncClientModo.fx for the applicable Modo version.
- Go to Modo's tabs UI, click on +, and choose Application -> Custom View -> UnityMeshSync.
- Confirm that UnityMeshSync view is added in the tabs UI.
Caveat
When installing a newer version of the plugin, the existing version must be removed first if it exists.
Steps to remove:
- Close all UnityMeshSync views.
- Restart Modo.
If installing a newer version still fails even after doing the above steps, then please try to remove manually after closing Modo.
- Windows:
- Open settings file using a text editor.
Example:C:\Users\<user_name>\AppData\Roaming\Luxology\MODO<modo_version>.CFG - Remove UnityMeshSync items like the following:
<hash type="Server" key="12345678-abcd-1234-abcd-111122223333:UnityMeshSync"> <atom type="Module">C:\ModoPlugins\Modo14\MeshSyncClientModo.lx</atom> <atom type="Direct">1</atom> </hash> - Save the settings file, and restart Modo.
- Open settings file using a text editor.