Building to devices with Unity MARS
This guide will show you how to install Unity MARS to a new Unity Project, use MARS to create a simple AR application that places a sphere on a surface, and build your application to an iOS or Android mobile device. Before getting started, make sure you have read the requirements to ensure your project meets the minimum requirements. Bear in mind that this guide is subject to change as different Unity versions come out, so make sure that you are viewing the documentation for the version of Unity MARS you have installed.
Installing MARS to a new project
To install Unity MARS you will first need to register at unity.com/products/unity-mars to gain access to the MARS Installer Asset Package, called MARS_Installer.unitypackage. The installer can be found in a download link in the welcome email you received after you signup. The installer can also be found at id.unity.com at My Account > My Seats or Organizations > "Your Organization". Initially, this installer is the only way to install MARS into a new or existing Unity project.
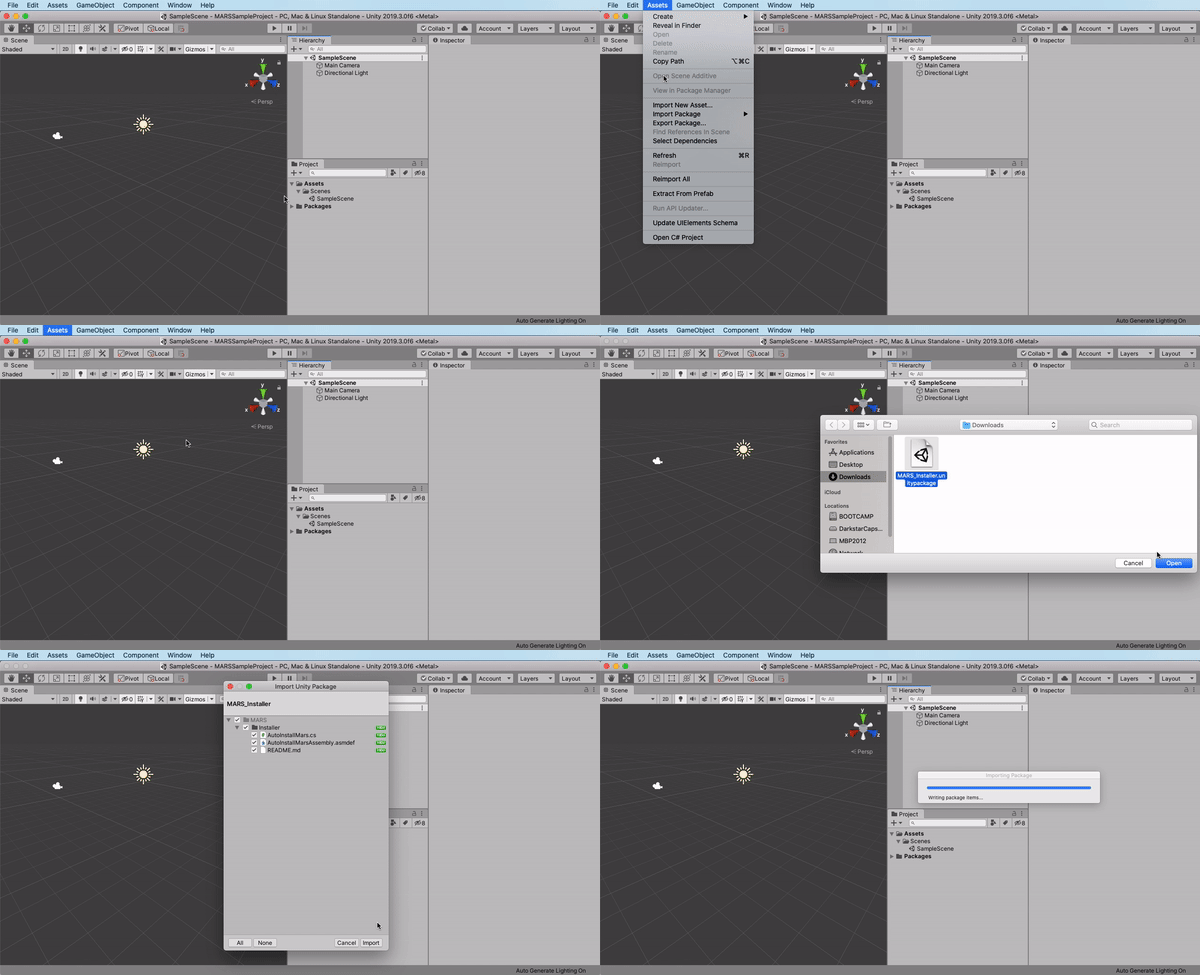
To get you started; Create a new project and import the MARS Installer .unitypackage through the Assets menu.
To import the local MARS_Install.unitypackage in Unity:
- Open the project in the Editor where you want to import the Asset package.
- Choose Assets > Import Package > Custom Package. A file browser appears, prompting you to "Import package ...".
- In the file browser, navigate to the
MARS_Install.unitypackagefile and click Open. - The Import Unity Package window displays all the items in the package already selected, ready to install.
- Do Not deselect any items before clicking Import. Unity will add the required assets and import the required packages from Unity's Package Manager, so that you can access them from your Project window
- After pressing Import it can take several minutes to add and process all the MARS assets and scripts.
Note: You will need access to a stable internet connection to download the required MARS assets from Unity's Package Manager.
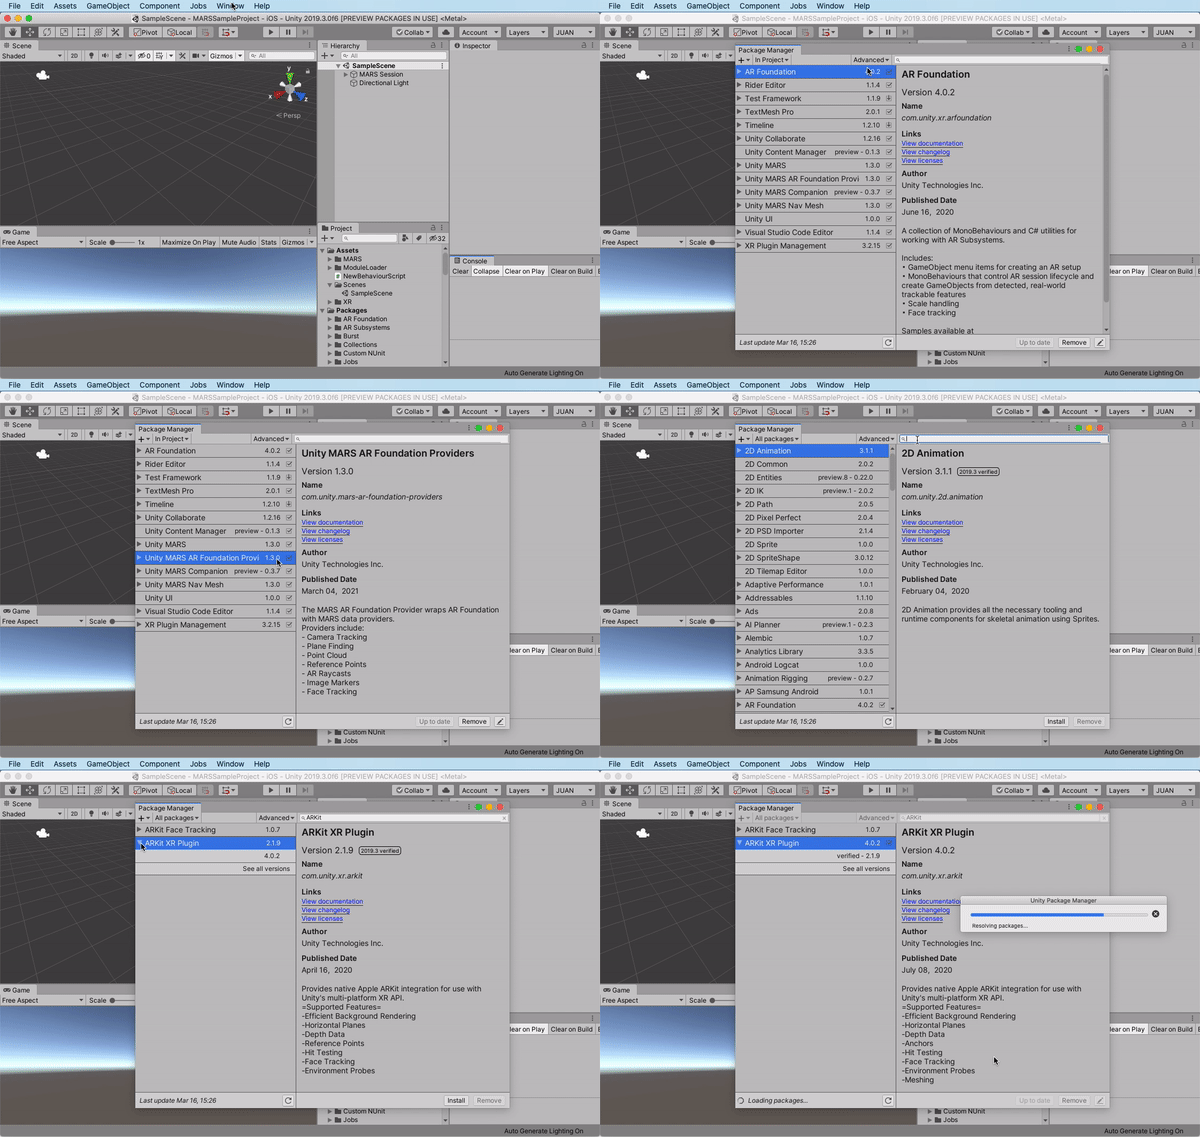
Since we are aiming to build to Android / iOS we will need an additional package: com.unity.mars-ar-foundation-providers.
To install packages in Unity, you do so through the package manager by going to Window > Package Manager and searching for the necessary packages
The com.unity.mars-ar-foundation-providers package will work with most versions of AR Foundation, starting with com.unity.xr.arfoundation@2.1.8, but does not directly depend on it. Also, depending on the platform you chose to build for, you might need ARCore (for Android builds) and / or ARKit (for iOS builds).
Finally, the version of the AR Foundation package you're using has to match with the version of ARKit and/or ARCore you are targeting, unless noted otherwise. Version mismatches will likely result in compiler errors.
For recommendations around package versions and project configuration, you can always check the MARS AR Foundation Providers package documentation.
So! Three things to check:
- Check that MARS AR Foundation Providers is installed in the package manager (if it's not installed, install it).
- Select and install ARCore (for Android builds) and/or ARKit (for iOS builds), depending on the platform(s) you plan to target your build for.
- Make sure that ARCore / ARKit versions match with ARFoundation.
Preparing Unity for making builds for Android - iOS
Now that we have MARS installed and all the necessary packages set we are ready to organize Unity for making our builds in the Build Settings Window.
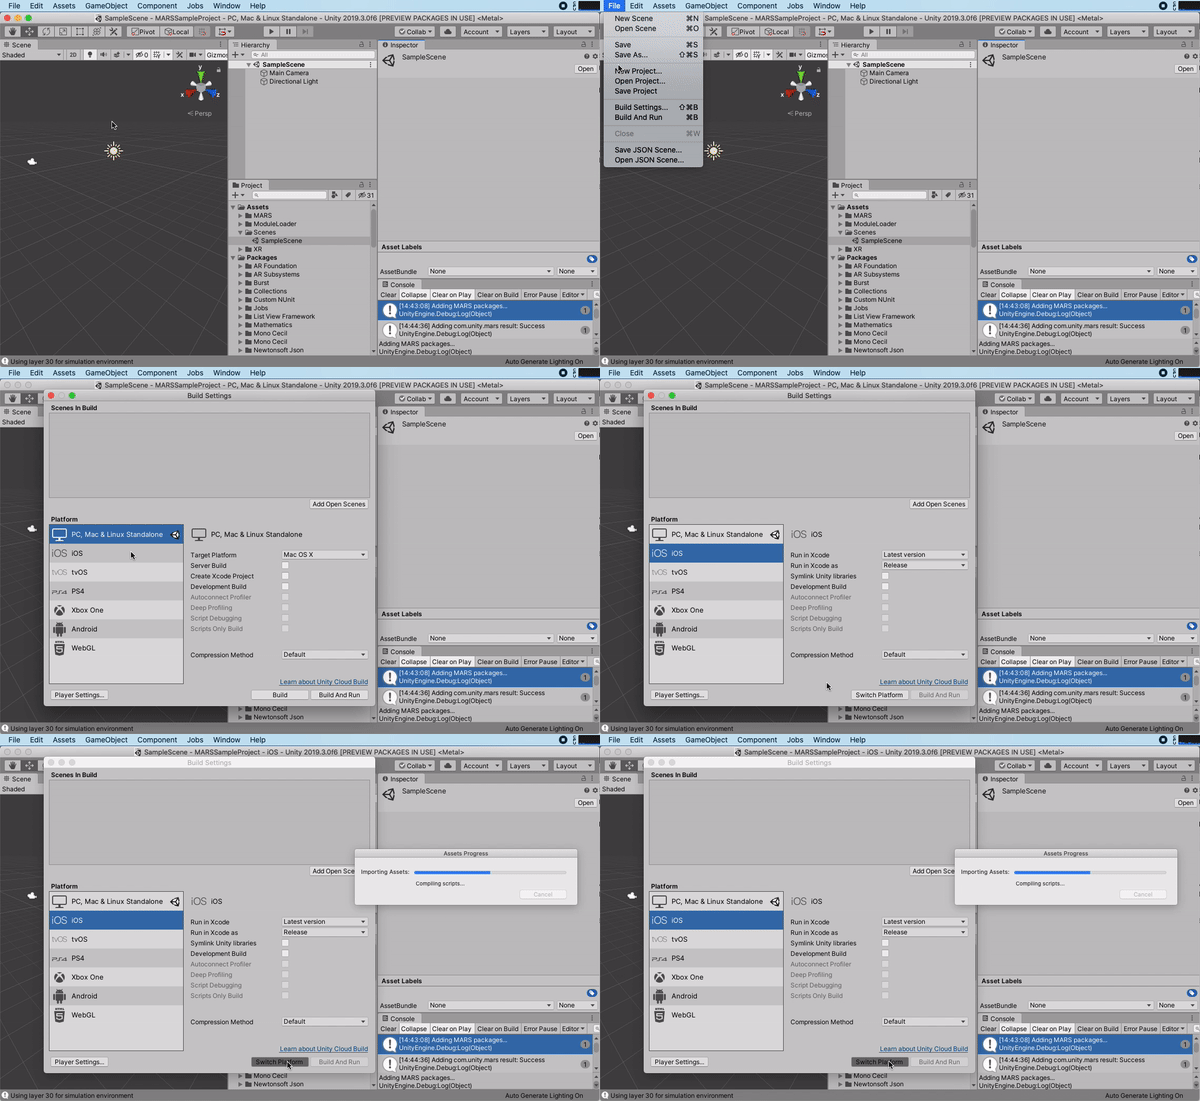
By default Unity is set to build to standalone platforms, so next we need to set the device platform we plan to build MARS to; for example, iOS or Android.
To do so, go to File > Build Settings, select the platform you plan to build for (iOS / Android), press the Switch Platform button, and wait while Unity re-imports the project for the new build target.
iOS-specific project setup for building with Unity MARS
If you are building for iOS, you will have to do some extra steps by opening the Project settings by either going to Edit > Project Settings > Player or File > Build Settings > Project Settings. Select the Other settings tab and:
- Set the name of your company and app. This is to avoid name conflicts when creating a bundle identifier in XCode.
- Set a message when asking for permissions to use the camera.
- Set the minimum version required for the version of ARFoundation you are planning to use. This is highly dependent on the version of Unity you are using, and the platform(s) you are targeting and the functionality you want to support; for more information check the ARFoundation docs on what is available and required depending on your needs.
- Set architecture to ARM64.
- In the
XR Plug-in managementsection in theProject Settingswindow, set the checkbox underARKitto enable the plugin provider.
Building Unity projects for iOS devices involves two steps:
- Unity builds an XCode project
- XCode builds said project to your device.
This guide will take you up until generating an XCode project; you can find more info about iOS build settings here
Android-specific project setup for building with Unity MARS
To build and run Android apps you must install the Unity Android Build Support platform module, the Android Software Development Kit (SDK) and the Native Development Kit (NDK).
It is recommended to use the Unity Hub to install Android Build Support and the required dependencies (Android SDK & NDK tools, and OpenJDK). For more detailed information on how to install the SDK and NDK you can follow this link here.
To setup your Unity MARS app to build on Android, follow these steps:
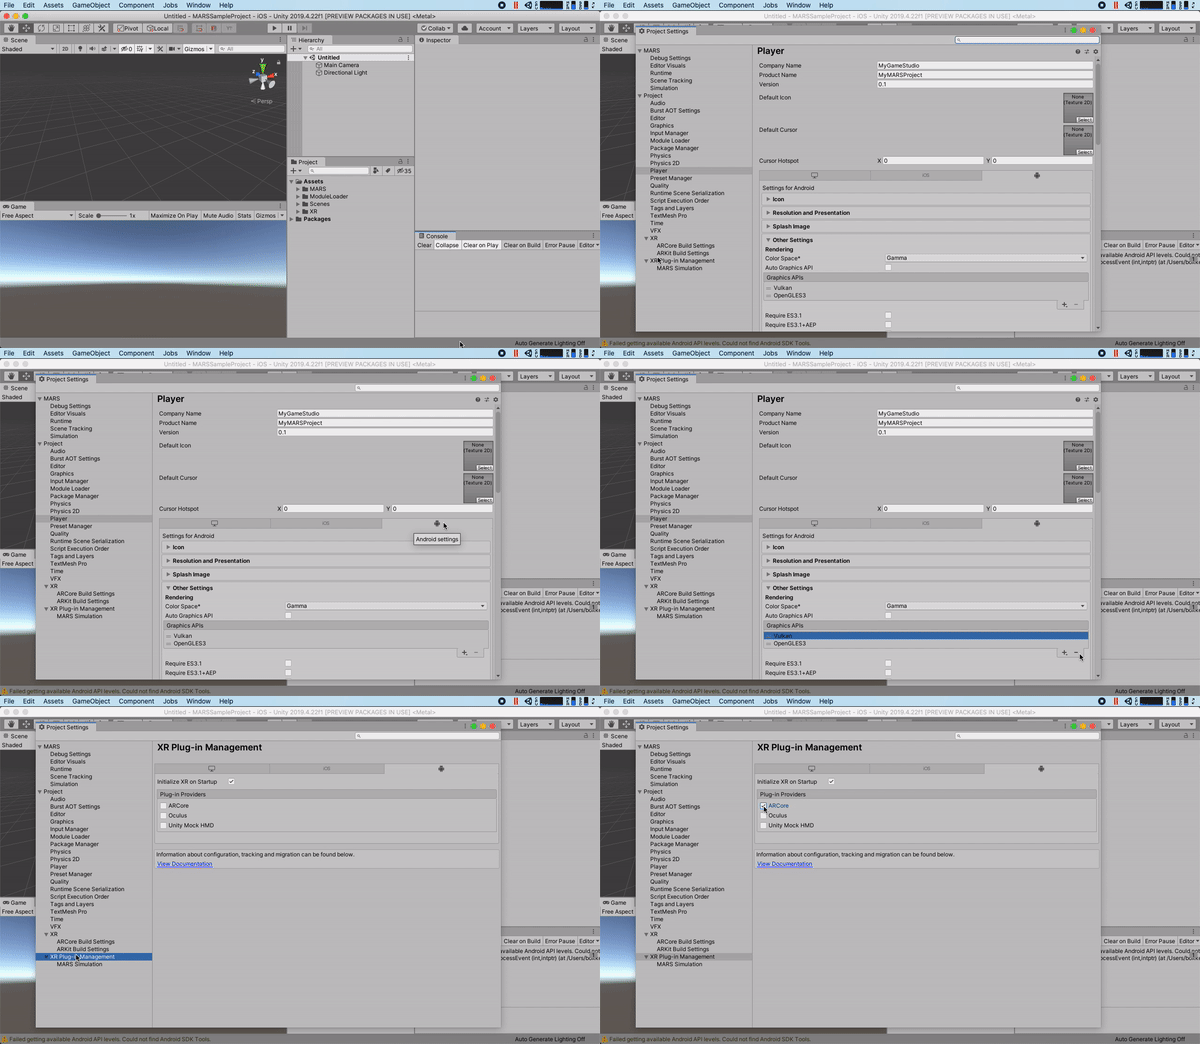
- In the Unity build settings, set your platform to
Androidby going toFile > Build Settings..., selectAndroid, and click theSwitch Platformbutton. - Enable ARCore in the
XR-Plugin managementsection in the Project Settings window by either going toEdit > Project Settings > XR-Plugin managementorFile > Build Settings > Project Settings > XR-Plugin Managementto activate the plugin provider. - Disable 'Auto Graphics API' to make sure the Vulkan Graphics API is not enabled. Go to
Edit > Project Settingsin thePlayersection on the left, in theOther Settingsfoldout under theRenderingheader. Disable Auto Graphics API. - If 'Vulkan' appears in the list of Graphics APIs under 'Auto Graphics API', select 'Vulkan' from the list and then click the '-' button in the lower right corner of the list.
Note
Android's ARCore does not currently support the Vulkan rendering APIs and will not work if 'Vulkan' is your application's graphics API.
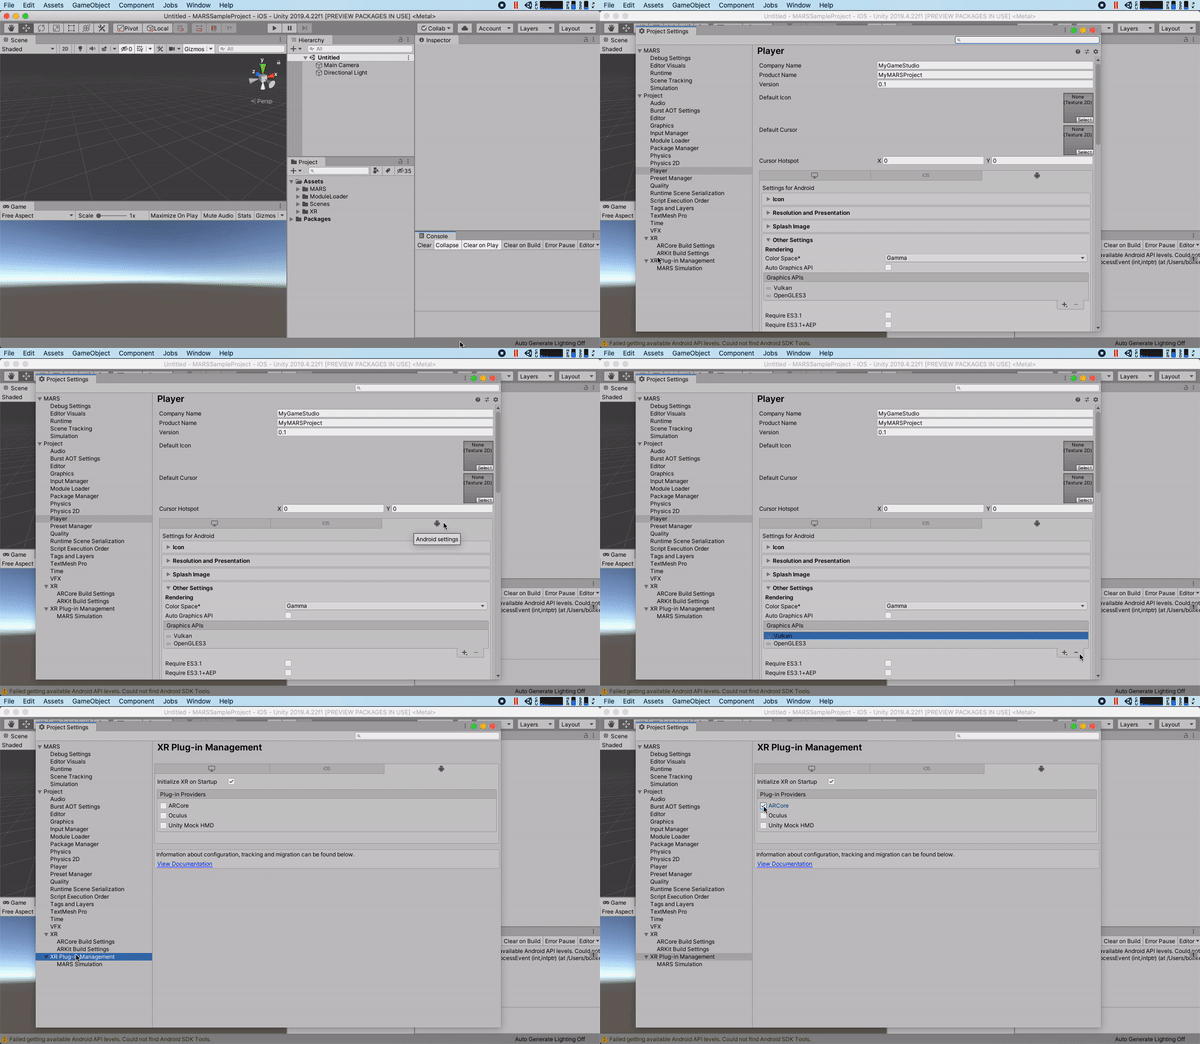
If you end up getting errors and can't enable the ARCore plugin provider, then most likely you have different ARFoundation and ARCore versions. Make sure that your ARCore package version matches the installed ARFoundation package version in Package Manager.
Creating a scene for testing on a device build
By now you should be ready to start working on your MARS application. Let's create something simple we can use to visualize on our build:
- Create a new Unity Scene by clicking on
File > New Scene - Save the scene (
File > Save as...) and call it "Sample Scene". - Create a Horizontal Plane proxy by right clicking on the
Hierarchy view > MARS > Presets > Horizontal Plane - Right click again on the created Horizontal Plane GameObject in the Hierarchy, and select
3D Object > Sphereand adjust its scale (a good scale would be around 10 cubic centimeters (0.1, 0.1, 0.1)). Make sure the sphere is a child of theHorizontal PlaneGameObject. - Create a Plane Visualizer by also right clicking in the Hierarchy view and selecting
MARS > Data Visualizers > Plane Visualizer.
You should now have a Horizontal Plane GameObject with a child GameObject Sphere, a Planes Visualizer GameObject, and a MARS Session GameObject, which should have automatically been created for you. With this scene, you will be able to see scanned surfaces, and when an horizontal plane is detected, a sphere will appear.
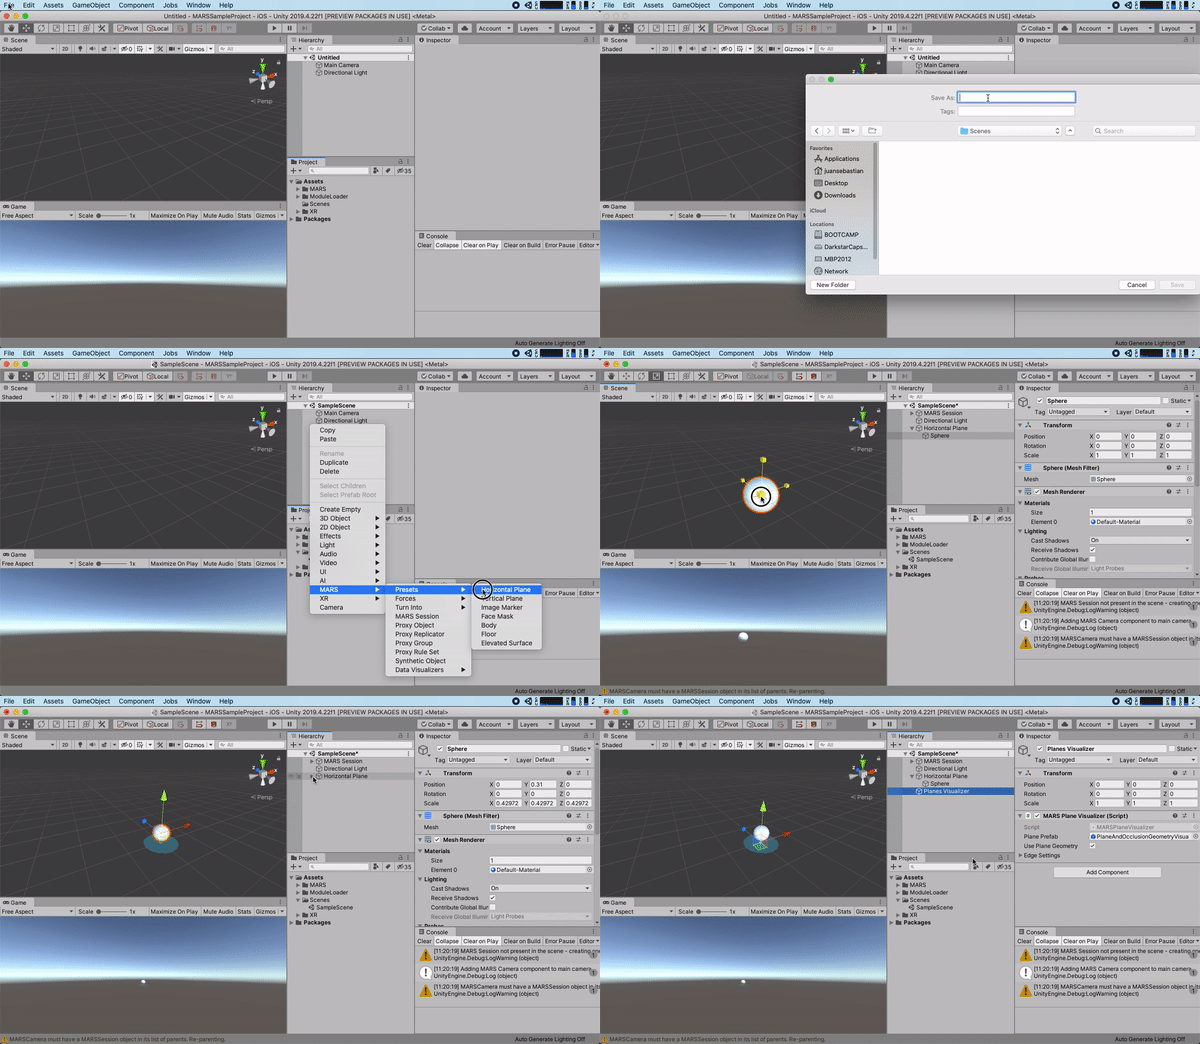
And that's it! We are ready to build the project now.
Building your project to your selected platform
Finally, depending on the platform you are targeting, you will be generating an XCode project (for iOS builds) or an apk file (for Android builds). Depending on the build target, you will have to compile the final build through XCode, or move the generated .apk file to your Android phone.
On Unity's side we just need to:
- Open the Build Settings window by going to
File > Build Settings... - Add the created scene by clicking on the
Add Open Scenesin the scenes build, or dragging the scene into the list from the Project view. - Click build.
- Follow any extra steps necessary for building to your device of choice; either build with XCode (for iOS builds) or move the generated
apkfile (for Android builds) to your device.
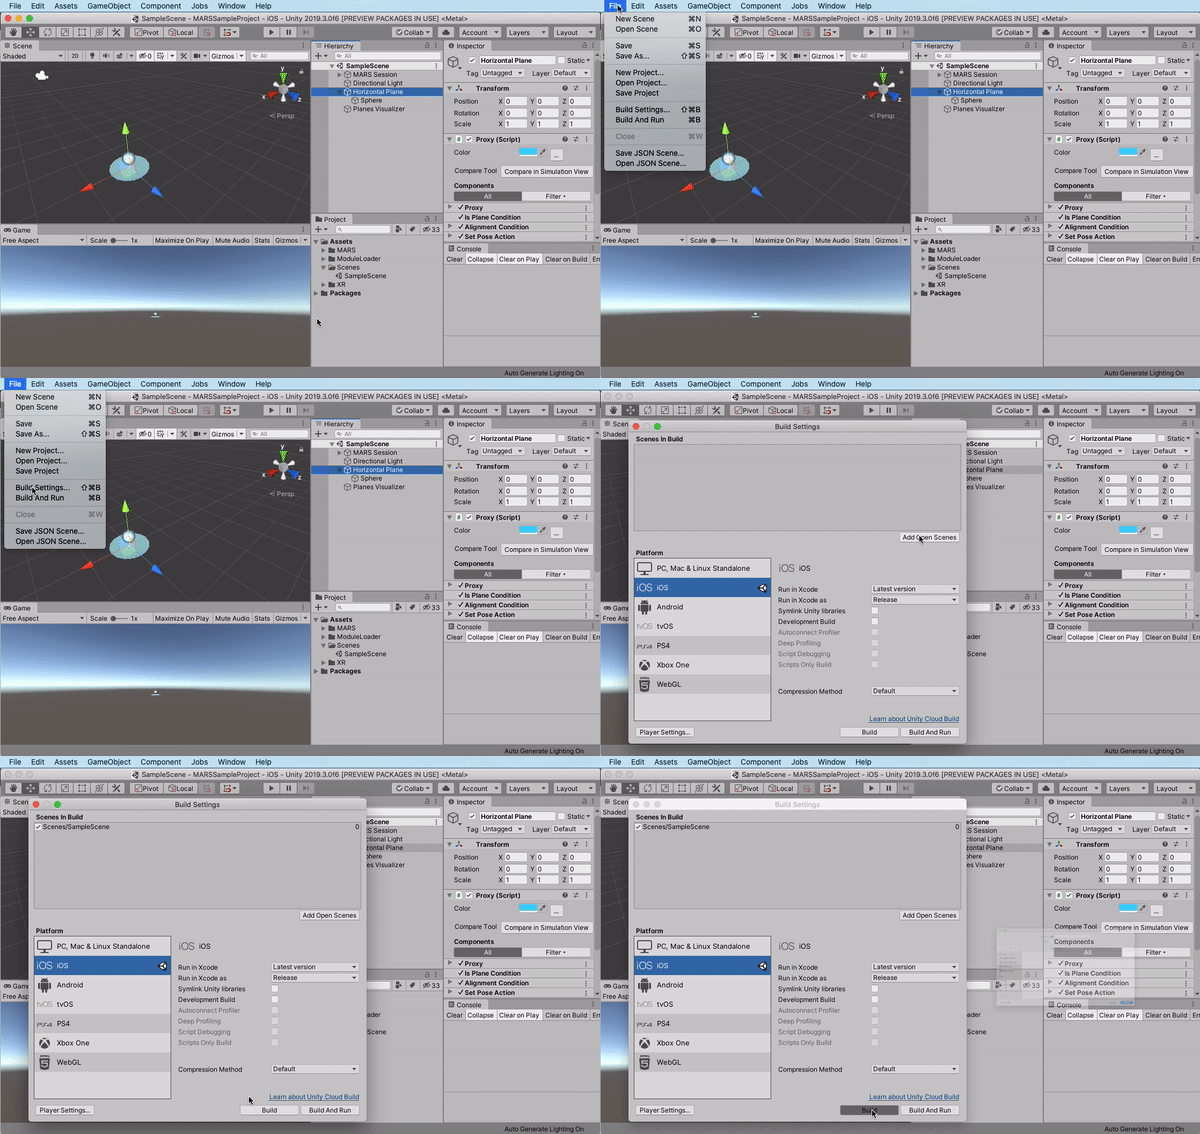
Upon starting the app, after the Unity splash screen, you should see a video stream of your camera.
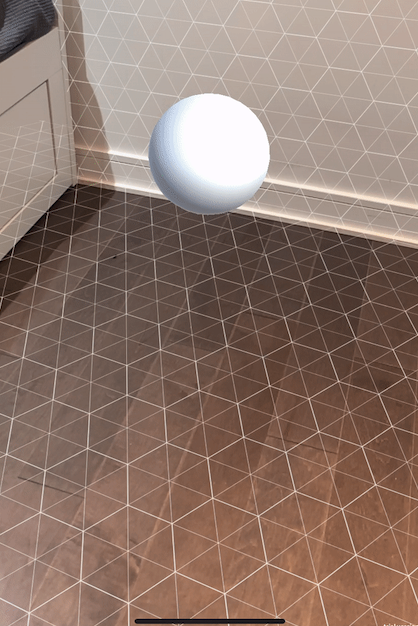
Start moving your device to scan surfaces. While doing this, you should scanned surfaces displayed with a hexagonal pattern; this is the default effect of the Plane Visualizer we added. When a horizontal plane is detected, the sphere you created as a child of the Horizontal Plane Proxy will appear as shown in the image.
Troubleshooting
If you are getting a black screen after building your project, check that you have installed these packages:
com.unity.mars-ar-foundation-providerscom.unity.xr.arfoundation
And one or both of the following:
com.unity.xr.arkitcom.unity.xr.arcore
If you are still seeing a black screen, please refer to the FAQ for some common causes. If you followed this step by step guide you should not have any problems.
If you are seeing several compile errors, make sure your ARFoundation, ARCore and / or ARKit packages have the same major and minor versions and that you are using a version of Unity that supports that version of AR Foundation. Note that some issues can be caused by using ARFoundation in older Unity 2019.4 versions.
If you have errors when generating a build, check that the version you have specified for ARCore / ARKit is supported by the SDK version. Otherwise, you will not be able to build to your devices.