Get started with the Localization package
Set up localization with the built-in Localization package, then use the features this package adds on top.
Key concepts
Before you start, understand how the built-in package and this package work together:
- The built-in package and this package: Unity 6.7 and later include Localization Runtime, the built-in Localization package. It provides the localization settings, locales, tables, and the preview locale dropdown. The
com.unity.localizationpackage adds features on top, such as the Addressables content source, CSV and XLIFF formats, Google Sheets sync, and component localizers. - Two kinds of Localization Settings: The built-in package and this package each have their own Localization Settings. New projects use the built-in settings. A project created with Localization package 1.x keeps the package's settings until you run the upgrade wizard. Some features, such as localized property variants, only work with the package's settings.
- Resource Table Collections and String and Asset Table Collections: The built-in package stores strings and assets together in Resource Table Collections, which you edit in the Resource Tables window. This package has separate String Table Collections and Asset Table Collections. Pages that document them apply to projects that use the package's settings.
Set up the project
Setup, locales, tables, and the preview locale dropdown come from the built-in package. Follow Get started with localization in the Unity Manual to:
- Create the Localization settings (Edit > Project Settings > Localization).
- Add the locales you want to support.
- Create a table collection and add a key with a value per locale.
- Reference the localized value from a component or script.
- Preview another locale using the toolbar's preview locale dropdown.
Projects without the built-in package
The built-in package is part of Unity 6.7 and later. In an earlier Unity version, or if you remove the built-in package from a project, Project Settings > Localization shows this package's own settings page instead. Select Create to make the package's Localization Settings. Then refer to Localization Settings and Localization Tables window to add locales and tables.
What this package adds
With com.unity.localization installed, the built-in package gains the following.
Addressables content source
When you create the Localization settings, choose Addressables as the reference mode to store collections and assets through Addressables instead of direct references. To switch later, add Addressables to the Content sources list in Project Settings > Localization. Refer to Content sources.
Import and export translations
Open Window > Localization > Resource Tables and select a collection, then use Import or Export.
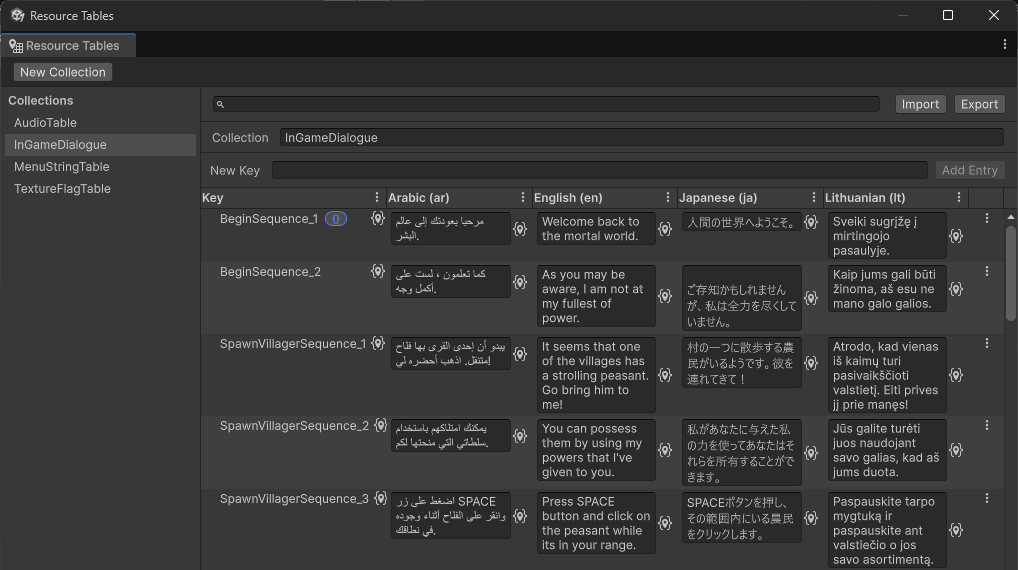
Alongside the built-in JSON and Character Set formats, this package adds:
- CSV, for sending translations to a translator through a spreadsheet.
- XLIFF, for translation tools that accept the XLIFF standard.
- Google Sheets, to keep a collection synced with a spreadsheet. Add a Google Sheets Resource Extension through the collection's Extensions field, assign a Sheets Service Provider, and enter a Spreadsheet Id or select Create New Spreadsheet. Then use Push To Google Sheets or Pull From Google Sheets on the collection's context menu.
Refer to Import and export table collections for the Resource Tables window's import and export menus. The CSV, XLIFF, and Google Sheets pages describe the package's own String Table Collections, in projects that use the package's Localization Settings.
Component localizers
Right-click a Text, Image, RawImage, Dropdown, TextMeshProUGUI, TMP_Dropdown, or AudioSource component and select Localize. Unity adds a component that updates the property when the locale changes. Refer to Component Localizers.
Localized property variants
Property variants need the package's Localization Settings, so they work in projects made with Localization package 1.x, before and after you upgrade. In a project set up only with the built-in package, the Localization Scene Controls window shows no controls.
To change a component directly in the Inspector or Scene view per locale instead of writing a component localizer, open Window > Asset Management > Localization Scene Controls, set the active locale to one other than the project locale, and enable Track Changes. Changes you make are recorded as variants on a GameObject Localizer component and reapplied when the locale changes. Refer to Localized Property Variants.
The String Table and Asset Table fields in Localization Scene Controls only accept the package's String and Asset Table Collections, not Resource Table Collections.
Upgrade a project made with an earlier package version
A project created with Localization package 1.x keeps the package's own Localization Settings page until you run the upgrade wizard. Open Project Settings > Localization and select Upgrade… to convert its table collections to the built-in package. For the full steps, what the wizard changes, and what to do afterward, refer to Upgrade guides.