Get started with screen reader support
The screen reader support APIs are agnostic of the UI system, so they work with UI Toolkit, uGUI, custom UI frameworks, and non-UI content such as 2D or 3D objectsA 3D GameObject such as a cube, terrain or ragdoll. More info
See in Glossary in the game world. For simplicity, this guide uses UI Toolkit, but you can adapt the code to your UI framework of choice.
Example overview
This example illustrates how to create an accessibility node, connect it to a UI Toolkit button, and test it with platform screen readers. By the end, you’ll have a button that native screen readers can read and activate.
Prerequisites
This guide is for developers familiar with the Unity Editor, UI Toolkit, and C# scripting. Before you start, get familiar with the following:
Enable the Accessibility module
The Accessibility module is enabled by default. If for some reason it’s not enabled in your project, do the following to enable it:
- Select Window > Package Management > Package Manager to open the Package Manager.
- Select the Built-in section.
- Select the Accessibility module.
- Select Enable.
Create the button
Use UI Toolkit to create a Start Game button in your sceneA Scene contains the environments and menus of your game. Think of each unique Scene file as a unique level. In each Scene, you place your environments, obstacles, and decorations, essentially designing and building your game in pieces. More info
See in Glossary.
Create a project with any template.
-
Create a UXML file named
AccessibleStartMenu.uxmlwith the following content:<ui:UXML xmlns:xsi="http://www.w3.org/2001/XMLSchema-instance" xmlns:ui="UnityEngine.UIElements" xmlns:uie="UnityEditor.UIElements" noNamespaceSchemaLocation="../../../UIElementsSchema/UIElements.xsd" editor-extension-mode="False"> <ui:Button text="Start Game" name="startButton"/> </ui:UXML> Create a C# script named
AccessibleStartMenu.cswith the following content:
using UnityEngine;
using UnityEngine.UIElements;

public class AccessibleStartMenu : MonoBehaviour
{
    Button m_Button;

    void OnEnable()
    {
        VisualElement root = GetComponent<UIDocument>().rootVisualElement;
        m_Button = root.Q<Button>("startButton");

        m_Button.clicked += OnButtonClicked;
    }

    void OnDisable()
    {
        m_Button.clicked -= OnButtonClicked;
    }

    void OnButtonClicked()
    {
        Debug.Log("Start Game button clicked");
    }
}
Create the accessibility hierarchy
The accessibility hierarchy is a semantic representation of your UI that screen readers use to discover and interact with your content. Screen readers cannot detect GameObject components or UI elements directly. They rely on this hierarchy to navigate your application. You create an AccessibilityHierarchy, then add an AccessibilityNode that represents the Start Game button.
To create the accessibility hierarchy:
- Add the
UnityEngine.Accessibilitynamespace. - Create an
AccessibilityHierarchyinstance. - Create and add an
AccessibilityNodeto the accessibility hierarchy. - Set the
label,role, andstateproperties of the node according to the button’s text and interactable state.
// ...
using UnityEngine.Accessibility;

public class AccessibleStartMenu : MonoBehaviour
{
    // ...

    AccessibilityHierarchy m_AccessibilityHierarchy;
    AccessibilityNode m_AccessibilityNode;

    void OnEnable()
    {
        // ...

        CreateAccessibilityHierarchy();
    }

    // ...

    void CreateAccessibilityHierarchy()
    {
        // Create a new accessibility hierarchy.
        m_AccessibilityHierarchy = new AccessibilityHierarchy();

        // Create a new accessibility node with the button's text as the label
        // (what the screen readers announces).
        m_AccessibilityNode = m_AccessibilityHierarchy.AddNode(m_Button.text);

        // Set a semantic role (tells the screen reader this is a button).
        m_AccessibilityNode.role = AccessibilityRole.Button;

        // Set the state (is it currently interactable?).
        m_AccessibilityNode.state = m_Button.enabledSelf ?
            AccessibilityState.None : AccessibilityState.Disabled;
    }
}
Set the node’s screen coordinates according to the button’s size and position
To set the node’s screen coordinates:
- Track the button’s changes in size and position.
- Calculate its screen coordinates from its world coordinates and the UI scale factor.
- Set the node’s
frameproperty to the calculated screen rectangle.
Update the AccessibleStartMenu.cs script as below:
public class AccessibleStartMenu : MonoBehaviour
{
    // ...

    void OnEnable()
    {
        // ...

        m_Button.RegisterCallback<GeometryChangedEvent>(OnGeometryChanged);
    }

    void OnDisable()
    {
        // ...

        m_Button.UnregisterCallback<GeometryChangedEvent>(OnGeometryChanged);
    }

    // ...

    void OnGeometryChanged(GeometryChangedEvent evt)
    {
        Rect worldRect = m_Button.worldBound;
        float scale = m_Button.panel.scaledPixelsPerPoint;

        // Update the screen coordinates of the node.
        m_AccessibilityNode.frame =
            new Rect(worldRect.position * scale, worldRect.size * scale);
    }
}
Connect the node’s activation event to the button
Subscribe to the node’s invoked event, which is triggered when the user activates the node via the screen reader, then invoke the button’s NavigationSubmitEvent in the event handler.
Update the CreateAccessibilityHierarchy method in the AccessibleStartMenu.cs script as below:
public class AccessibleStartMenu : MonoBehaviour
{
    // ...

    void CreateAccessibilityHierarchy()
    {
        // ...

        // Handle when the user activates this node (e.g., double-tap).
        // Called `selected` in versions before Unity 6.3.
        m_AccessibilityNode.invoked += () =>
        {
            using var evt = NavigationSubmitEvent.GetPooled();
            evt.target = m_Button;
            m_Button.SendEvent(evt);

            return true;
        };
    }
}
Activate the accessibility hierarchy when a screen reader is enabled
- When the menu appears, activate the accessibility hierarchy by assigning it to
AssistiveSupport.activeHierarchy.- When the user turns the screen reader off,
AssistiveSupport.activeHierarchyis automatically set tonullto free resources.
- When the user turns the screen reader off,
- Re-assign the hierarchy every time the user turns the screen reader on.
- When the menu disappears, remove the hierarchy by setting
AssistiveSupport.activeHierarchytonull.
public class AccessibleStartMenu : MonoBehaviour
{
    // ...

    void OnEnable()
    {
        // ...

        AssistiveSupport.activeHierarchy = m_AccessibilityHierarchy;
        AssistiveSupport.screenReaderStatusChanged += OnScreenReaderStatusChanged;
    }

    void OnDisable()
    {
        // ...

        AssistiveSupport.activeHierarchy = null;
        AssistiveSupport.screenReaderStatusChanged -= OnScreenReaderStatusChanged;
    }

    // ...

    void OnScreenReaderStatusChanged(bool enabled)
    {
        if (enabled)
        {
            AssistiveSupport.activeHierarchy = m_AccessibilityHierarchy;
        }
        // else
        // {
        //     // This is automatically done when the user turns the screen
        //     // reader off.
        //     AssistiveSupport.activeHierarchy = null;
        // }
    }
}
You created a semantic representation (AccessibilityNode) of the visual button that screen readers can discover and interact with.
The complete AccessibleStartMenu.cs script is as follows:
using UnityEngine;
using UnityEngine.Accessibility;
using UnityEngine.UIElements;

public class AccessibleStartMenu : MonoBehaviour
{
    Button m_Button;

    AccessibilityHierarchy m_AccessibilityHierarchy;
    AccessibilityNode m_AccessibilityNode;

    void OnEnable()
    {
        VisualElement root = GetComponent<UIDocument>().rootVisualElement;
        m_Button = root.Q<Button>("startButton");

        m_Button.clicked += OnButtonClicked;
        m_Button.RegisterCallback<GeometryChangedEvent>(OnGeometryChanged);

        CreateAccessibilityHierarchy();

        AssistiveSupport.activeHierarchy = m_AccessibilityHierarchy;
        AssistiveSupport.screenReaderStatusChanged += OnScreenReaderStatusChanged;
    }

    void OnDisable()
    {
        m_Button.clicked -= OnButtonClicked;
        m_Button.UnregisterCallback<GeometryChangedEvent>(OnGeometryChanged);

        AssistiveSupport.activeHierarchy = null;
        AssistiveSupport.screenReaderStatusChanged -= OnScreenReaderStatusChanged;
    }

    void CreateAccessibilityHierarchy()
    {
        // Create a new accessibility hierarchy.
        m_AccessibilityHierarchy = new AccessibilityHierarchy();

        // Create a new accessibility node with the button's text as the label
        // (what the screen readers announces).
        m_AccessibilityNode = m_AccessibilityHierarchy.AddNode(m_Button.text);

        // Set a semantic role (tells the screen reader this is a button).
        m_AccessibilityNode.role = AccessibilityRole.Button;

        // Set the state (is it currently interactable?).
        m_AccessibilityNode.state = m_Button.enabledSelf ?
            AccessibilityState.None : AccessibilityState.Disabled;

        // Handle when the user activates this node (e.g., double-tap).
        // Called `selected` in versions before Unity 6.3.
        m_AccessibilityNode.invoked += () =>
        {
            using var evt = NavigationSubmitEvent.GetPooled();
            evt.target = m_Button;
            m_Button.SendEvent(evt);

            return true;
        };
    }

    void OnGeometryChanged(GeometryChangedEvent evt)
    {
        Rect worldRect = m_Button.worldBound;
        float scale = m_Button.panel.scaledPixelsPerPoint;

        // Update the screen coordinates of the node.
        m_AccessibilityNode.frame =
            new Rect(worldRect.position * scale, worldRect.size * scale);
    }

    void OnButtonClicked()
    {
        Debug.Log("Start Game button clicked");
    }

    void OnScreenReaderStatusChanged(bool isEnabled)
    {
        if (isEnabled)
        {
            AssistiveSupport.activeHierarchy = m_AccessibilityHierarchy;
        }
        // else
        // {
        //     // This is automatically done when the user turns the screen
        //     // reader off.
        //     AssistiveSupport.activeHierarchy = null;
        // }
    }
}
Attach the script
To attach the script to your scene:
- Create an empty
GameObjectin your scene and name itAccessibleStartMenu. - Add a
UI Documentcomponent to theGameObject. - Create a Panel Settings Asset and assign it to the
Panel Settingsfield in the InspectorA Unity window that displays information about the currently selected GameObject, asset or project settings, allowing you to inspect and edit the values. More info
See in Glossary window of theUI Documentcomponent. - Assign the
AccessibleStartMenu.uxmlfile to theSource Assetfield. - Add the
AccessibleStartMenu.csscript to theGameObject.
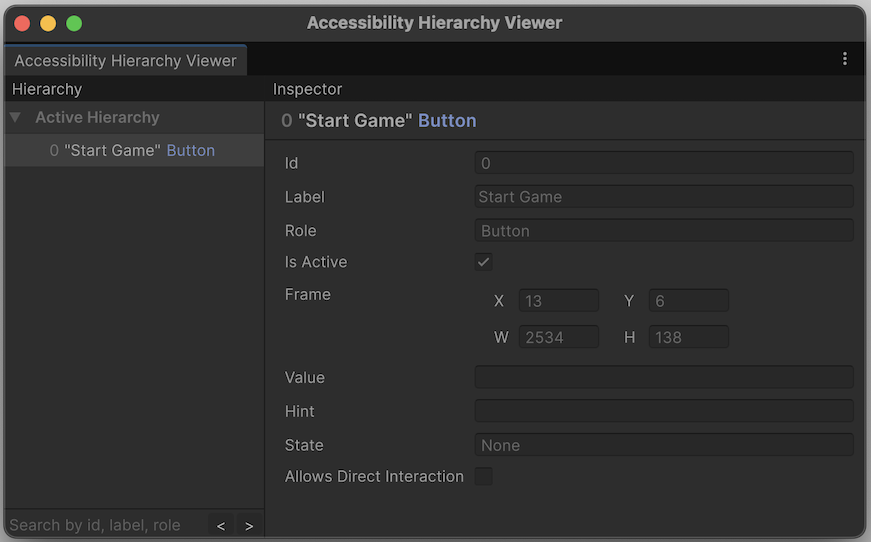
Test the hierarchy and node properties in Play mode
To test the hierarchy and node properties in the Unity Editor:
- Enter Play mode.
- Select Window > Accessibility > Hierarchy Viewer.
- Verify that the accessibility hierarchy shows the accessibility node with the correct properties.
Test the screen reader interaction on your target platform
To test screen reader interaction on your target platform:
- Build and run the application on your target platform (Android, iOS, Windows, or macOS).
- Get familiar with the gestures or commands of your platform’s built-in screen reader:
- Android: TalkBack gestures on Android
- iOS: VoiceOver gestures on iPhone
- Windows: Narrator commands on Windows
- macOS: VoiceOver commands on Mac
- Enable the screen reader.
- Navigate to the button using screen reader gestures or commands. The screen reader should be able to focus on the button and announce “Start Game, button”.
- Activate the button using the screen reader’s activation gesture or command. The button should respond, and the text “Start Game button clicked” should appear in the player logThe .log file created by a Standalone Player that contains a record of events, such as script execution times, the compiler version, and AssetImport time. Log files can help diagnose problems. More info
See in Glossary.
Additional resources
- Documentation: Accessibility module API reference
- Video: Reach new audiences with Accessibility and Localization in Unity 6 (Unite 2025)
- Sample project: LetterSpell: example of an accessible Unity application
- Community: Unity Discussions: Accessibility