Make a GameObject compatible with 2D lights in URP
Make a shader or a visual effect graph compatible with 2D lights in the Universal Render Pipeline (URP).
By default, sprites and tiles you drag into the Scene view use the Sprite-Lit-Default shader, which is already compatible with 2D lights.
To manually set a sprite to use the Sprite-Lit-Default shader, follow these steps:
- Select the sprite GameObject in the Hierarchy window.
- In the Inspector window, in the Sprite Renderer component, select the Material picker (⊙).
- Select the Sprite-Lit-Default material.
Create a custom shader that reacts to 2D light
To create a custom shader that reacts to 2D lights, use Shader Graph.
Follow these steps:
In the Assets menu, go to Create > Shader Graph > URP > Sprite Lit Shader Graph.
Open the newly created shader graph asset.
Add three Sample Texture 2D nodes to the shader graph.
Set the Type of one of the new nodes to Normal.
-
Connect the outputs of the nodes to the following Fragment context input slots:
- First Default type node: Connect RGBA to Base Color, then connect A to Alpha.
- Second Default type node: Connect RGBA to Sprite Mask.
- Normal type node: Connect RGBA to Normal (Tangent Space).
- Create three Texture 2D properties by selecting Add (+) on the Blackboard, then choosing Texture 2D:
-
Main Texture
MainTex: Defines the base color and transparency (alpha) of the sprite. -
Mask Texture
MaskTex: Determines areas of the sprite that should be visible or hidden using a custom mask. -
Normal Map
NormalMap: Adds surface details by simulating bumps and grooves, enhancing lighting effects on the sprite.
-
Main Texture
Drag each property into the shader graph workspace and connect them to the Texture input slots in the corresponding Sample Texture 2D nodes.
-
Select Save Asset to save the shader.
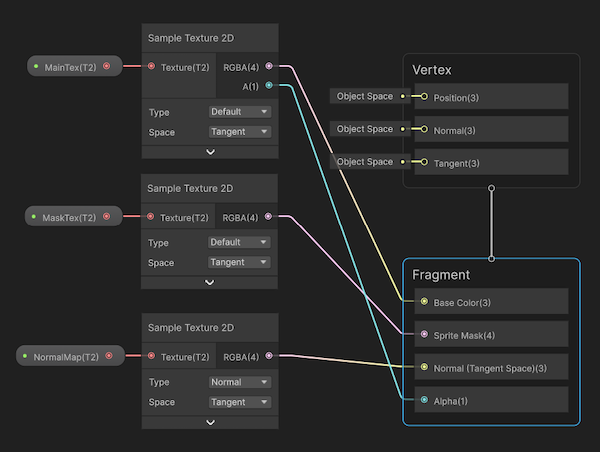
A shader graph that enables 2D sprites to react to lighting. Three textures are connected to three Sample Texture 2D nodes. The third node has a type of Normal. The nodes are connected to the inputs of the Fragment context.
You can now apply the shader graph to a material and use it on sprites in a scene, allowing sprites to interact with 2D lights.
Create a visual effect graph that reacts to 2D light
To create a visual effect graph that reacts to 2D light, follow these steps:
- Create a visual effect graph and select the Simple Loop template.
- In the visual effect graph, replace the Output Particle Unlit node with an Output Particle Shader Graph Quad node.
- In the Output Particle Shader Graph Quad node, select the Shader Graph picker (⊙).
- In the Select Shader Graph Vfx Asset window, select the eye icon to show hidden packages.
- Select the VFXSpriteLit shader.
For more information, refer to Using a Shader Graph in a visual effect.