Reducing the file size of a build
Keeping the file size of your built application to a minimum is important to ensure that it doesn’t take up too much space on the end device, or to meet size requirements when submitting your application to online stores.
Suggestions for reducing build size
The following settings and features impact the size of a build:
| Feature | Resolution |
|---|---|
| Compressed texture formatsA file format for handling textures during real-time rendering by 3D graphics hardware, such as a graphics card or mobile device. More info See in Glossary |
Refer to Choose a GPU texture format by platform. |
| Compressed meshes | Refer to Configure mesh compression. |
| Compressed animation clipsAnimation data that can be used for animated characters or simple animations. It is a simple “unit” piece of motion, such as (one specific instance of) “Idle”, “Walk” or “Run”. More info See in Glossary |
Refer to Animation properties. |
| Strip unreferenced code | Refer to Configure managed code stripping. |
| .NET library size | Using .NET Standard as the API Compatibility Level restricts you to a smaller subset of the .NET API, which can help keep size down. |
| Built-in physics modules | Disable com.unity.modules.physics and com.unity.modules.physics2d in the Package Manager window if your project doesn’t use them.Note: If you use local volumes in your project, keep the com.unity.modules.physics module enabled for these volumes to work. |
Tools to analyze build size
Unity has the following tools for analyzing the size of a build.
Build Report Inspector
Use the Build Report Inspector package to add an InspectorA Unity window that displays information about the currently selected GameObject, asset or project settings, allowing you to inspect and edit the values. More info
See in Glossary to the BuildReport file that Unity generates when it creates a build. The build report file is located at Library/LastBuild.buildreport. The package uses the BuildReport API to create the Inspector window. It displays information such as the build steps, and assets in the build.
Editor logs
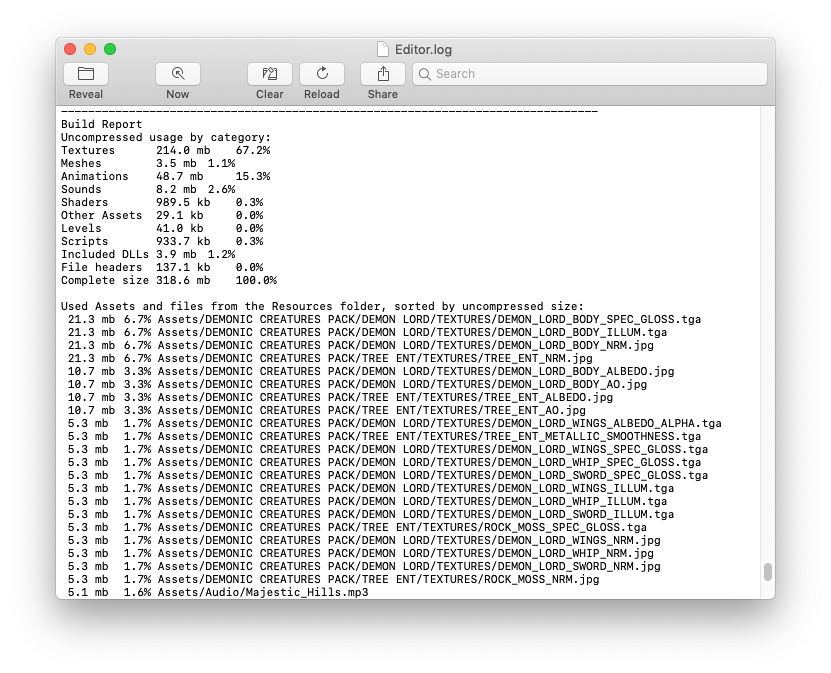
You can inspect the Editor log after you perform a build to determine which assets were the largest in the build. To open the log:
- Open the Console window (Window > General > ConsoleAbbreviation of game console
See in Glossary). - Select the More menu (⋮) and select Open Editor Log.

The Editor log provides a summary of assets broken down by type, and then lists all the individual assets in order of size contribution. Typically, assets like textures, sounds, and animations take up the most storage. ScriptsA piece of code that allows you to create your own Components, trigger game events, modify Component properties over time and respond to user input in any way you like. More info
See in Glossary, scenesA Scene contains the environments and menus of your game. Think of each unique Scene file as a unique level. In each Scene, you place your environments, obstacles, and decorations, essentially designing and building your game in pieces. More info
See in Glossary, and shadersA program that runs on the GPU. More info
See in Glossary usually have the smallest impact. The File headers in the list are extra data added to asset files to store references and settings. The headers normally make very little difference to asset size, but the value might be large if you have many large assets in the Resources folder.
The Editor Log helps you to identify assets that you might want to remove or optimize, but consider the following before you start:
- Unity re-codes imported assets into its own internal formats, so the choice of source asset type isn’t relevant. For example, if you have a multi-layer texture
.psdfile in the project, Unity flattens and compresses it before building. Exporting the texture as a.pngfile doesn’t make any difference to build size. - Unity includes assets that are referenced in your project and strips any unused assets during the build process, so you don’t need to manually remove assets from the project. The only assets that aren’t removed are assets in the
Resourcesfolder. Unity includes all assets in theResourcesfolder in a build, so it’s important to ensure that all assets in theResourcesfolder are ones used in your application.