Analyze a render graph in URP
To analyze a render graph, use the Render Graph Viewer window.
The Render Graph Viewer window displays a render graph, which is the optimized sequence of render passes the Universal Render Pipeline (URP) steps through each frame. The Render Graph Viewer displays both built-in render passes and any custom render passes you create.
For more information about the Render Graph Viewer window, refer to Render Graph Viewer window reference.
You can also use the following windows to analyze a render graph:
Open the Render Graph Viewer window
Go to Window > Analysis > Render Graph Viewer.
The Render Graph Viewer window displays the render graph for the active camera by default. To select another camera, use the dropdown in the toolbar.
View the render graph for a build
To connect the Render Graph Viewer window to a build, enable Development Build in the Build Profiles window when you build the project. If you build for WebGL or Universal Windows Platform (UWP), enable both Development Build and Autoconnect Profiler.
After you build your project, follow these steps:
- Run your built project.
- In the Render Graph Viewer window, select the Target Selection dropdown. The dropdown is set to Editor by default.
- In the Local section, select your build.
Your build appears in the Local section only if the build is running.
Example: Check how URP uses a resource
You can use the resource access blocks next to a resource name to check how the render passes use the resource.
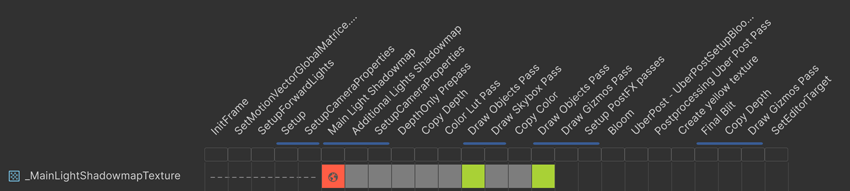
In this example, the _MainLightShadowmapTexture_ texture goes through the following stages:
During the first five render passes between InitFrame and SetupCameraProperties, the texture doesn’t exist. The resource access blocks are dotted lines.
-
The Main Light Shadowmap render pass creates the texture as a global texture, and has write-only access to it. The resource access block is red. For more information about global textures, refer to Transfer textures between passes.
The blue merge bar below Main Light Shadowmap means URP merged Main Light Shadowmap, Additional Lights Shadowmap and SetupCameraProperties into a single render pass.
The next five render passes don’t have access to the texture. The resource access blocks are gray.
The first Draw Objects render pass has read-only access to the texture. The resource access block is green.
The next two render passes don’t have access to the texture. The resource access blocks are gray.
The second Draw Objects render pass has read-only access to the texture. The resource access block is green.
Unity destroys the texture, because it’s no longer needed. The resource access blocks are blank.
Check how URP optimized a render pass
To check the details of a render pass, for example to find out why it’s not a native render pass or a merged pass, do either of the following:
- Select the render pass name to display the details in the Pass List.
- Below the render pass name, hover your cursor over the gray, blue, or flashing blue resource access overview block.
For more information about displaying details of a render pass, refer to Render Graph Viewer window reference.