Create a World Space UI
To create a World Space UI, set the render mode of the Panel Settings asset to World Space.
In a World Space UI, you can position, rotate, and scale UI elements just like any other 2D or 3D objectA 3D GameObject such as a cube, terrain or ragdoll. More info
See in Glossary. This is useful for displaying interactive UI elements, such as health bars or labels, directly in the game world, tied to objects or characters.
Set the resolution
You need to decide what’s the resolution of the World Space UI. You set this in the Pixels Per Unit parameters of the Panel Settings asset. This is the number of panel-space pixels that fit into one unit in the World Space. The default value is 100, which means that one unit in the World Space is 100 pixels in the panel. This is a good starting point, but you can adjust it to fit your needs.
Specify the size
To specify the size of the World Space UI container, use USS properties size and position. The container (UIDocument.rootVisualElement) contains the UI Document and is the parent of all the elements in the UI hierarchy. The size property sets the width and height of the container in World Space. This allows you to control how large the container appears relative to other objects in the SceneA Scene contains the environments and menus of your game. Think of each unique Scene file as a unique level. In each Scene, you place your environments, obstacles, and decorations, essentially designing and building your game in pieces. More info
See in Glossary. The position property determines the container’s location in the World Space and lets you place it accurately within the 3D environment.
If you create your UI in absolute position with an explicit size in USS, in your UI Document’s Inspector window, select World-Space Dimensions > Size Mode > Dynamic. This ensures that the World Space UI adjusts itself to the content size. Otherwise, use the Fixed option and set the size manually.
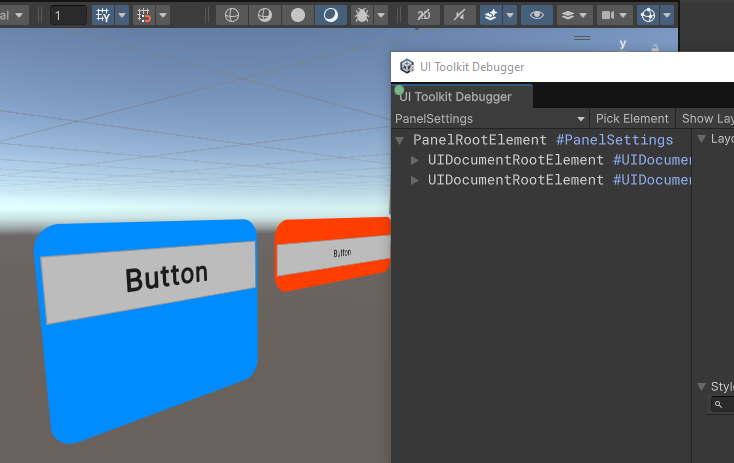
If you connect multiple UI Documents to the same Panel Settings asset, you can configure each container’s size and position independently. In the following example, two UI Documents share the same Panel Settings asset, but each container has its own size and position settings, allowing flexible customization within the same World Space UI setup.
Tips:
- Dynamic sizing works best when the content size is unpredictable and needs to adjust automatically. For example, a player’s info panel that grows or shrinks based on the details shown.
- Fixed sizing is useful when the content at the UXML level doesn’t have a specific size and will flex to fill the parent container (GameObject). For example, UI placed on top of an in-game monitor that visually needs to stay within that container.
Specify the pivot reference size
Unlike a Screen Space Overlay, you can freely position and rotate a World Space UI within the Scene viewAn interactive view into the world you are creating. You use the Scene View to select and position scenery, characters, cameras, lights, and all other types of Game Object. More info
See in Glossary. You can place it on walls, floors, or ceilings. You can also position it on slanted surfaces or have it float in mid-air. Use the standard Translate and Rotate tools in the Scene view’s toolbarA row of buttons and basic controls at the top of the Unity Editor that allows you to interact with the Editor in various ways (e.g. scaling, translation). More info
See in Glossary to adjust the position and orientation of the GameObjectThe fundamental object in Unity scenes, which can represent characters, props, scenery, cameras, waypoints, and more. A GameObject’s functionality is defined by the Components attached to it. More info
See in Glossary that’s referencing your UI.
The pivot reference size is the size of the container that the UI Document uses to calculate for pivot positioning in World Space.
To set the pivot reference size, in the Inspector window of the UI Document, select the following pivot reference size from the World-Space Dimensions > Pivot Reference Size dropdown list:
- Bounding Box includes all elements within the container, both inside and outside the layout
- Layout sizes the container based on the UI Toolkit layout system
Position the pivot point
The pivot point is the reference point the UI Document uses for position and transformations, such as rotation and scaling. The default pivot point is at the center of the UI Document. You can set it to any of the following points in the World-Space Dimensions > Pivot dropdown list in the Inspector window of the UI Document:
- Top Center
- Top Left
- Top Right
- Left Center
- Right Center
- Bottom Center
- Bottom Left
- Bottom Right
Configure the Panel Input Configuration settings
To configure the Panel Input Configuration settings, do one of the following:
- From the main menu, select GameObject > UI Toolkit > Panel Input Configuration.
- In the Hierarchy window, select + > UI Toolkit > Panel Input Configuration.
- If the underlying Panel Settings is in World Space rendering mode, select the Create Panel Input Configuration button in the InspectorA Unity window that displays information about the currently selected GameObject, asset or project settings, allowing you to inspect and edit the values. More info
See in Glossary window.
This adds a Panel Input Configuration component. You can then configure the Panel Input Configuration properties in its Inspector window.
Sorting order of the World Space UI
In World Space rendering, the z-distance from the cameraA component which creates an image of a particular viewpoint in your scene. The output is either drawn to the screen or captured as a texture. More info
See in Glossary determines the sorting order of root UI Documents. UI elements closer to the camera appear in front of those farther away. Nested UI Documents are rendered together with their parent, and you can use the sorting order property to control their order relative to sibling UI Documents under the same parent.
Note: Integration with 2D sorting layers isn’t currently supported. You can set a logical layer on the GameObject and use it for camera culling. It gets added to the default sorting layer.