Install Unity using Download Assistant
Unity Download Assistant is a small-sized executable file provided as .exe for Windows and .dmg for macOS. The Download Assistant guides you through downloading and installing Unity Editor and other components together.
To install Unity using the Download Assistant, follow these steps:
Access the Unity download archive website to select the release versions of the Unity Editor.
Use the filter controls to list the versions of Unity you’re interested in.
In the Downloads column, select See all for the version of Unity you want to install.
This opens a new page that displays the Manual installs and Component installers sections for the selected Unity Editor version.In the Manual installs section, expand Other installs.
Select Download Assistant for the operating system of your computer.
This starts the download process of the Download Assistant executable file. If prompted, save the file, and note the download location.-
Use your file manager application to go to the location where you downloaded the Download Assistant (
.exefor Windows and.dmgfor macOS) and open it.Note: On macOS, the
.dmgfile opens a new Finder window. From that window, openUnity Download Assistant.app. Follow the Introduction and License prompts, then select the components you want to install.
The Download Assistant will install all the components you select on the current computer. If you want to install on other computers later, you have an option to save the installer files to a folder.To save the installer files on macOS, select Advanced on the Destination Select panel (Select a Destination).
Without closing the Download Assistant, go to your file manager application, and create a folder to store the installer files you’ll download in the next step.
-
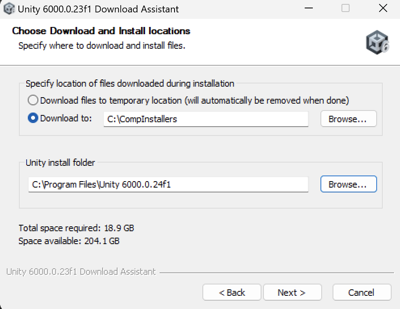
Return to the Download Assistant and set a location for storing installer files.
Important: Don’t save the installation files at the default location. Selecting the default location might result in incomplete file sets, or complete removal of the files you’ll need to run the setup on other computers.
- On macOS, change Default to Custom. Select the folder icon and choose the folder you explicitly created in the previous step.

Change the default location to Custom for macOS - On Windows, select Download to and choose the folder you explicitly created in the previous step.

Change the default location to Download to for Windows -
Proceed through the remaining steps to complete the installation process. When the process completes, the installer deploys the Unity Editor to the following default locations:
- On macOS,
Applications/Unity. - On Windows,
C:\Program Files\Unity <version>.
- On macOS,
The Download Assistant also places the setup files you need to install Unity on offline computers. To confirm that the download of these files was successful, do the following:
Open your file manager application.
Go to the folder you specified when selecting the location for storing installation files during the Download Assistant setup.
-
Confirm that an
install.shorinstall.batfile is inside that folder.If this folder is empty, or missing an
install.shorinstall.batfile, repeat the main procedure. Make sure you specify an explicit location for installation files, rather than accepting the default location. -
Check the contents of the
install.shorinstall.batfile to make sure they resemble the following example:
Sample contents of an install.bat file (Windows)