Bind ListView to a list with runtime binding
Version: 6000.0+
The ListView control is the most efficient way to create lists. This example demonstrates how to use runtime binding to bind a ListView to a list without C# code.
Example overview
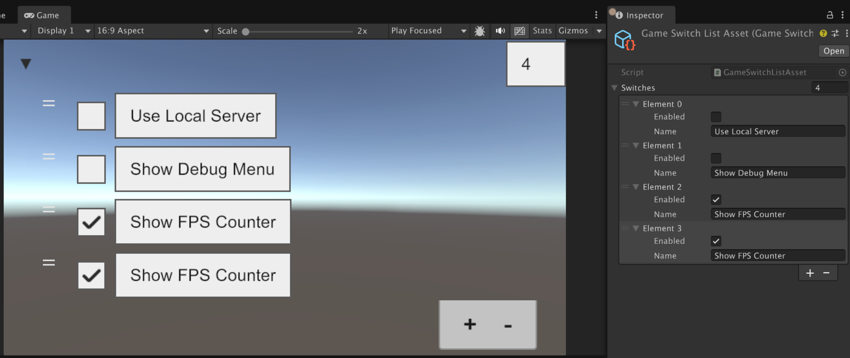
This example creates a GameSwitchListAsset ScriptableObject that contains a list of GameSwitch objects. Each GameSwitch object has two properties: enabled and name. The ListView displays a list of toggles and text fields that are bound to the enabled and name properties of each GameSwitch object.
You can find the completed files that this example creates in this GitHub repository.
Prerequisites
This guide is for developers familiar with the Unity Editor, UI Toolkit, and C# scripting. Before you start, get familiar with the following:
Create an object with a list
Create the data structure that holds your list items.
- Create a Unity project with any template.
- In your Project window, create a C# script named
GameSwitchListAsset.cswith the following contents:
using System;
using System.Collections.Generic;
using System.Diagnostics;
using UnityEngine;

[CreateAssetMenu(fileName = "GameSwitchListAsset.asset", menuName = "GameSwitchListAsset")]
public class GameSwitchListAsset : ScriptableObject
{
    public List<GameSwitch> switches = new();

    public void Reset()
    {
        switches = new List<GameSwitch>{
            new() { name = "Use Local Server", enabled = false },
            new() { name = "Show Debug Menu", enabled = false },
            new() { name = "Show FPS Counter", enabled = true },
        };
    }

    public bool IsSwitchEnabled(string switchName) => switches.Find(s => s.name == switchName).enabled;

    [Serializable]
    public struct GameSwitch
    {
        public bool enabled;
        public string name;
    }
}
Create the ListView item template in UI Builder
Create a reusable template that defines how each list item look and behave. ListView uses this template to generate visual elements for each data item. The template approach is efficient because:
- One template definition works for any number of list items
- UI Toolkit can recycle visual elements as users scroll
- Changes to the template automatically apply to all items
Each item contains a Toggle for the enabled state and a TextField for the name. You bind these UI elements to the corresponding properties of the GameSwitch object.
Create a UXML file named
ListViewItem.uxml.Double-click the
ListViewItem.uxmlfile to open it in UI Builder.In the Hierarchy panel, add a VisualElement.
Add a Toggle as a child of VisualElement.
Add a TextField as a child VisualElement.
Remove the label text for the Toggle and TextField.
Set the Flex direction of the VisualElement to
Row.In the Inspector panel of the Toggle, do the following:
Right-click Value and select Add binding.
In the Add Binding window, set Data Source Path to
enabled.Set Binding Mode to
Two Way. This ensures changes in the Toggle update the data source, and changes in the data source update the Toggle.-
In the Inspector panel of the TextField, do the following:
- Right-click Value and select Add binding.
- In the Add Binding window, set Data Source Path to
name. - Set Binding Mode to
Two Way. This ensures changes in the TextField update the data source, and changes in the data source update the TextField.
Save the UXML file. The finished UXML file looks like the following:
   <ui:UXML xmlns:ui="UnityEngine.UIElements" editor-extension-mode="False">
       <ui:VisualElement name="" style="flex-direction: row;">
           <ui:Toggle>
               <Bindings>
                   <ui:DataBinding property="value" data-source-path="enabled" binding-mode="TwoWay"/>
               </Bindings>
           </ui:Toggle>
           <ui:TextField placeholder-text="filler text">
               <Bindings>
                   <ui:DataBinding property="value" data-source-path="name" binding-mode="TwoWay"/>
               </Bindings>
           </ui:TextField>
       </ui:VisualElement>
   </ui:UXML>
Create the ListView UI in UI Builder
Create the asset that contains a list of items and create the main UI that hosts the ListView. This step configures how the ListView connects to your data and defines the user interaction capabilities.
From the menu, select Assets > Create > UIToolkitExamples > GameSwitchList. This creates an asset named GameSwitchListAsset.
Create a UXML file named
UIListView.uxml.Double-click the
UIListView.uxmlfile to open it in UI Builder.In the Hierarchy panel, add a ListView.
In the Inspector panel of the ListView, configure the following settings:
Data Source: Select GameSwitchListAsset.asset. This establishes the type of object the ListView expects to receive as its data source.
Binding Source Selection Mode: Set to Auto Assign. This tells the binding system to automatically determine the correct data context for each list item. When rendering item templates, each template receives the corresponding
GameSwitchobject as its binding source.Item Template: Set to
ListViewItem.uxml.Show Add Remove Footers: Enable this option to allow users to add or remove items from the list.
Reorder Mode: Set to Animated to enable drag-and-drop reordering.
Save the UXML file.
Set the itemsSource binding in UXML
The final crucial step is connecting the ListView’s itemsSource property to your data. The itemsSource determines what collection of objects the ListView displays. In this case, the switches list from your GameSwitchListAsset.
This property isn’t exposed in UI Builder’s Inspector. You need to manually edit the UXML to add this binding. The itemsSource binding is what makes the ListView populate with your actual data items.
To create this binding, add a <Bindings> tag inside <ui:ListView>:
<ui:ListView>
   <Bindings>
      <ui:DataBinding property="itemsSource" data-source-path="switches" />
   </Bindings>
</ui:ListView>
Note: This example sets up the itemsSource in UXML for simplicity. You can also set up the data source connection in your C# script like this:
var listView = rootVisualElement.Q<ListView>();
var gameSwitchListAsset = /* obtain reference to your GameSwitchListAsset instance */;
listView.dataSource = gameSwitchListAsset;
The finished UIListView.uxml file looks like the following:
<ui:UXML xmlns:ui="UnityEngine.UIElements" editor-extension-mode="False">
    <ui:ListView binding-source-selection-mode="AutoAssign" item-template="ListViewItem.uxml" data-source="GameSwitchListAsset.asset" show-foldout-header="true" virtualization-method="DynamicHeight" show-border="false" reorderable="true" horizontal-scrolling="false" selection-type="Single" reorder-mode="Animated" show-add-remove-footer="true">
        <Bindings>
            <ui:DataBinding property="itemsSource" data-source-path="switches" />
        </Bindings>
    </ui:ListView>
</ui:UXML>
Note: In your UXML file, make sure to remove the engine="UnityEngine.UIElements" and editor="UnityEditor.UIElements" attributes from the <ui:UXML> tag if you have them. These attributes set the default namespace, which breaks the <Bindings> tag because Bindings isn’t a type, but a field.
Test the binding in a scene
Test the complete system to check how runtime binding creates a dynamic, interactive interface.
- In a sample scene, select GameObject > UI Toolkit > UI Document to add a UI Document.
- In the Inspector panel of the UI Document component, set the Source Asset to
UIListView.uxml. - Enter Play mode. The ListView displays the list of
GameSwitchobjects from theGameSwitchListAsset. You can interact with the toggles and text fields, add or remove items, and reorder the list. All changes reflect in the underlying data source, and vice versa.