

Physics
Unity has NVIDIA PhysX physics engine built-in. This allows for unique emergent behaviour and is generally very cool.
Basics
To put an object under physics control, simply add a Rigidbody to it. When you do this, the object will be affected by gravity, and can collide with other objects in the world.
Rigidbodies
Rigidbodies are physically simulated objects. You use Rigidbodies for things that the player can push around, eg. crates or loose objects, or you can move Rigidbodies around directly by adding forces to it by scripting.
If you move the Transform of a non-Kinematic Rigidbody directly it may not collide correctly with other objects. Instead you should move a Rigidbody by applying forces and torque to it. You can also add Joints to rigidbodies to make the behavior more complex. For example, you could make a physical door or a crane with a swinging chain.
You also use Rigidbodies to bring vehicles to life, for example you can make cars using a Rigidbody, 4 Wheel Colliders and a script applying wheel forces based on the user's Input.
You can make airplanes by applying forces to the Rigidbody from a script. Or you can create special vehicles or robots by adding various Joints and applying forces via scripting.
Rigidbodies are most often used in combination with primitive colliders.
Tips:
- You should never have a parent and child rigidbody together
- You should never scale the parent of a rigidbody
Kinematic Rigidbodies
A Kinematic Rigidbody is a Rigidbody that has the isKinematic option enabled. Kinematic Rigidbodies are not affected by forces, gravity or collisions. They are driven explicitly by setting the position and rotation of the Transform or animating them, yet they can interact with other non-Kinematic Rigidbodies.
Kinematic Rigidbodies correctly wake up other Rigidbodies when they collide with them, and they apply friction to Rigidbodies placed on top of them.
These are a few example uses for Kinematic Rigidbodies:
- Sometimes you want an object to be under physics control but in another situation to be controlled explicitly from a script or animation. For example you could make an animated character whose bones have Rigidbodies attached that are connected with joints for use as a Ragdoll. Most of the time the character is under animation control, thus you make the Rigidbody Kinematic. But when he gets hit you want him to turn into a Ragdoll and be affected by physics. To accomplish this, you simply disable the isKinematic property.
- Sometimes you want a moving object that can push other objects yet not be pushed itself. For example if you have an animated platform and you want to place some Rigidbody boxes on top, you should make the platform a Kinematic Rigidbody instead of just a Collider without a Rigidbody.
- You might want to have a Kinematic Rigidbody that is animated and have a real Rigidbody follow it using one of the available Joints.
Static Colliders
A Static Collider is a GameObject that has a Collider but not a Rigidbody. Static Colliders are used for level geometry which always stays at the same place and never moves around. You can add a Mesh Collider to your already existing graphical meshes (even better use the Generate Colliders check box), or you can use one of the other Collider types.
You should never move a Static Collider on a frame by frame basis. Moving Static Colliders will cause an internal recomputation in PhysX that is quite expensive and which will result in a big drop in performance. On top of that the behaviour of waking up other Rigidbodies based on a Static Collider is undefined, and moving Static Colliders will not apply friction to Rigidbodies that touch it. Instead, Colliders that move should always be Kinematic Rigidbodies.
Character Controllers
You use Character Controllers if you want to make a humanoid character. This could be the main character in a third person platformer, FPS shooter or any enemy characters.
These Controllers don't follow the rules of physics since it will not feel right (in Doom you run 90 miles per hour, come to halt in one frame and turn on a dime). Instead, a Character Controller performs collision detection to make sure your characters can slide along walls, walk up and down stairs, etc.
Character Controllers are not affected by forces but they can push Rigidbodies by applying forces to them from a script. Usually, all humanoid characters are implemented using Character Controllers.
Character Controllers are inherently unphysical, thus if you want to apply real physics - Swing on ropes, get pushed by big rocks - to your character you have to use a Rigidbody, this will let you use joints and forces on your character. Character Controllers are always aligned along the Y axis, so you also need to use a Rigidbody if your character needs to be able to change orientation in space (for example under a changing gravity). However, be aware that tuning a Rigidbody to feel right for a character is hard due to the unphysical way in which game characters are expected to behave. Another difference is that Character Controllers can slide smoothly over steps of a specified height, while Rigidbodies will not.
If you parent a Character Controller with a Rigidbody you will get a "Joint" like behavior.
Rigidbody
Rigidbodies enable your GameObjects to act under the control of physics. The Rigidbody can receive forces and torque to make your objects move in a realistic way. Any GameObject must contain a Rigidbody to be influenced by gravity, act under added forces via scripting, or interact with other objects through the NVIDIA PhysX physics engine.
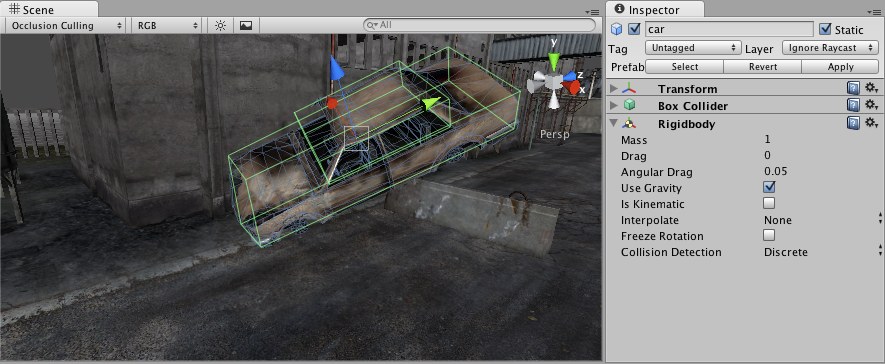
Rigidbodies allow GameObjects to act under physical influence
Properties
| Mass | The mass of the object (arbitrary units). It is recommended to make masses not more or less than 100 times that of other Rigidbodies. |
| Drag | How much air resistance affects the object when moving from forces. 0 means no air resistance, and infinity makes the object stop moving immediately. |
| Angular Drag | How much air resistance affects the object when rotating from torque. 0 means no air resistance, and infinity makes the object stop rotating immediately. |
| Use Gravity | If enabled, the object is affected by gravity. |
| Is Kinematic | If enabled, the object will not be driven by the physics engine, and can only be manipulated by its Transform. This is useful for moving platforms or if you want to animate a Rigidbody that has a HingeJoint attached. |
| Interpolate | Try one of the options only if you are seeing jerkiness in your Rigidbody's movement. |
| None | No Interpolation is applied. |
| Interpolate | Transform is smoothed based on the Transform of the previous frame. |
| Extrapolate | Transform is smoothed based on the estimated Transform of the next frame. |
| Freeze Rotation | If enabled, this GameObject will never rotate based on collisions or forces added via script -- it will only rotate when using transform.Rotate(). |
| Collision Detection | Used to prevent fast moving objects from passing through other objects without detecting collisions. |
| Discrete | Use Discreet collision detection against all other colliders in the scene. Other colliders will use Discreet collision detection when testing for collision against it. Used for normal collisions (This is the default value). |
| Continuous | Use Discrete collision detection against dynamic colliders (with a rigidbody) and continuous collision detection against static MeshColliders (without a rigidbody). Rigidbodies set to Continuous Dynamic will use continuous collision detection when testing for collision against this rigidbody. Other rigidbodies will use Discreet Collision detection. Used for objects which the Continuous Dynamic detection needs to collide with. (This has a big impact on physics performance, leave it set to Discrete, if you don't have issues with collisions of fast objects) |
| Continuous Dynamic | Use continuous collision detection against objects set to Continuous and Continuous Dynamic Collision. It will also use continuous collision detection against static MeshColliders (without a rigidbody). For all other colliders it uses discreet collision detection. Used for fast moving objects. |
| Constraints | Restrictions on the Rigidbody's motion:- |
| Freeze Position | Stops the Rigidbody moving in the world X, Y and Z axes selectively. |
| Freeze Rotation | Stops the Rigidbody rotating around the world X, Y and Z axes selectively. |
Details
Rigidbodies allow your GameObjects to act under control of the physics engine. This opens the gateway to realistic collisions, varied types of joints, and other very cool behaviors. Manipulating your GameObjects by adding forces to a Rigidbody creates a very different feel and look than adjusting the Transform Component directly. Generally, you shouldn't manipulate the Rigidbody and the Transform of the same GameObject - only one or the other.
The biggest difference between manipulating the Transform versus the Rigidbody is the use of forces. Rigidbodies can receive forces and torque, but Transforms cannot. Transforms can be translated and rotated, but this is not the same as using physics. You'll notice the distinct difference when you try it for yourself. Adding forces/torque to the Rigidbody will actually change the object's position and rotation of the Transform component. This is why you should only be using one or the other. Changing the Transform while using physics could cause problems with collisions and other calculations.
Rigidbodies must be explicitly added to your GameObject before they will be affected by the physics engine. You can add a Rigidbody to your selected object from Components->Physics->Rigidbody in the menubar. Now your object is physics-ready; it will fall under gravity and can receive forces via scripting, but you may need to add a Collider or a Joint to get it to behave exactly how you want.
Parenting
When an object is under physics control, it moves semi-independently of the way its transform parents move. If you move any parents, they will pull the Rigidbody child along with them. However, the Rigidbodies will still fall down due to gravity and react to collision events.
Scripting
To control your Rigidbodies, you will primarily use scripts to add forces or torque. You do this by calling AddForce() and AddTorque() on the object's Rigidbody. Remember that you shouldn't be directly altering the object's Transform when you are using physics.
Animation
For some situations, mainly creating ragdoll effects, it is neccessary to switch control of the object between animations and physics. For this purpose Rigidbodies can be marked isKinematic. While the Rigidbody is marked isKinematic, it will not be affected by collisions, forces, or any other part of physX. This means that you will have to control the object by manipulating the Transform component directly. Kinematic Rigidbodies will affect other objects, but they themselves will not be affected by physics. For example, Joints which are attached to Kinematic objects will constrain any other Rigidbodies attached to them and Kinematic Rigidbodies will affect other Rigidbodies through collisions.
Colliders
Colliders are another kind of component that must be added alongside the Rigidbody in order to allow collisions to occur. If two Rigidbodies bump into each other, the physics engine will not calculate a collision unless both objects also have a Collider attached. Collider-less Rigidbodies will simply pass through each other during physics simulation.

Colliders define the physical boundaries of a Rigidbody
Add a Collider with the Component->Physics menu. View the Component Reference page of any individual Collider for more specific information:
- Box Collider - primitive shape of a cube
- Sphere Collider - primitive shape of a sphere
- Capsule Collider - primitive shape of a capsule
- Mesh Collider - creates a collider from the object's mesh, cannot collide with another Mesh Collider
- Wheel Collider - specifically for creating cars or other moving vehicles
Compound Colliders
Compound Colliders are combinations of primitive Colliders, collectively acting as a single Collider. They come in handy when you have a complex mesh to use in collisions but cannot use a Mesh Collider. To create a Compound Collider, create child objects of your colliding object, then add a primitive Collider to each child object. This allows you to position, rotate, and scale each Collider easily and independently of one another.
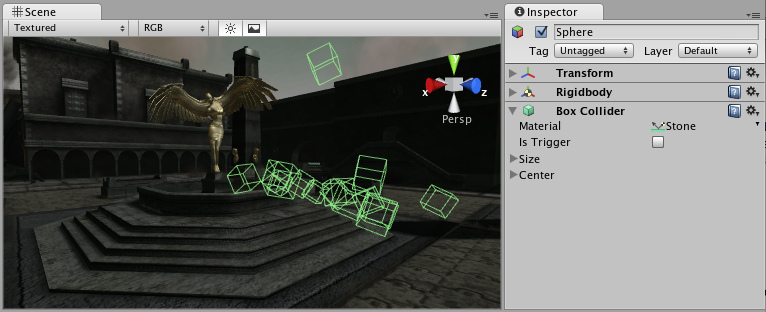
A real-world Compound Collider setup
In the above picture, the environment has a Mesh Collider attached. Mesh Colliders work the best for terrain or environments made from irregular shapes. The GameObject has a Rigidbody attached, and multiple primitive Colliders as child GameObjects. When the Rigidbody parent is moved around by forces, the child Colliders move along with it. The primitive Colliders will collide with the environment's Mesh Collider, and the parent Rigidbody will alter the way it moves based on forces being applied to it and how its child Colliders interact with other Colliders in the Scene.
Mesh Colliders can't normally collide with each other. If a Mesh Collider is marked as Convex, then it can collide with another Mesh Collider. The typical solution is to use primitive Colliders for any objects that move, and Mesh Colliders for static background objects.
Continuous Collision Detection
Continuous collision detection is a feature to prevent fast-moving colliders from passing each other. This may happen when using normal (Discrete) collision detection, when an object is one side of a collider in one frame, and already passed the collider in the next frame. To solve this, you can enable continuous collision detection on the rigidbody of the fast-moving object. Set the collision detection mode to Continuous to prevent the rigidbody from passing through any static (ie, non-rigidbody) MeshColliders. Set it to Continuous Dynamic to also prevent the rigidbody from passing through any other supported rigidbodies with collision detection mode set to Continuous or Continuous Dynamic. Continuous collision detection is supported for Box-, Sphere- and CapsuleColliders. Note that continuous collision detection is intended as a safety net to catch collisions in cases where objects would otherwise pass through each other, but will not deliver physically accurate collision results, so you might still consider decreasing the fixed Time step value in the TimeManager inspector to make the simulation more precise, if you run into problems with fast moving objects.
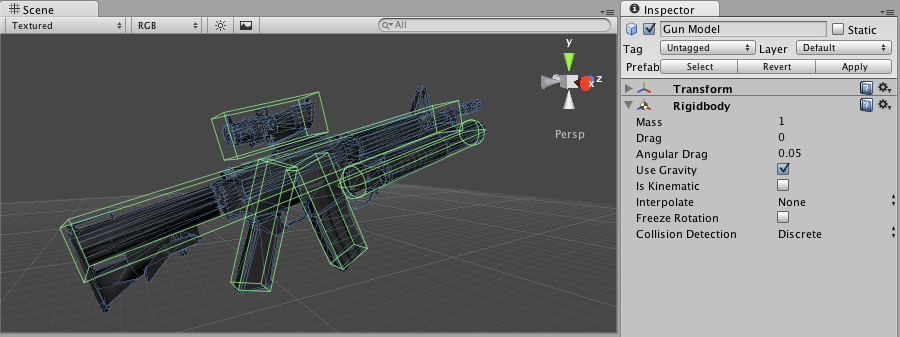
Use the right size
The size of the your GameObject's mesh is much more important than the mass of the Rigidbody. If you find that your Rigidbody is not behaving exactly how you expect - it moves slowly, floats, or doesn't collide correctly - consider adjusting the scale of your mesh asset. Unity's default unit scale is 1 unit = 1 meter, so the scale of your imported mesh is maintained, and applied to physics calculations. For example, a crumbling skyscraper is going to fall apart very differently than a tower made of toy blocks, so objects of different sizes should be modeled to accurate scale.
If you are modeling a human make sure he is around 2 meters tall in Unity. To check if your object has the right size compare it to the default cube. You can create a cube using . The cube's height will be exactly 1 meter, so your human should be twice as tall.
If you aren't able to adjust the mesh itself, you can change the uniform scale of a particular mesh asset by selecting it in Project View and choosing from the menubar. Here, you can change the scale and re-import your mesh.
If your game requires that your GameObject needs to be instantiated at different scales, it is okay to adjust the values of your Transform's scale axes. The downside is that the physics simulation must do more work at the time the object is instantiated, and could cause a performance drop in your game. This isn't a terrible loss, but it is not as efficient as finalizing your scale with the other two options. Also keep in mind that non-uniform scales can create undesirable behaviors when Parenting is used. For these reasons it is always optimal to create your object at the correct scale in your modeling application.
Hints
- The relative Mass of two Rigidbodies determines how they react when they collide with each other.
- Making one Rigidbody have greater Mass than another does not make it fall faster in free fall. Use Drag for that.
- A low Drag value makes an object seem heavy. A high one makes it seem light. Typical values for Drag are between .001 (solid block of metal) and 10 (feather).
- If you are directly manipulating the Transform component of your object but still want physics, attach a Rigidbody and make it Kinematic.
- If you are moving a GameObject through its Transform component but you want to receive Collision/Trigger messages, you must attach a Rigidbody to the object that is moving.
Constant Force
Constant Force is a quick utility for adding constant forces to a Rigidbody. This works great for one shot objects like rockets, if you don't want it to start with a large velocity but instead accelerate.
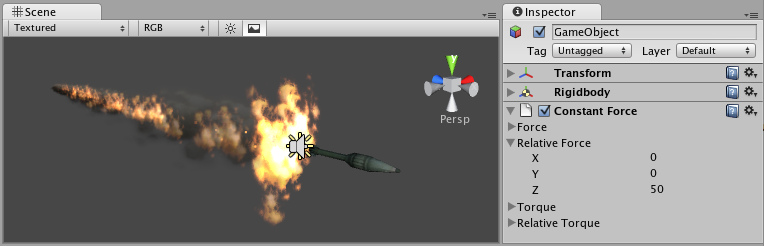
A rocket propelled forward by a Constant Force
Properties
| Force | The vector of a force to be applied in world space. |
| Relative Force | The vector of a force to be applied in the object's local space. |
| Torque | The vector of a torque, applied in world space. The object will begin spinning around this vector. The longer the vector is, the faster the rotation. |
| Relative Torque | The vector of a torque, applied in local space. The object will begin spinning around this vector. The longer the vector is, the faster the rotation. |
Details
To make a rocket that accelerates forward set the Relative Force to be along the positive z-axis. Then use the Rigidbody's Drag property to make it not exceed some maximum velocity (the higher the drag the lower the maximum velocity will be). In the Rigidbody, also make sure to turn off gravity so that the rocket will always stay on its path.
Hints
- To make an object flow upwards, add a Constant Force with the Force property having a positive Y value.
- To make an object fly forwards, add a Constant Force with the Relative Force property having a positive Z value.
Sphere Collider
The Sphere Collider is a basic sphere-shaped collision primitive.
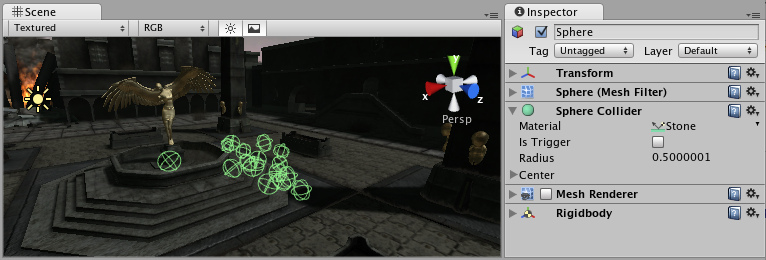
A pile of Sphere Colliders
Properties
| Material | Reference to the Physic Material that determines how this Collider interacts with others. |
| Is Trigger | If enabled, this Collider is used for triggering events, and is ignored by the physics engine. |
| Radius | The size of the Collider. |
| Center | The position of the Collider in the object's local space. |
Details
The Sphere Collider can be resized to uniform scale, but not along individual axes. It works great for falling boulders, ping pong balls, marbles, etc.
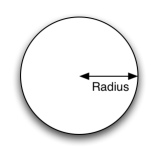
A standard Sphere Collider
Colliders work with Rigidbodies to bring physics in Unity to life. Whereas Rigidbodies allow objects to be controlled by physics, Colliders allow objects to collide with each other. Colliders must be added to objects independently of Rigidbodies. A Collider does not necessarily need a Rigidbody attached, but a Rigidbody must be attached in order for the object to move as a result of collisions.
When a collision between two Colliders occurs and if at least one of them has a Rigidbody attached, three collision messages are sent out to the objects attached to them. These events can be handled in scripting, and allow you to create unique behaviors with or without making use of the built-in NVIDIA PhysX engine.
Triggers
An alternative way of using Colliders is to mark them as a Trigger, just check the IsTrigger property checkbox in the Inspector. Triggers are effectively ignored by the physics engine, and have a unique set of three trigger messages that are sent out when a collision with a Trigger occurs. Triggers are useful for triggering other events in your game, like cutscenes, automatic door opening, displaying tutorial messages, etc. Use your imagination!
Be aware that in order for two Triggers to send out trigger events when they collide, one of them must include a Rigidbody as well. For a Trigger to collide with a normal Collider, one of them must have a Rigidbody attached. For a detailed chart of different types of collisions, see the collision action matrix in the Advanced section below.
Friction and bouncyness
Friction, bouncyness and softness are defined in the Physic Material. The Standard Assets contain the most common physics materials. To use one of them click on the Physic Material drop-down and select one, eg. Ice. You can also create your own physics materials and tweak all friction values.
Compound Colliders
Compound Colliders are combinations of primitive Colliders, collectively acting as a single Collider. They come in handy when you have a complex mesh to use in collisions but cannot use a Mesh Collider. To create a Compound Collider, create child objects of your colliding object, then add a primitive Collider to each child object. This allows you to position, rotate, and scale each Collider easily and independently of one another.

A real-world Compound Collider setup
In the above picture, the environment has a Mesh Collider attached. Mesh Colliders work the best for terrain or environments made from irregular shapes. The GameObject has a Rigidbody attached, and multiple primitive Colliders as child GameObjects. When the Rigidbody parent is moved around by forces, the child Colliders move along with it. The primitive Colliders will collide with the environment's Mesh Collider, and the parent Rigidbody will alter the way it moves based on forces being applied to it and how its child Colliders interact with other Colliders in the Scene.
Mesh Colliders can't normally collide with each other. If a Mesh Collider is marked as Convex, then it can collide with another Mesh Collider. The typical solution is to use primitive Colliders for any objects that move, and Mesh Colliders for static background objects.
Hints
- To add multiple Colliders for an object, create child GameObjects and attach a Collider to each one. This allows each Collider to be manipulated independently.
- You can look at the gizmos in the Scene View to see how the Collider is being calculated on your object.
- Colliders do their best to match the scale of an object. If you have a non-uniform scale (a scale which is different in each direction), only the Mesh Collider can match completely.
- If you are moving an object through its Transform component but you want to receive Collision/Trigger messages, you must attach a Rigidbody to the object that is moving.
- If you make an explosion, it can be very effective to add a rigidbody with lots of drag and a sphere collider to it in order to push it out a bit from the wall it hits.
Advanced
Collider combinations
There are numerous different combinations of collisions that can happen in Unity. Each game is unique, and different combinations may work better for different types of games. If you're using physics in your game, it will be very helpful to understand the different basic Collider types, their common uses, and how they interact with other types of objects.
Static Collider
These are GameObjects that do not have a Rigidbody attached, but do have a Collider attached. These objects should remain still, or move very little. These work great for your environment geometry. They will not move if a Rigidbody collides with them.
Rigidbody Collider
These GameObjects contain both a Rigidbody and a Collider. They are completely affected by the physics engine through scripted forces and collisions. They might collide with a GameObject that only contains a Collider. These will likely be your primary type of Collider in games that use physics.
Kinematic Rigidbody Collider
This GameObject contains a Collider and a Rigidbody which is marked IsKinematic. To move this GameObject, you modify its Transform Component, rather than applying forces. They're similar to Static Colliders but will work better when you want to move the Collider around frequently. There are some other specialized scenarios for using this GameObject.
This object can be used for circumstances in which you would normally want a Static Collider to send a trigger event. Since a Trigger must have a Rigidbody attached, you should add a Rigidbody, then enable IsKinematic. This will prevent your Object from moving from physics influence, and allow you to receive trigger events when you want to.
Kinematic Rigidbodies can easily be turned on and off. This is great for creating ragdolls, when you normally want a character to follow an animation, then turn into a ragdoll when a collision occurs, prompted by an explosion or anything else you choose. When this happens, simply turn all your Kinematic Rigidbodies into normal Rigidbodies through scripting.
If you have Rigidbodies come to rest so they are not moving for some time, they will "fall asleep". That is, they will not be calculated during the physics update since they are not going anywhere. If you move a Kinematic Rigidbody out from underneath normal Rigidbodies that are at rest on top of it, the sleeping Rigidbodies will "wake up" and be correctly calculated again in the physics update. So if you have a lot of Static Colliders that you want to move around and have different object fall on them correctly, use Kinematic Rigidbody Colliders.
Collision action matrix
Depending on the configurations of the two colliding Objects, a number of different actions can occur. The chart below outlines what you can expect from two colliding Objects, based on the components that are attached to them. Some of the combinations only cause one of the two Objects to be affected by the collision, so keep the standard rule in mind - physics will not be applied to objects that do not have Rigidbodies attached.
| Collision detection occurs and messages are sent upon collision | ||||||
| Static Collider | Rigidbody Collider | Kinematic Rigidbody Collider | Static Trigger Collider | Rigidbody Trigger Collider | Kinematic Rigidbody Trigger Collider | |
| Static Collider | Y | |||||
| Rigidbody Collider | Y | Y | Y | |||
| Kinematic Rigidbody Collider | Y | |||||
| Static Trigger Collider | ||||||
| Rigidbody Trigger Collider | ||||||
| Kinematic Rigidbody Trigger Collider | ||||||
| Trigger messages are sent upon collision | ||||||
| Static Collider | Rigidbody Collider | Kinematic Rigidbody Collider | Static Trigger Collider | Rigidbody Trigger Collider | Kinematic Rigidbody Trigger Collider | |
| Static Collider | Y | Y | ||||
| Rigidbody Collider | Y | Y | Y | |||
| Kinematic Rigidbody Collider | Y | Y | Y | |||
| Static Trigger Collider | Y | Y | Y | Y | ||
| Rigidbody Trigger Collider | Y | Y | Y | Y | Y | Y |
| Kinematic Rigidbody Trigger Collider | Y | Y | Y | Y | Y | Y |
Layer-Based Collision Detection
In Unity 3.x we introduce something called Layer-Based Collision Detection, and is that you can now selectively tell Unity GameObjects to collide with specific layers they are attached to. For more info, you can click here
Box Collider
The Box Collider is a basic cube-shaped collision primitive.
A pile of Box Colliders
Properties
| Material | Reference to the Physic Material that determines how this Collider interacts with others. |
| Is Trigger | If enabled, this Collider is used for triggering events, and is ignored by the physics engine. |
| Size | The size of the Collider in the X, Y, Z directions. |
| Center | The position of the Collider in the object's local space. |
Details
The Box Collider can be resized into different shapes of rectangular prisms. It works great for doors, walls, platforms, etc. It is also effective as a human torso in a ragdoll or as a car hull in a vehicle. Of course, it works perfectly for just boxes and crates as well!
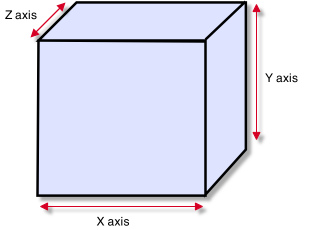
A standard Box Collider
Colliders work with Rigidbodies to bring physics in Unity to life. Whereas Rigidbodies allow objects to be controlled by physics, Colliders allow objects to collide with each other. Colliders must be added to objects independently of Rigidbodies. A Collider does not necessarily need a Rigidbody attached, but a Rigidbody must be attached in order for the object to move as a result of collisions.
When a collision between two Colliders occurs and if at least one of them has a Rigidbody attached, three collision messages are sent out to the objects attached to them. These events can be handled in scripting, and allow you to create unique behaviors with or without making use of the built-in NVIDIA PhysX engine.
Triggers
An alternative way of using Colliders is to mark them as a Trigger, just check the IsTrigger property checkbox in the Inspector. Triggers are effectively ignored by the physics engine, and have a unique set of three trigger messages that are sent out when a collision with a Trigger occurs. Triggers are useful for triggering other events in your game, like cutscenes, automatic door opening, displaying tutorial messages, etc. Use your imagination!
Be aware that in order for two Triggers to send out trigger events when they collide, one of them must include a Rigidbody as well. For a Trigger to collide with a normal Collider, one of them must have a Rigidbody attached. For a detailed chart of different types of collisions, see the collision action matrix in the Advanced section below.
Friction and bouncyness
Friction, bouncyness and softness are defined in the Physic Material. The Standard Assets contain the most common physics materials. To use one of them click on the Physic Material drop-down and select one, eg. Ice. You can also create your own physics materials and tweak all friction values.
Mesh Collider
The Mesh Collider takes a Mesh Asset and builds its Collider based on that mesh. It is far more accurate for collision detection than using primitives for complicated meshes. Mesh Colliders that are marked as Convex can collide with other Mesh Colliders.
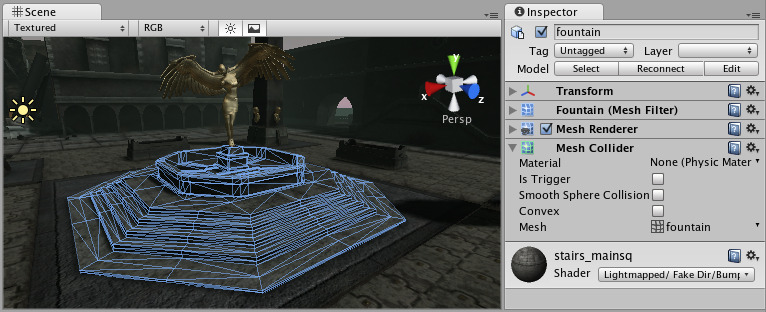
A Mesh Collider used on level geometry
Properties
| Material | Reference to the Physic Material that determines how this Collider interacts with others. |
| Is Trigger | If enabled, this Collider is used for triggering events, and is ignored by the physics engine. |
| Mesh | Reference to the Mesh to use for collisions. |
| Smooth Sphere Collisions | When this is enabled, collision mesh normals are smoothed. You should enable this on smooth surfaces eg. rolling terrain without hard edges to make sphere rolling smoother. |
| Convex | If enabled, this Mesh Collider will collide with other Mesh Colliders. Convex Mesh Colliders are limited to 255 triangles. |
Details
The Mesh Collider builds its collision representation from the Mesh attached to the GameObject, and reads the properties of the attached Transform to set its position and scale correctly.
Collision meshes use backface culling. If an object collides with a mesh that will be backface culled graphically it will also not collide with it physically.
There are some limitations when using the Mesh Collider. Usually, two Mesh Colliders cannot collide with each other. All Mesh Colliders can collide with any primitive Collider. If your mesh is marked as Convex, then it can collide with other Mesh Colliders.
Colliders work with Rigidbodies to bring physics in Unity to life. Whereas Rigidbodies allow objects to be controlled by physics, Colliders allow objects to collide with each other. Colliders must be added to objects independently of Rigidbodies. A Collider does not necessarily need a Rigidbody attached, but a Rigidbody must be attached in order for the object to move as a result of collisions.
When a collision between two Colliders occurs and if at least one of them has a Rigidbody attached, three collision messages are sent out to the objects attached to them. These events can be handled in scripting, and allow you to create unique behaviors with or without making use of the built-in NVIDIA PhysX engine.
Triggers
An alternative way of using Colliders is to mark them as a Trigger, just check the IsTrigger property checkbox in the Inspector. Triggers are effectively ignored by the physics engine, and have a unique set of three trigger messages that are sent out when a collision with a Trigger occurs. Triggers are useful for triggering other events in your game, like cutscenes, automatic door opening, displaying tutorial messages, etc. Use your imagination!
Be aware that in order for two Triggers to send out trigger events when they collide, one of them must include a Rigidbody as well. For a Trigger to collide with a normal Collider, one of them must have a Rigidbody attached. For a detailed chart of different types of collisions, see the collision action matrix in the Advanced section below.
Friction and bouncyness
Friction, bouncyness and softness are defined in the Physic Material. The Standard Assets contain the most common physics materials. To use one of them click on the Physic Material drop-down and select one, eg. Ice. You can also create your own physics materials and tweak all friction values.
Hints
- Mesh Colliders cannot collide with each other unless they are marked as Convex. Therefore, they are most useful for background objects like environment geometry.
- Convex Mesh Colliders must be fewer than 255 triangles.
- Primitive Colliders are less costly for objects under physics control.
- When you attach a Mesh Collider to a GameObject, its Mesh property will default to the mesh being rendered. You can change that by assigning a different Mesh.
- To add multiple Colliders for an object, create child GameObjects and attach a Collider to each one. This allows each Collider to be manipulated independently.
- You can look at the gizmos in the Scene View to see how the Collider is being calculated on your object.
- Colliders do their best to match the scale of an object. If you have a non-uniform scale (a scale which is different in each direction), only the Mesh Collider can match completely.
- If you are moving an object through its Transform component but you want to receive Collision/Trigger messages, you must attach a Rigidbody to the object that is moving.
Physic Material
The Physic Material is used to adjust friction and bouncing effects of colliding objects.
To create a Physic Material select from the menu bar. Then drag the Physic Material from the Project View onto a Collider in the scene.
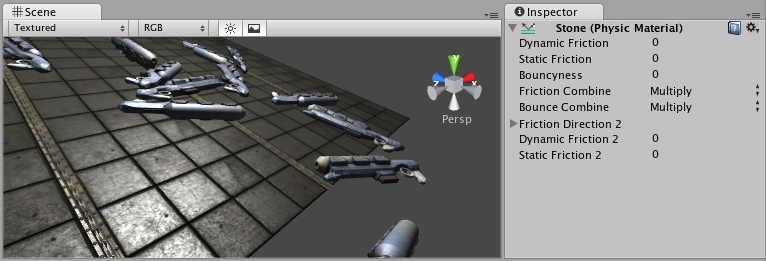
The Physic Material Inspector
Properties
| Dynamic Friction | The friction used when already moving. Usually a value from 0 to 1. A value of zero feels like ice, a value of 1 will make it come to rest very quickly unless a lot of force or gravity pushes the object. |
| Static Friction | The friction used when an object is laying still on a surface. Usually a value from 0 to 1. A value of zero feels like ice, a value of 1 will make it very hard to get the object moving. |
| Bouncyness | How bouncy is the surface? A value of 0 will not bounce. A value of 1 will bounce without any loss of energy. |
| Friction Combine Mode | How the friction of two colliding objects is combined. |
| Average | The two friction values are averaged. |
| Min | The smallest of the two values is used. |
| Max | The largest of the two values is used. |
| Multiply | The friction values are multiplied with each other. |
| Bounce Combine | How the bouncyness of two colliding objects is combined. It has the same modes as Friction Combine Mode |
| Friction Direction 2 | The direction of anisotropy. Anisotropic friction is enabled if this direction is not zero. Dynamic Friction 2 and Static Friction 2 will be applied along Friction Direction 2. |
| Dynamic Friction 2 | If anisotropic friction is enabled, DynamicFriction2 will be applied along Friction Direction 2. |
| Static Friction 2 | If anisotropic friction is enabled, StaticFriction2 will be applied along Friction Direction 2. |
Details
Friction is the quantity which prevents surfaces from sliding off each other. This value is critical when trying to stack objects. Friction comes in two forms, dynamic and static. Static friction is used when the object is lying still. It will prevent the object from starting to move. If a large enough force is applied to the object it will start moving. At this point Dynamic Friction will come into play. Dynamic Friction will now attempt to slow down the object while in contact with another.
Hints
- Don't try to use a standard physic material for the main character. Make a customized one and get it perfect.
Hinge Joint
The Hinge Joint groups together two Rigidbodies, constraining them to move like they are connected by a hinge. It is perfect for doors, but can also be used to model chains, pendulums, etc.
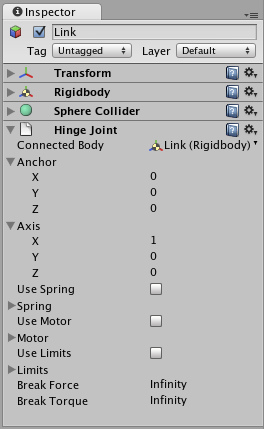
The Hinge Joint Inspector
Properties
| Connected Body | Optional reference to the Rigidbody that the joint is dependent upon. If not set, the joint connects to the world. |
| Anchor | The position of the axis around which the body swings. The position is defined in local space. |
| Axis | The direction of the axis around which the body swings. The direction is defined in local space. |
| Use Spring | Spring makes the Rigidbody reach for a specific angle compared to its connected body. |
| Spring | Properties of the Spring that are used if Use Spring is enabled. |
| Spring | The force the object asserts to move into the position. |
| Damper | The higher this value, the more the object will slow down. |
| Target Position | Target angle of the spring. The spring pulls towards this angle measured in degrees. |
| Use Motor | The motor makes the object spin around. |
| Motor | Properties of the Motor that are used if Use Motor is enabled. |
| Target Velocity | The speed the object tries to attain. |
| Force | The force applied in order to attain the speed. |
| Free Spin | If enabled, the motor is never used to brake the spinning, only accelerate it. |
| Use Limits | If enabled, the angle of the hinge will be restricted within the Min & Max values. |
| Limits | Properties of the Limits that are used if Use Limits is enabled. |
| Min | The lowest angle the rotation can go. |
| Max | The highest angle the rotation can go. |
| Min Bounce | How much the object bounces when it hits the minimum stop. |
| Max Bounce | How much the object bounces when it hits the maximum stop. |
| Break Force | The force that needs to be applied for this joint to break. |
| Break Torque | The torque that needs to be applied for this joint to break. |
Details
A single Hinge Joint should be applied to a GameObject. The hinge will rotate at the point specified by the Anchor property, moving around the specified Axis property. You do not need to assign a GameObject to the joint's Connected Body property. You should only assign a GameObject to the Connected Body property if you want the joint's Transform to be dependent on the attached object's Transform.
Think about how the hinge of a door works. The Axis in this case is up, positive along the Y axis. The Anchor is placed somewhere at the intersection between door and wall. You would not need to assign the wall to the Connected Body, because the joint will be connected to the world by default.
Now think about a doggy door hinge. The doggy door's Axis would be sideways, positive along the relative X axis. The main door should be assigned as the Connected Body, so the doggy door's hinge is dependent on the main door's Rigidbody.
Chains
Multiple Hinge Joints can also be strung together to create a chain. Add a joint to each link in the chain, and attach the next link as the Connected Body.
Hints
- You do not need to assign a Connected Body to your joint for it to work.
- Use Break Force in order to make dynamic damage systems. This is really cool as it allows the player to break a door off its hinge by blasting it with a rocket launcher or running into it with a car.
- The Spring, Motor, and Limits properties allow you to fine-tune your joint's behaviors.
Spring Joint
The Spring Joint groups together two Rigidbodies, constraining them to move like they are connected by a spring.

The Spring Joint Inspector
Properties
| Connected Body | Optional reference to the Rigidbody that the joint is dependent upon. |
| Anchor | Position in the object's local space (at rest) that defines the center of the joint. This is not the point that the object will be drawn toward. |
| X | Position of the joint's local center along the X axis. |
| Y | Position of the joint's local center along the Y axis. |
| Z | Position of the joint's local center along the Z axis. |
| Spring | Strength of the spring. |
| Damper | Amount that the spring is reduced when active. |
| Min Distance | Distances greater than this will not cause the Spring to activate. |
| Max Distance | Distances less than this will not cause the Spring to activate. |
| Break Force | The force that needs to be applied for this joint to break. |
| Break Torque | The torque that needs to be applied for this joint to break. |
Details
Spring Joints allows a Rigidbodied GameObject to be pulled toward a particular "target" position. This position will either be another Rigidbodied GameObject or the world. As the GameObject travels further away from this "target" position, the Spring Joint applies forces that will pull it back to its original "target" position. This creates an effect very similar to a rubber band or a slingshot.
The "target" position of the Spring is determined by the relative position from the Anchor to the Connected Body (or the world) when the Spring Joint is created, or when Play mode is entered. This makes the Spring Joint very effective at setting up Jointed characters or objects in the Editor, but is harder to create push/pull spring behaviors in runtime through scripting. If you want to primarily control a GameObject's position using a Spring Joint, it is best to create an empty GameObject with a Rigidbody, and set that to be the Connected Rigidbody of the Jointed object. Then in scripting you can change the position of the Connected Rigidbody and see your Spring move in the ways you expect.
Connected Rigidbody
You do not need to use a Connected Rigidbody for your joint to work. Generally, you should only use one if your object's position and/or rotation is dependent on it. If there is no Connected Rigidbody, your Spring will connect to the world.
Spring & Damper
Spring is the strength of the force that draws the object back toward its "target" position. If this is 0, then there is no force that will pull on the object, and it will behave as if no Spring Joint is attached at all.
Damper is the resistance encountered by the Spring force. The lower this is, the springier the object will be. As the Damper is increased, the amount of bounciness caused by the Joint will be reduced.
Min & Max Distance
If the position of your object falls in-between the Min & Max Distances, then the Joint will not be applied to your object. The position must be moved outside of these values for the Joint to activate.
Hints
- You do not need to assign a Connected Body to your Joint for it to work.
- Set the ideal positions of your Jointed objects in the Editor prior to entering Play mode.
- Spring Joints require your object to have a Rigidbody attached.
 iOS
iOS
iOS physics optimization hints can be found here.