Customize UXML tag names and attributes
You can customize a UXML tag name, create custom attributes for a custom control, and add attribute decorators in UI(User Interface) Allows a user to interact with your application. Unity currently supports three UI systems. More info
See in Glossary Builder.
Customize the custom control name
By default, the tag name in UXML for your custom control is the C# class name. It’s not recommended that a tag has a different name than the C# class. However, you have the option to customize the tag name.
To customize a UXML tag name, add a name argument to the UxmlElement attribute.
Note: The tag name must be unique and you must reference the classes’ namespace in UXML.
For example, if you create the following custom button:
using UnityEngine.UIElements;

[UxmlElement("MyButton")]
public partial class CustomButtonElement : Button
{
}
You can then reference the custom button in UXML with the custom name or its type:
<ui:UXML xmlns:ui="UnityEngine.UIElements">
    <MyButton />
    <CustomButtonElement />
</ui:UXML>
Create custom attributes for a custom control
To create new attributes for a custom control, add the UxmlAttribute attribute to the custom attribute definition. By default, UI Toolkit resolves the C# Camel case or Pascal case attribute names into lowercase words connected by hyphens. For example, a property named MyFloat or myFloat in C# becomes my-float in UXML and UI Builder.
Create simple custom attributes
The following example creates a custom control with multiple custom attributes:
using System;
using System.Collections.Generic;
using UnityEngine;
using UnityEngine.UIElements;

[UxmlElement]
public partial class ExampleVisualElement : VisualElement
{
    [UxmlAttribute]
    public string myStringValue { get; set; }

    [UxmlAttribute]
    public int myIntValue { get; set; }

    [UxmlAttribute]
    public float myFloatValue { get; set; }

    [UxmlAttribute]
    public List<int> myListOfInts { get; set; }

    [UxmlAttribute, UxmlTypeReference(typeof(VisualElement))]
    public Type myType { get; set; }

    [UxmlAttribute]
    public Texture2D myTexture { get; set; }

    [UxmlAttribute]
    public Color myColor { get; set; }
}
The following example UXML document uses the custom control:
<ui:UXML xmlns:ui="UnityEngine.UIElements">
    <ExampleElement my-string-value="Hello World" my-int-value="123" />
    <ExampleElement my-float-value="3.14" my-list-of-ints="1,2,3" />
    <ExampleElement my-string-value="Hello World" my-int-value="123" />
    <ExampleElement my-texture="project://database/Assets/MyTexture.png" />
    <ExampleElement my-color="#FF0000FF" />
    <ExampleElement my-type="UnityEngine.UIElements.Button, UnityEngine.UIElementsModule" />
</ui:UXML>
Create complex custom attributes
You can use struct or class instances as attributes, and lists of struct or class instances as attributes. To do so, you must convert them to and from a string and declare a UxmlAttributeConverter to support this conversion.
Note: When you use a class in a list, ensure that its string representation doesn’t contain any commas (,) because commas are used to separate the items.
The following example creates a custom control with custom list attributes:
using System;
using System.Collections.Generic;
using UnityEngine.UIElements;

[Serializable]
public class MyClassWithData
{
    public int myInt;
    public float myFloat;
}

[UxmlElement]
public partial class MyElementWithData : VisualElement
{
    [UxmlAttribute]
    public MyClassWithData someData;

    [UxmlAttribute]
    public List<MyClassWithData> lotsOfData;
}
The following example converts the custom property and declares a UxmlAttributeConverter to support the conversion:
using UnityEditor.UIElements;

public class MyClassWithDataConverter : UxmlAttributeConverter<MyClassWithData>
{
    public override MyClassWithData FromString(string value)
    {
        // Split using a | so that comma (,) can be used by the list.
        var split = value.Split('|');

        return new MyClassWithData
        {
            myInt = int.Parse(split[0]),
            myFloat = float.Parse(split[1])
        };
    }

    public override string ToString(MyClassWithData value) => $"{value.myInt}|{value.myFloat}";
}
The following example UXML document uses the custom control:
<ui:UXML xmlns:ui="UnityEngine.UIElements">
    <MyElementWithData some-data="1|2.3" lots-of-data="1|2,3|4,5|6" />
</ui:UXML>
Create nested custom attributes with UxmlObjectReference
You can use UxmlObjectReference to create nested custom attributes. To do this, you use the UxmlObjectReference attribute to set a name. This name indicates that the UxmlObjects will be parented to an element with that name. This helps you to manage UxmlObjects within elements, especially when elements have multiple UxmlObject fields. By assigning UxmlObjects to specific names within UxmlObjectReference, you can easily tell which UxmlObjects belong to which field, making your project clearer and better organized.
For more information and examples, see UxmlObjectReferenceAttribute.
Customize the custom attribute names
You can customize the attribute name through the name argument of the UxmlAttribute attribute.
The following example creates a custom control with customized attribute names:
using UnityEngine.UIElements;

[UxmlElement]
public partial class CustomAttributeNameExample : VisualElement
{
    [UxmlAttribute("character-name")]
    public string myStringValue { get; set; }

    [UxmlAttribute("credits")]
    public float myFloatValue { get; set; }

    [UxmlAttribute("level")]
    public int myIntValue { get; set; }

    [UxmlAttribute("usage")]
    public UsageHints myEnumValue { get; set; }
}
The following example UXML document uses the custom attribute names:
<ui:UXML xmlns:ui="UnityEngine.UIElements">
    <CustomAttributeNameExample character-name="Karl" credits="1.23" level="1" usage="DynamicColor" />
</ui:UXML>
If you’ve changed the name of an attribute, to ensure that the UXML files with the previous attribute name can still be used, add the obsoleteNames argument to the UxmlAttribute attribute.
The following example creates a custom control with customized and obsolete attributes names:
using UnityEngine.UIElements;

[UxmlElement]
public partial class CharacterDetails : VisualElement
{
    [UxmlAttribute("character-name", "npc-name")]
    public string npcName { get; set; }

    [UxmlAttribute("character-health", "health")]
    public float health { get; set; }
}
The following example UXML document uses obsolete names:
<ui:UXML xmlns:ui="UnityEngine.UIElements">
    <CharacterDetails npc-name="Haydee" health="100" />
</ui:UXML>
Add attribute decorators in UI Builder
You can add the following decorator attributes on custom attribute fields. When you add a decorator attribute, the corresponding UI controls, such as a slider for Range, are displayed in the UI Builder’s InspectorA Unity window that displays information about the currently selected GameObject, asset or project settings, allowing you to inspect and edit the values. More info
See in Glossary tab:
The following example creates a custom control with decorators on its attribute fields:
using UnityEngine.UIElements;
using UnityEngine;

[UxmlElement]
public partial class ExampleText : VisualElement
{
    [TextArea, UxmlAttribute]
    public string myText;

    [Header("My Header")]
    [Range(0, 100)]
    [UxmlAttribute]
    public int rangedInt;

    [Tooltip("My custom tooltip")]
    [Min(10)]
    [UxmlAttribute]
    public int minValue = 100;
}
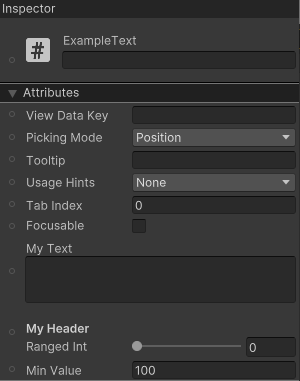
The UI Builder displays the attributes with the decorators:
Add custom property drawer in UI Builder
You can add custom property drawers on fields in the UI Builder.
The following example creates a custom control with a custom property drawerA Unity feature that allows you to customize the look of certain controls in the Inspector window by using attributes on your scripts, or by controlling how a specific Serializable class should look More info
See in Glossary:
using UnityEngine;
using UnityEngine.UIElements;

public class MyDrawerAttribute : PropertyAttribute { }

[UxmlElement]
public partial class MyDrawerExample : Button
{
    [UxmlAttribute]
    public Color myColor;

    [MyDrawer, UxmlAttribute]
    public string myText;
}
To access other serialized properties, prepend the name with serializedData. The following code example uses serializedData.myColor to find the myColor attribute:
using UnityEditor;
using UnityEditor.UIElements;
using UnityEngine.UIElements;

[CustomPropertyDrawer(typeof(MyDrawerAttribute))]
public class MyDrawerAttributePropertyDrawer : PropertyDrawer
{
    public override VisualElement CreatePropertyGUI(SerializedProperty property)
    {
        var row = new VisualElement { style = { flexDirection = FlexDirection.Row } };
        var textField = new TextField("My Text") { style = { flexGrow = 1 } };
        var button = new Button { text = ":" };
        button.clicked += () => textField.value = "RESET";

        // Get the parent property
        var parentPropertyPath = property.propertyPath.Substring(0, property.propertyPath.LastIndexOf('.'));
        var parent = property.serializedObject.FindProperty(parentPropertyPath);

        var colorProp = parent.FindPropertyRelative("myColor");
        textField.TrackPropertyValue(colorProp, p =>
        {
            row.style.backgroundColor = p.colorValue;
        });

        row.style.backgroundColor = colorProp.colorValue;
        row.Add(textField);
        row.Add(button);
        textField.BindProperty(property);

        return row;
    }
}
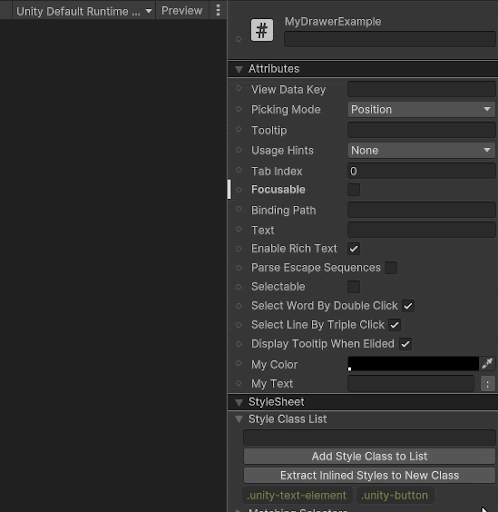
The custom property drawer looks like the following: