Create a drag-and-drop list and tree views between windows
Version: 2023.2+
Drag-and-drop is a common feature in UI(User Interface) Allows a user to interact with your application. Unity currently supports three UI systems. More info
See in Glossary design. You can use UI Toolkit to create a drag-and-drop UI inside a custom Editor window or inside an application built by Unity. This example demonstrates how to create a drag-and-drop UI with ListView and TreeView inside a custom Editor window.
Example overview
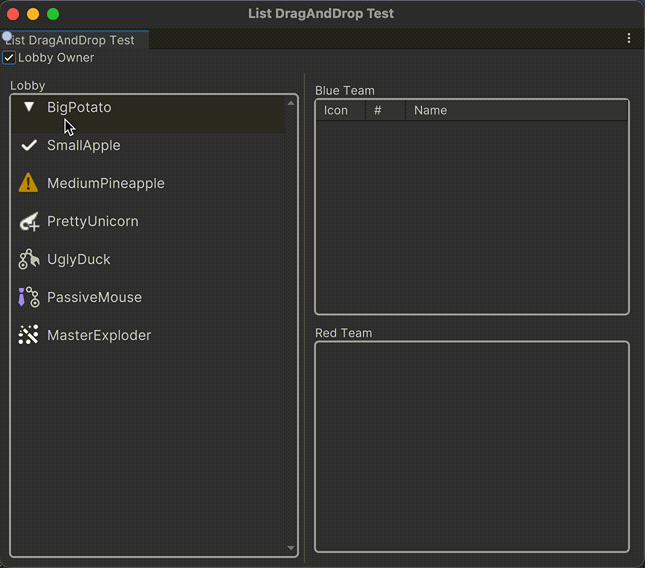
The example creates a split window that includes a lobby and two teams within a custom Editor window. The lobby is created with ListView. For demonstration purposes, one team is created with MultiColumnListView and another team is created with TreeView. The example uses a Toggle to enable and disable the drag-and-drop operation. Once enabled, you can drag the players to reorder them and drag them from the lobby list to the team lists, as shown below:
You can find the completed files that this example creates in this GitHub repository.
Prerequisites
This guide is for developers familiar with the Unity Editor, UI Toolkit, and C# scripting. Before you start, get familiar with the following:
- UI Builder
- Visual TreeAn object graph, made of lightweight nodes, that holds all the elements in a window or panel. It defines every UI you build with the UI Toolkit.
See in Glossary - UXML
- USS
- ListView
- MultiColumnListView
- TreeView
Create the player data
To begin, create an asset to manage a list of players in the lobby. Create a script to define the struct of PlayerData that represents data for a player. The struct has three fields: a string name, an integer number, and a Texture2D object icon. Mark the fields with the [SerializeField] attribute, so that their values can be serialized and stored in Unity’s data format. Create a Collection Database asset to manage the player data for the drag-and-drop UI. The Collection Database asset contains a serialized list of PlayerData objects that you can set in the Unity Editor.
Create a project in Unity with any template.
In the Assets folder of your Project windowA window that shows the contents of your
Assetsfolder (Project tab) More info
See in Glossary, create a folder namedScriptsto store your script files.In the ScriptsA piece of code that allows you to create your own Components, trigger game events, modify Component properties over time and respond to user input in any way you like. More info
See in Glossary folder, create a folder namedData.-
In the Data folder, create a C# script named
PlayerData.cswith the following content:using System; using UnityEngine; namespace CollectionTests { // Make the struct serializable, so its values can be stored in Unity's data format [Serializable] public struct PlayerData { // Declare private fields for the player's name, number, and icon, with the SerializeField attribute [SerializeField] string name; [SerializeField] int number; [SerializeField] Texture2D icon; // Calculate a unique identifier for the player based on their name and number public int id => name.GetHashCode() + 27 * number; // Define read-only properties for accessing the private fields public string Name => name; public int Number => number; public Texture2D Icon => icon; // Override the ToString() method to return a formatted string representation of the player data public override string ToString() { return $"{Name} #{Number.ToString()}"; } } } -
In the Data folder, create a C# script named
CollectionDatabase.cswith the following content:using System.Collections.Generic; using UnityEngine; namespace CollectionTests { // Create a CollectionDatabase object that you can create as an asset via the Asset menu. [CreateAssetMenu] public class CollectionDatabase : ScriptableObject { // Declare a private list of PlayerData that can set in the Unity Editor. [SerializeField] List<PlayerData> m_InitialLobbyList; public IEnumerable<PlayerData> initialLobbyList => m_InitialLobbyList; } } In the Assets folder, create a folder named
Resources.Right-click in the Resources folder, and select Create > Collection Database. This creates a new Collection Database asset.
In the InspectorA Unity window that displays information about the currently selected GameObject, asset or project settings, allowing you to inspect and edit the values. More info
See in Glossary window of the Collection Database asset, add a few players to the Lobby list. You can add as many players as you want.
Create custom controls to display the data
Create custom controls named PlayerDataElement and PlayerItemView to display the data of a player. The PlayerItemView control binds to a PlayerData object as its data context.
In the Scripts folder, create a folder named
UI.-
In the UI folder, create a C# script named
PlayerDataElement.cswith the following content:using System; using UnityEngine.UIElements; namespace CollectionTests { [UxmlElement] public partial class PlayerDataElement : VisualElement { public PlayerData data { get; private set; } public int id { get; set; } public virtual void Bind(PlayerData player) { data = player; } public virtual void Reset() { data = default; id = -1; } } } -
In the UI folder, create a C# script named
PlayerItemView.cswith the following content:using System; using UnityEngine.UIElements; namespace CollectionTests { [UxmlElement] public partial class PlayerItemView : PlayerDataElement { VisualElement m_Icon; Label m_Name; // Bind the player data to the UI. public override void Bind(PlayerData player) { base.Bind(player); m_Icon ??= this.Q("Icon"); m_Name ??= this.Q<Label>(); m_Icon.style.backgroundImage = player.Icon; m_Name.text = player.Name; } } }
Define the layout and the style of the UI
Create a USS file to define the style for the UI. Create two UXML Documents to define the UI layout for the player item view and the main view. In the main view, to enable the reordering of list items by dragging, set the reorderable attribute to true for the ListView, MultiColumnListView, and TreeView.
In the Assets folder, create a folder named
UIto store your UXML and USS files.-
In the UI folder, create a USS file named
main.usswith the following content:.team-list { border-color: rgb(164, 164, 164); border-width: 2px; border-top-left-radius: 5px; border-bottom-left-radius: 5px; border-top-right-radius: 5px; border-bottom-right-radius: 5px; flex-grow: 1; } .section-container { padding: 5px; flex-grow: 1; background-color: rgba(0, 0, 0, 0); } .unity-list-view__empty-label { display: none; } #Container { flex-direction: row; align-items: center; padding-left: 6px; } #Icon { width: 24px; height: 24px; } #PlayerName { flex-grow: 1; -unity-text-align: middle-left; font-size: 14px; padding-left: 6px; } .split-window{ min-width: 250px; } .main-view{ flex-grow: 1; background-color: rgba(0, 0, 0, 0); flex-direction: column; } -
In the UI folder, create a UXML file named
PlayerItemView.uxmlwith the following content:<ui:UXML xmlns:ui="UnityEngine.UIElements" xmlns:uie="UnityEditor.UIElements" editor-extension-mode="False"> <Style src="main.uss" /> <CollectionTests.PlayerItemView name="container"> <ui:VisualElement name="Icon" /> <ui:Label name="PlayerName"/> </CollectionTests.PlayerItemView> </ui:UXML> -
In the UI folder, create a UXML file named
ListDragAndDropTestWindow.uxmlwith the following content:<ui:UXML xmlns:ui="UnityEngine.UIElements" xmlns:uie="UnityEditor.UIElements" xsi="http://www.w3.org/2001/XMLSchema-instance" engine="UnityEngine.UIElements" editor="UnityEditor.UIElements" noNamespaceSchemaLocation="../../../UIElementsSchema/UIElements.xsd" editor-extension-mode="False"> <Style src="main.uss" /> <ui:VisualElement class="main-view"> <ui:Toggle name="Toggle-LobbyOwner" text="Lobby Owner" /> <ui:VisualElement class="section-container" > <ui:TwoPaneSplitView fixed-pane-initial-dimension="300"> <ui:VisualElement class="split-window" > <ui:VisualElement name="LobbyContainer" class="section-container" > <ui:Label tabindex="-1" text="Lobby" display-tooltip-when-elided="true" name="Name-Lobby" /> <ui:ListView name="ListView-Lobby" reorderable="true" selection-type="Multiple" class="team-list" /> </ui:VisualElement> </ui:VisualElement> <ui:VisualElement class="split-window" > <ui:VisualElement name="TeamContainer" class="section-container" > <ui:VisualElement name="BlueTeam" class="section-container" > <ui:Label tabindex="-1" text="Blue Team" display-tooltip-when-elided="true" name="Name-BlueTeam" /> <ui:MultiColumnListView name="ListView-BlueTeam" reorderable="true" selection-type="Multiple" class="team-list" > <ui:Columns> <ui:Column name="icon" title="Icon" width="50" resizable="false" /> <ui:Column name="number" title="#" width="40" resizable="false" /> <ui:Column name="name" stretchable="true" title="Name" /> </ui:Columns> </ui:MultiColumnListView> </ui:VisualElement> <ui:VisualElement name="RedTeam" class="section-container" > <ui:Label tabindex="-1" text="Red Team" display-tooltip-when-elided="true" name="Name-RedTeam" /> <ui:TreeView name="TreeView-RedTeam" reorderable="true" selection-type="Multiple" class="team-list" /> </ui:VisualElement> </ui:VisualElement> </ui:VisualElement> </ui:TwoPaneSplitView> </ui:VisualElement> </ui:VisualElement> </ui:UXML>
Implement the drag-and-drop operations
Create a script to set up the lobby and the teams’ lists and bind them to the player data you created earlier. The script also implements drag-and-drop operations between the lobby and the teams’ lists.
In the Scripts folder, create a folder named
Controllers.-
In the Controllers folder, create a C# script named
LobbyController.cswith the following content:using System; using System.Collections.Generic; using UnityEngine; using UnityEngine.UIElements; namespace CollectionTests { public class LobbyController { const string k_DraggedItemsKey = "DraggedIndices"; const string k_SourceKey = "SourceCollection"; ListView m_LobbyListView; MultiColumnListView m_BlueTeamListView; TreeView m_RedTeamTreeView; Toggle m_IsOwnerToggle; List<PlayerData> m_LobbyItemsSource; List<PlayerData> m_BlueTeamItemsSource = new(); List<TreeViewItemData<PlayerData>> m_RedTeamItemsSource = new(); public LobbyController(VisualElement rootVisualElement, VisualTreeAsset playerItemAsset, CollectionDatabase collectionDatabase) { // Grab references m_IsOwnerToggle = rootVisualElement.Q<Toggle>("Toggle-LobbyOwner"); m_LobbyListView = rootVisualElement.Q<ListView>("ListView-Lobby"); m_BlueTeamListView = rootVisualElement.Q<MultiColumnListView>("ListView-BlueTeam"); m_RedTeamTreeView = rootVisualElement.Q<TreeView>("TreeView-RedTeam"); m_LobbyItemsSource = new List<PlayerData>(); foreach (var item in collectionDatabase.initialLobbyList) { m_LobbyItemsSource.Add(item); } m_LobbyListView.makeItem = MakeItem; m_LobbyListView.bindItem = (e, i) => BindItem(e, i, m_LobbyItemsSource[i]); m_LobbyListView.destroyItem = DestroyItem; m_LobbyListView.fixedItemHeight = 38; m_LobbyListView.itemsSource = m_LobbyItemsSource; m_LobbyListView.canStartDrag += OnCanStartDrag; m_LobbyListView.setupDragAndDrop += args => OnSetupDragAndDrop(args, m_LobbyListView); m_LobbyListView.dragAndDropUpdate += args => OnDragAndDropUpdate(args, m_LobbyListView, true); m_LobbyListView.handleDrop += args => OnHandleDrop(args, m_LobbyListView, true); var scrollView = m_LobbyListView.Q<ScrollView>(); scrollView.touchScrollBehavior = ScrollView.TouchScrollBehavior.Elastic; scrollView.verticalScrollerVisibility = ScrollerVisibility.AlwaysVisible; m_BlueTeamListView.columns["icon"].makeCell = () => new PlayerDataElement { style = { width = 24, height = 24, alignSelf = Align.Center } }; m_BlueTeamListView.columns["icon"].bindCell = (element, i) => { BindItem(element, i, m_BlueTeamItemsSource[i]); element.style.backgroundImage = m_BlueTeamItemsSource[i].Icon; }; m_BlueTeamListView.columns["number"].makeCell = () => new Label { style = { alignSelf = Align.Center } }; m_BlueTeamListView.columns["number"].bindCell = (element, i) => ((Label)element).text = $"#{m_BlueTeamItemsSource[i].Number}"; m_BlueTeamListView.columns["name"].makeCell = () => new Label { style = { paddingLeft = 10 } }; m_BlueTeamListView.columns["name"].bindCell = (element, i) => ((Label)element).text = m_BlueTeamItemsSource[i].Name; m_BlueTeamListView.fixedItemHeight = 38; m_BlueTeamListView.reorderable = false; m_BlueTeamListView.itemsSource = m_BlueTeamItemsSource; m_BlueTeamListView.canStartDrag += OnCanStartDrag; m_BlueTeamListView.setupDragAndDrop += args => OnSetupDragAndDrop(args, m_BlueTeamListView); m_BlueTeamListView.dragAndDropUpdate += args => OnDragAndDropUpdate(args, m_BlueTeamListView); m_BlueTeamListView.handleDrop += args => OnHandleDrop(args, m_BlueTeamListView); m_RedTeamTreeView.makeItem = MakeItem; m_RedTeamTreeView.bindItem = (e, i) => BindItem(e, m_RedTeamTreeView.GetIdForIndex(i), (PlayerData)m_RedTeamTreeView.viewController.GetItemForIndex(i)); m_RedTeamTreeView.destroyItem = DestroyItem; m_RedTeamTreeView.fixedItemHeight = 38; m_RedTeamTreeView.SetRootItems(m_RedTeamItemsSource); m_RedTeamTreeView.canStartDrag += OnCanStartDrag; m_RedTeamTreeView.setupDragAndDrop += args => OnSetupDragAndDrop(args, m_RedTeamTreeView); m_RedTeamTreeView.dragAndDropUpdate += args => OnDragAndDropUpdate(args, m_RedTeamTreeView); m_RedTeamTreeView.handleDrop += args => OnHandleDrop(args, m_RedTeamTreeView); VisualElement MakeItem() { return playerItemAsset.Instantiate(); } static void BindItem(VisualElement element, int index, PlayerData data) { var playerView = element.Q<PlayerDataElement>(); playerView.Bind(data); playerView.id = index; } static void DestroyItem(VisualElement element) { var playerView = element.Q<PlayerDataElement>(); playerView.Reset(); } bool OnCanStartDrag(CanStartDragArgs _) => m_IsOwnerToggle.value; StartDragArgs OnSetupDragAndDrop(SetupDragAndDropArgs args, BaseVerticalCollectionView source) { var playerView = args.draggedElement.Q<PlayerDataElement>(); if (playerView == null) return args.startDragArgs; var startDragArgs = new StartDragArgs(args.startDragArgs.title, DragVisualMode.Move); startDragArgs.SetGenericData(k_SourceKey, source); var hasSelection = false; foreach (var id in args.selectedIds) { hasSelection = true; break; } startDragArgs.SetGenericData(k_DraggedItemsKey, hasSelection ? args.selectedIds : new List<int> { playerView.id }); return startDragArgs; } DragVisualMode OnDragAndDropUpdate(HandleDragAndDropArgs args, BaseVerticalCollectionView destination, bool isLobby = false) { var source = args.dragAndDropData.GetGenericData(k_SourceKey); if (source == destination) return DragVisualMode.None; return !isLobby && destination.itemsSource.Count >= 3 ? DragVisualMode.Rejected : DragVisualMode.Move; } DragVisualMode OnHandleDrop(HandleDragAndDropArgs args, BaseVerticalCollectionView destination, bool isLobby = false) { if (args.dragAndDropData.unityObjectReferences != null) { var objectsToString = string.Empty; foreach (var obj in args.dragAndDropData.unityObjectReferences) { objectsToString += $"{obj.name}, "; } if (!string.IsNullOrEmpty(objectsToString)) { Debug.Log($"That was {objectsToString}"); return DragVisualMode.Move; } } if (args.dragAndDropData.GetGenericData(k_DraggedItemsKey) is not List<int> draggedIds) throw new ArgumentNullException($"Indices are null."); if (args.dragAndDropData.GetGenericData(k_SourceKey) is not BaseVerticalCollectionView source) throw new ArgumentNullException($"Source is null."); // Let default reordering happen. if (source == destination) return DragVisualMode.None; // Be coherent with the dragAndDropUpdate condition. if (!isLobby && destination.itemsSource.Count >= 3) return DragVisualMode.Rejected; var treeViewSource = source as BaseTreeView; // ******************************************************** // Add items first, from item indices in the source. // ******************************************************** // Gather ids from dragged indices var ids = new List<int>(); foreach (var id in draggedIds) { ids.Add(id); } // Special TreeView case, we need to gather children or selected indices. if (treeViewSource != null) { GatherChildrenIds(ids, treeViewSource); } if (destination is BaseTreeView treeView) { foreach (var id in ids) { var data = (PlayerData)source.viewController.GetItemForId(id); treeView.AddItem(new TreeViewItemData<PlayerData>(data.id, data), args.parentId, args.childIndex, false); } treeView.viewController.RebuildTree(); } else if (destination.viewController is BaseListViewController destinationListViewController) { for (var i = ids.Count - 1; i >= 0; i--) { var id = ids[i]; var data = (PlayerData)source.viewController.GetItemForId(id); destinationListViewController.itemsSource.Insert(args.insertAtIndex, data); } } else { throw new ArgumentException("Unhandled destination."); } // Then remove from the source. if (source is BaseTreeView sourceTreeView) { foreach (var id in draggedIds) { var data = (PlayerData)source.viewController.GetItemForId(id); sourceTreeView.viewController.TryRemoveItem(data.id, false); } sourceTreeView.viewController.RebuildTree(); sourceTreeView.RefreshItems(); } else if (source.viewController is BaseListViewController sourceListViewController) { sourceListViewController.RemoveItems(draggedIds); } else { throw new ArgumentException("Unhandled source."); } foreach (var id in ids) { var index = destination.viewController.GetIndexForId(id); destination.AddToSelection(index); } source.ClearSelection(); destination.RefreshItems(); LogTeamSizes(); return DragVisualMode.Move; } } void LogTeamSizes() { Debug.Log($"Blue: {m_BlueTeamListView.itemsSource.Count} / 3\tRed: {m_RedTeamTreeView.viewController.GetItemsCount()} / 3"); } static void GatherChildrenIds(List<int> ids, BaseTreeView treeView) { for (var i = 0; i < ids.Count; i++) { var id = ids[i]; var childrenIds = treeView.viewController.GetChildrenIds(id); foreach (var childId in childrenIds) { ids.Insert(i + 1, childId); i++; } } } } }
Create a custom Editor window
Create a custom Editor window to display the drag-and-drop UI.
In the Assets folder, create a folder named
Editor.-
In the Editor folder, create a C# script named
ListDragAndDropTestWindow.cswith the following content:using System; using UnityEditor; using UnityEngine; using UnityEngine.UIElements; namespace CollectionTests { public class ListDragAndDropTestWindow : EditorWindow { [MenuItem("Collection Tests/List DragAndDrop Window")] public static void ShowExample() { var wnd = GetWindow<ListDragAndDropTestWindow>(); wnd.titleContent = new GUIContent("List DragAndDrop Test"); } public void CreateGUI() { // Each editor window contains a root VisualElement object var root = rootVisualElement; // Import UXML var visualTreeAsset = EditorGUIUtility.Load("Assets/create-drag-and-drop-list-treeview/UI/ListDragAndDropTestWindow.uxml") as VisualTreeAsset; visualTreeAsset.CloneTree(root); // Load the PlayerItemView.uxml file var playerItemAsset = EditorGUIUtility.Load("Assets/create-drag-and-drop-list-treeview/UI/PlayerItemView.uxml") as VisualTreeAsset; //Load the CollectionDatabase from the Resources folder var collectionDatabase = Resources.Load<CollectionDatabase>("CollectionDatabaseAsset"); // Create the LobbyController var lobbyController = new LobbyController(root, playerItemAsset, collectionDatabase); } } }
Test the UI
To test, change the order of the players in the Lobby list and move players from the Lobby list to the team lists when the Lobby Owner checkbox is selected. You can also change the hierarchy of players in the Red team list. Based on the conditions set in the LobbyController.cs script, you can add a maximum of three players to each team.
- From the main menu, select Collection Tests > List DragAndDrop Window.
- In the List DragAndDrop Test window, select the Lobby Owner checkbox.
- Drag the players in the Lobby list to change their orders.
- Drag the players from the Lobby list to the team lists.
- Drag the players in the Red team list to change their hierarchies.