GUI Скин
GUISkins are a collection of GUIStyles that can be applied to your GUI. Each Control type has its own Style definition. Skins are intended to allow you to apply style to an entire UI, instead of a single Control by itself.

To create a GUISkin, select Assets->Create->GUI Skin from the menubar.
Please Note: This page refers to part of the IMGUI system, which is a scripting-only UI system. Unity has a full GameObject-based UI system which you may prefer to use. It allows you to design and edit user interface elements as visible objects in the scene view. See the UI System Manual for more information.
Свойства
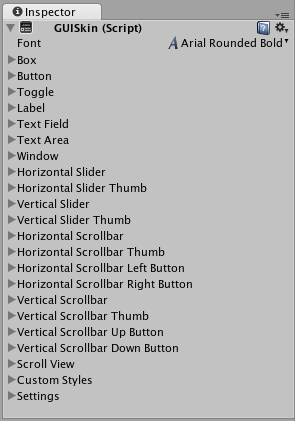
Каждое свойство GUISkin содержит индивидуальный GUIStyle. Please read the GUIStyle page for more information about how to use Styles. Пожалуйста, прочитайте GUIStyle для получения дополнительной информации о том, как использовать Styles.
| Свойство: | Функция: |
|---|---|
| Font | Глобальный Font для каждого элемента GUI. |
| Box | Style, используемый для каждого Button |
| Button | Style, используемый для каждого Button |
| Toggle | Style, используемый для каждого Toggle |
| Label | Style, используемый для каждого Label |
| Text Field | Style, используемый для каждого Text Fields |
| Text Area | Style, используемый для каждого Text Areas |
| Window | Style используемый для всех Window |
| Horizontal Slider | Style, используемый для каждого Horizontal Slider |
| Horizontal Slider Thumb | Style, используемый для каждого Horizontal Slider Thumb Buttons |
| Vertical Slider | Style, используемый для каждого Vertical Slider |
| Vertical Slider Thumb | Style, используемый для каждого Vertical Slider Thumb Button |
| Horizontal Scrollbar | Style, используемый для каждого Horizontal Scrollbar |
| Horizontal Scrollbar Thumb | Style, используемый для каждого Horizontal Scrollbar Thumb Button |
| Horizontal Scrollbar Left Button | Style, используемый для Left Button у каждого Horizontal Scrollbar |
| Horizontal Scrollbar Right Button | Style, используемый для Right Button у каждого Horizontal Scrollbar |
| Vertical Scrollbar | Style, используемый для каждого Vertical Scrollbar |
| Vertical Scrollbar Thumb | Style, используемый для каждого Vertical Scrollbar Thumb Button |
| Vertical Scrollbar Up Button | Style, используемый для Up Button у каждого Horizontal Scrollbar |
| Vertical Scrollbar Down Button | Style, используемый для Down Button у каждого Vertical Scrollbar |
| Custom 1–20 | Дополнительный Style, который может быть применён к любому Control |
| Custom Styles | Массив дополнительных Style, которые могут быть применены к любому элементу GUI |
| Settings | Дополнительные Settings для всех GUI |
| Double Click Selects Word | Если опция включена, то дважды нажимая на слово, оно будет выделено |
| Triple Click Selects Line | Если опция включена, то трижды нажимая на слово, будет выделена вся строка |
| Cursor Color | Цвет курсора клавиатуры |
| Cursor Flash Speed | Скорость, с которой курсор будет моргать при редактировании в любом Text элементе |
| Selection Color | Цвет выделенной области текста |
Детали
Когда вы создаёте GUI для вашей игры, вам, вероятно, нужно сделать много настроек для каждого элемента GUI. В разных жанрах игры, таких как стратегия или ролевая игра, есть необходимость практически в каждом типе элементов GUI.
Because each individual Control uses a particular Style, it does not make sense to create a dozen-plus individual Styles and assign them all manually. GUI Skins take care of this problem for you. By creating a GUI Skin, you have a pre-defined collection of Styles for every individual Control. You then apply the Skin with a single line of code, which eliminates the need to manually specify the Style of each individual Control.
Creating GUISkins
GUISkins are asset files. To create a GUI Skin, select Assets->Create->GUI Skin from the menubar. This will put a new GUISkin in your Project View.

Editing GUISkins
After you have created a GUISkin, you can edit all of the Styles it contains in the Inspector. For example, the Text Field Style will be applied to all Text Field Controls.

No matter how many Text Fields you create in your script, they will all use this Style. Of course, you have control over changing the styles of one Text Field over the other if you wish. We’ll discuss how that is done next.
Applying GUISkins
To apply a GUISkin to your GUI, you must use a simple script to read and apply the Skin to your Controls.
    // Create a public variable where we can assign the GUISkin
    var customSkin : GUISkin;

    // Apply the Skin in our OnGUI() function
    function OnGUI () {
        GUI.skin = customSkin;

        // Now create any Controls you like, and they will be displayed with the custom Skin
        GUILayout.Button ("I am a re-Skinned Button");

        // You can change or remove the skin for some Controls but not others
        GUI.skin = null;

        // Any Controls created here will use the default Skin and not the custom Skin
        GUILayout.Button ("This Button uses the default UnityGUI Skin");
    }
In some cases you want to have two of the same Control with different Styles. For this, it does not make sense to create a new Skin and re-assign it. Instead, you use one of the Custom Styles in the skin. Provide a Name for the custom Style, and you can use that name as the last argument of the individual Control.
    // One of the custom Styles in this Skin has the name "MyCustomControl"
    var customSkin : GUISkin;

    function OnGUI () {
        GUI.skin = customSkin;

        // We provide the name of the Style we want to use as the last argument of the Control function
        GUILayout.Button ("I am a custom styled Button", "MyCustomControl");

        // We can also ignore the Custom Style, and use the Skin's default Button Style
        GUILayout.Button ("I am the Skin's Button Style");
    }
For more information about working with GUIStyles, please read the GUIStyle page. For more information about using UnityGUI, please read the GUI Scripting Guide.