トラブルシューティング
このセクションでは、以下の問題に関する情報を提供します。
| エラーの種類 | エラーメッセージ |
|---|---|
| 一般的な起動時の問題 | - Error messages in the Package Manager window - Package Manager missing or window doesn’t open - Problems after upgrading Unity to new version |
| パッケージのインストールに関する問題 | - Package installation fails - Unable to add package from Git URL - Insufficient drive space |
| Package signature issues | - Package version has no signature - Package version doesn’t have a valid signature |
| Git 依存関係のインストールに関する問題 | - ‘git’ 実行ファイルが見つからない - git-lfs: コマンドが見つからない - リポジトリが見つからない - [Could not read Username: terminal prompts disabled] メッセージ(#prompts-disabled) - Git バージョンをアップデートできない |
| Asset Store パッケージ (My Assets) | - ‘Failed to parse http response’ in My Assets context |
| スコープ付きのレジストリー | - Package Manager ウィンドウに ‘My Registries’ が表示されない |
| パッケージビルド時の問題 | - Missing MonoBehaviour errors |
You can also run the Unity Package Manager Diagnostics tool if you are experiencing problems that might be network-related. For more information, refer to Diagnose network issues.
Package Manager ウィンドウのエラーメッセージ
The Package Manager displays error indicators in the Package Manager window when it encounters problems.
System-wide issues
-
Network connection issues
Error messages appear in the status bar when the Package Manager has detected an issue that isn’t related to a specific package. For example, if the Package Manager can’t access the package registry server, it displays this message in the status bar:

ネットワークエラーメッセージ -
Error refreshing assets (or Error refreshing packages)
If your network can’t reach the package registry server, it’s probably because there is a connection problem with the network. When you or your system administrator diagnose and fix the network error, the status bar clears.
If your network connection is working, but you aren’t signed into your Unity account, the Package Manager doesn’t display any Asset Store packages. When you try to use the My Assets context, the Package Manager prompts you to sign in:
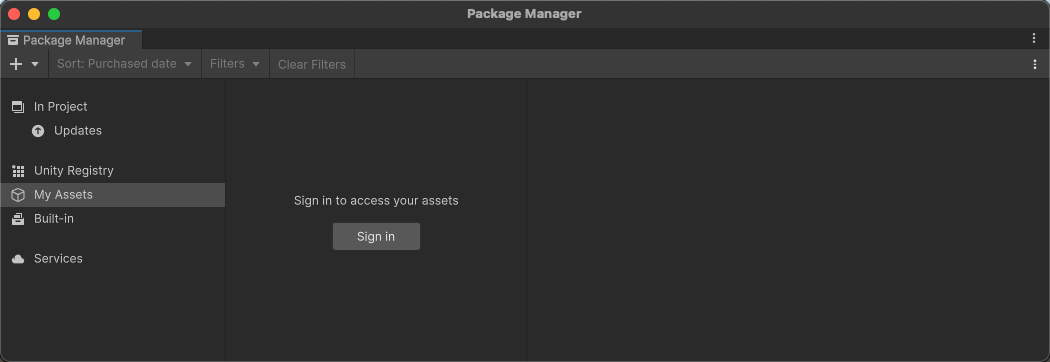
Unity アカウントからログアウトした状態 Click the Sign in button inside the list panel to sign into your Unity account through the Unity Hub.
Package-specific issues
-
If a specific package has a problem when loading or installing (for example, when determining which package versions to load), the error icon (
 ) appears in the list panel next to the compromised package (A). To find out what the problem is, check the compromised package’s details panel to view the detailed error message (B):
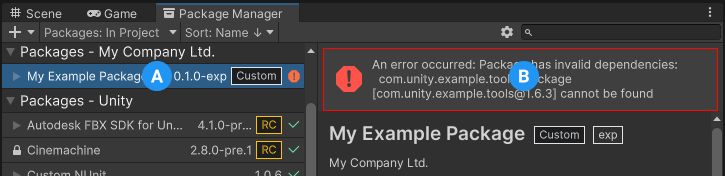
Dependency error message
Package Manager が見つからない、またはウィンドウが開かない
Package Manager ウィンドウが画面外に移動したり、他のウィンドウに隠れてしまうことがあります。このような場合には Package Manager ウィンドウを開くのに失敗したように見えます。この場合、ウィンドウのレイアウトをリセットして (Window > Layouts > Default)、Package Manager ウィンドウを再度開いてみてください。
それでもPackage Manager ウィンドウが表示されない場合は、Unity Console ウィンドウを確認してください。
Failed to resolve packages: The file [<project-path>/Packages/manifest.json] is not valid JSON:
  Unexpected token '}' at 44:1
  }
This error message indicates a malformed manifest.json file. It also tells you the line number where the Package Manager failed to parse the file, so you can fix the JSON. There are several online validators that you can use to try to correct the problem. Once you save the corrected file, Unity reloads the Package Manager window.
If you upgraded from an earlier version of the Unity Editor, there might be other problems with your package manifest file:
-
As of 2019.3, your
manifest.jsonfile shouldn’t contain any references to the com.unity.package-manager-ui package. Remove the following line from the manifest’s dependencies list:"com.unity.package-manager-ui": "2.1.1", Check if your project manifest uses “exclude” as a package version. This is an obsolete value for the dependencies property. If you find any lines like these, remove the entire line. Package Manager only installs packages that are explicitly included as a dependency in your project, so once you remove that entry, Package Manager ignores the package and doesn’t install it.
Unity を新しいバージョンにアップグレードした後に問題が発生する
When you upgrade a project to a newer Unity version, the Package Manager automatically updates incompatible packages to newer compatible versions. However, if your package doesn’t compile, the Package Manager displays error messages in the Console window.
これらのメッセージを修正するには、エラーメッセージを読み、可能な限り問題を修正します。たとえば、パッケージに別のパッケージまたはバージョンへの依存関係がない場合があります。その場合は、自身でパッケージをインストールしてみてください。
使用できるものが見つかるまで、以下の一連の解決法を試すこともできます。
- バックアップして、プロジェクトの下の
Packagesフォルダーを削除します。 - バックアップしてから、プロジェクトの
Packagesフォルダー内のパッケージソースを削除し、manifest.jsonファイルのみを残します。次に、プロジェクトを再ロードしてください。 - Create a new empty project. If the Package Manager window loads without errors, replace the
Library/PackageCache/com.unity.package-manager-ui@<version>folder in the failing project with the same folder from the newly created project.
パッケージのインストールが失敗する
If you are trying to install a new package from the registry and it’s not working, it might be due to permission problems.
You must have full permissions on the cache folder:
- Windows (user account):
%LOCALAPPDATA%\Unity\cache\upm - Windows (system account):
%ALLUSERSPROFILE%\Unity\cache\upm - macOS:
$HOME/Library/Caches/Unity/upm - Linux:
$HOME/.cache/Unity/upm
ネットワークに問題がある可能性があります。 ファイアウォール と プロキシ の設定を確認してください。
Sometimes institutional environments, such as schools, government offices, or network-protected workplaces set up proxy servers to control traffic between the network and the Internet, and use their own server certificates which aren’t recognized by Unity or the Package Manager. Talk to your network administrator.
Unable to add package from Git URL
Refer to Repository not found.
Insufficient drive space
If your installation drive is out of space or low on space, consider the following solutions:
- Change the location of the global cache. Refer to Customize the global cache.
- Change the location of the Asset Store cache, refer to Customize the Asset Store cache location.
- Reduce the maximum size of the registry data cache limit. For information, refer to Customize the global cache.
Package version has no signature
This message can appear when you fetch a Unity package from a scoped registry. Unity signs packages that it creates, except for older packages, which aren’t necessarily re-signed in later releases. If you copy an unsigned Unity package from a scoped registry to another registry, Package Manager can’t determine if the package content is safe and identical to the original package.
If you get this message, try these solutions:
- Use another version of the package.
- Fetch the Unity package from the Unity Registry.
- If you own the scoped registry, make sure you copy the newest version of the package from the Unity Registry.
Package version doesn’t have a valid signature
Packages have a signature to ensure that the content wasn’t changed before or during transit. An invalid signature typically occurs in the following situations:
- Someone published the package with modifications on their own registry.
- An error occurred while transferring the file to the end user.
In both cases, Package Manager considers the package to be potentially malicious.
When you get an invalid signature, you can try to install a different version of the package. Also, avoid using Unity packages from a registry other than the Unity Registry.
If you are sharing a Unity package that has a fix, consider using a Git URL or embedding the package in your project.
No ‘git’ executable was found メッセージ
Git の URL からパッケージをインストールしようとすると、以下のようなメッセージが表示されます。
Cannot perform upm operation: Unable to add package
[https://github.example.com/myuser/myrepository.git]:
No 'git' executable was found. Please install Git on your system and restart Unity [NotFound]
UnityEditor.EditorApplication:Internal_CallUpdateFunctions()
git-lfs: command not found メッセージ
If you are trying to download a package that uses Git LFS (Large File Storage), you might get this error message:
Error when executing git command. git-lfs filter-process: command not found.
This indicates that Git LFS is probably not installed on your computer. To make sure, test it on the command line:
git lfs --version
Git LFS is installed if the command returns something like this:
git-lfs/2.8.0 (GitHub; darwin amd64; go 1.12.7)
そうでない場合は、Bitbucket と GitHub の手順に従ってインストールできます。
Repository not found メッセージ
If you specify a location that doesn’t exist, a message similar to this one appears in the Unity Console:
Cannot perform upm operation: Unable to add package [https://mycompany.github.com/gitproject/com.mycompany.mypackage.git]:
  Error when executing git command. fatal: repository 'https://mycompany.github.com/gitproject/com.mycompany.mypackage.git/' not found
 [NotFound]
UnityEditor.EditorApplication:Internal_CallUpdateFunctions() (at /Users/builduser/buildslave/unity/build/Editor/Mono/EditorApplication.cs:310)
入力を確認してください。正しい URL を使用していることを確認するには、リポジトリのページに移動し、Clone ボタンから URL をコピーします 。
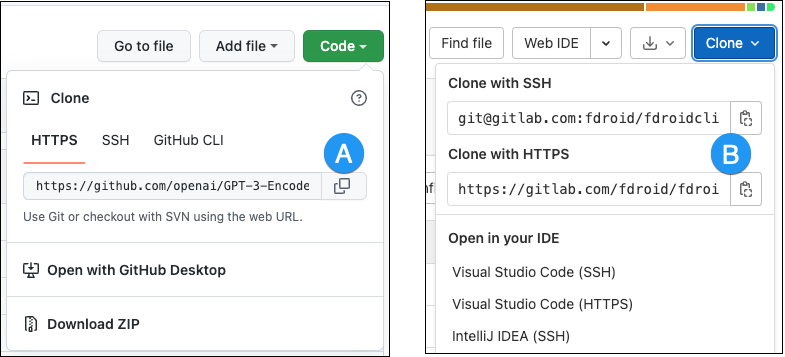
GitHub (A) または GitLab (B) の URL の右にあるボタンをクリックして、URL をクリップボードにコピーします。
リポジトリの場所が正しい場合は、URL に別の問題があるかもしれません。
- If you are targeting a specific revision, make sure your revision comes last. For example:
https://github.example.com/myuser/myrepository1.git#revision - If you are targeting a revision and the package isn’t at the root, make sure the
pathquery parameter precedes the revision anchor. For example:https://github.example.com/myuser/myrepository.git?path=/example/folder#v1.2.3
Could not read Username: terminal prompts disabled メッセージ
認証を必要とするプライベートリポジトリからパッケージをインストールしようとすると、Unity コンソールに以下のようなメッセージが表示されます。
Cannot perform upm operation: Unable to add package [https://mycompany.github.com/gitproject/com.mycompany.mypackage.git]:
  Error when executing git command. fatal: could not read Username for 'https://mycompany.github.com': terminal prompts disabled
 [NotFound]
UnityEditor.EditorApplication:Internal_CallUpdateFunctions() (at /Users/builduser/buildslave/unity/build/Editor/Mono/EditorApplication.cs:310)
Usually, this message appears because Package Manager doesn’t provide an interactive terminal or dialog where you can enter your username and password for HTTP, or your passphrase to unlock your SSH key:
-
With HTTP(S), every time you log onto Bitbucket, GitHub, or GitLab you need to enter your username and password in a terminal or a dialog. However, the Package Manager doesn’t provide an interactive terminal or dialog where you can enter your username and password for HTTP(S).
この問題を回避するには、HTTPS の解決策 で提案されている回避策のいずれかを使用してください。
-
SSH uses a pair of public and private SSH keys. You can add your public SSH key to Bitbucket, GitHub, or GitLab and then access repositories without having to enter a username and password.
However, if you have set up a passphrase to keep your SSH key safe, you still have to enter that passphrase in a terminal or a dialog to authorize your key. In that case, you can use an SSH agent that can unlock your SSH key to authenticate with the Package Manager on your behalf.
HTTPS の解決策
The Package Manager doesn’t provide an interactive terminal or dialog where you can enter your HTTP(S) username and password. To bypass this, use one of these workarounds:
- Follow the instructions at Using private repositories with HTTPS Git URLs and Using passphrase-protected SSH keys with SSH Git URLs.
- クレデンシャルマネージャーを使用します (Git Credential Manager for Windows またはOSXKeyChain)。クレデンシャルマネージャーは、ターミナルやコマンドプロンプトを使用しなくても、パスワードの送信を処理します。
- Use git-credentials from a terminal or command prompt, then launch the Hub from the same terminal so that Unity has access to the cached or stored credentials.
- Use SSH to authenticate instead. If you set up your SSH key without a passphrase, the Package Manager doesn’t have to decrypt it to authenticate with the Git server. If you decide to use a passphrase for added security, you can use the ssh-agent on either macOS or Windows to get around the authentication problem.
SSH の解決策
If you use the SSH protocol to install a package by Git URL, you might get an authentication error from Git. This typically happens when you set up a private SSH key on your local computer that you protected with a passphrase.
この問題を解決するには、SSH キーを解除する SSH エージェントを設定し Package Manager で認証できるようにします。使用するオペレーティングシステムに対応する説明に従ってください。
Windows 用の OpenSSH の設定
The built-in Windows OpenSSH version of the ssh-agent works better than the version available by default with Git for Windows. This procedure explains how to set up the OpenSSH client and add your key to its ssh-agent. If you are using Git for Windows, you can also prioritize the built-in Windows OpenSSH over the Git for Windows SSH agent:
Make sure the OpenSSH Client is installed. To do this, search for it in the Windows Settings Optional features window (Start > Settings, then search for “Optional features”). This applies to Windows 10+.
-
Check your
%PATH%environment variable to make sure the built-in Windows OpenSSH location appears (for example,C:\WINDOWS\System32\OpenSSH\).Note: If you’re already using Git for Windows, make sure the built-in Windows OpenSSH location appears before the Git for Windows SSH location in your
%PATH%variable. This ensures that Windows uses the built-in Windows OpenSSH agent over the Git for Windows SSH agent. -
PowerShell ターミナルで、
ssh-agentプロセスを開始し、自動的に開始されることを確認します。# Set the ssh-agent service to start automatically and manually start it now Get-Service ssh-agent | Set-Service -StartupType Automatic # Run the ssh-agent process to start the ssh-agent service ssh-agent -
Import your key into the ssh-agent. To do this, run
ssh-addon the command line and then follow the instructions. By default, the agent adds the%USERPROFILE%\.ssh\id_rsakey and prompts you for the password.# key ssh-add のインポート別のキーを使用するには、それを引数として指定します。
# ssh-agent サービスを設定して自動的に起動するように設定し、今から手動で起動します。
ssh-add <your-secure-ssh-key-name>
If you can’t remember the name of your key, use the following command to list your keys:
ssh-add -l -
If you installed Git for Windows, reset the
%GIT-SSH%environment variable to make sure that Git always uses the built-in Windows OpenSSH version of the ssh-agent:[Environment]::SetEnvironmentVariable("GIT_SSH", "$((Get-Command ssh).Source)", [System.EnvironmentVariableTarget]::User)
macOS 用の SSH エージェントに SSH キーを加える
Use the ssh-add command to add your SSH keys to the ssh-agent running on your macOS system. The command parameter you use depends on your version of macOS:
-
On macOS 11 and earlier, use:
ssh-add -K ~/.ssh/<your-secure-ssh-key-name> -
On macOS 12 and later, use:
ssh-add --apple-use-keychain ~/.ssh/<your-secure-ssh-key-name>
このコマンドを実行すると、ターミナルが SSH キーのロックを解除するためのパスワードを要求し、そのキーを macOS のキーチェーンに追加します。ただし、システムを再起動すると、ssh-agent に保存されているすべてのキーがリセットされます。
To make sure you don’t need to re-enter your password after you restart your system, open the ~/.ssh/config file (or create one if you don’t find it), and add the following:
Host *
    UseKeychain yes
    AddKeysToAgent yes
    IdentityFile ~/.ssh/<your-secure-ssh-key-name>
Restart your computer to apply these changes.
Git バージョンの更新ができない
If you’re trying to update your Git dependency to a newer version from the repository, but it’s not working, it’s probably because of a locked Git dependency. If you want to update your Git dependency to a newer version from the repository, use the Add package from Git URL button and enter a Git URL. For more information, refer to Locked Git dependencies.
‘Failed to parse http response’ in My Assets context
If you get the following message in the Console window when you try to download an Asset Store package, there might be a problem with your Asset Store cache:
[PackageManager] Error Failed to parse response. UnityEditor.AsyncHTTPClientone(State, Int32)
To solve this problem, delete all downloaded assets from the Asset Store package directory and then try to download the assets again.
Warning: If your project has a lot of asset data, it might take a lot of time and bandwidth to re-download everything.
Package Manager ウィンドウに ‘My Registries’ が表示されない
Not all registry providers are compatible with Unity’s Package Manager. If the package registry server you added doesn’t implement the /-/v1/search or /-/all endpoints, your scoped registry isn’t compatible with Unity’s Package Manager, and doesn’t appear under My Registries in the navigation panel of the Package Manager window.
Missing MonoBehaviour エラーメッセージ
ビルド中に Missing Behavior のエラーが多発する場合、UnityLinker が参照しないと思ったコンポーネントを誤って除去している可能性があります。これは、ストリッピングのレベルが強すぎるために起こります。たとえば、2D SpriteShape パッケージの SpriteShape コンポーネントを参照するプレハブが AssetBundle 内にある場合、そのオブジェクトが見つからず、コンパイラー警告が発生することがあります。
To fix this, you can either lower the stripping level for the UnityLinker or declare the package’s assemblies inside the link.xml file to preserve them from being stripped:
<linker>
    <assembly fullname="Unity.2D.SpriteShape.Runtime" preserve="all"/>
    <assembly fullname="Unity.2D.Common.Runtime" preserve="all"/>
 </linker>
For more information on stripping levels and the UnityLinker, refer to Managed code stripping.