ネイティブオーディオプラグイン SDK
Unity のネイティブオーディオプラグイン SDK は、Unity のビルトインネイティブオーディオプラグインインターフェースです。このページでは、基本的なコンセプトと複雑な使用例の両方について説明します。
要件
You must first download the newest audio plugin SDK.
概要
ネイティブオーディオプラグインシステムは、2 つの部分から構成されます。
ネイティブ DSP (デジタル信号処理) プラグインは、C または C++ の .dll (Windows) または .dylib (OSX) として実装されます。スクリプトとは違い、これは、サポートしたい任意のプラットフォームでコンパイル可能である必要があり、場合によってはプラットフォーム固有の最適化が必要です。
C# で開発される GUI。GUI はオプションであるため、プラグイン開発は常に基本的なネイティブ DSP プラグインを作成して開始し、Unity にネイティブプラグインが公開するパラメーター表示用のデフォルトのスライダー ベースの UI を表示させます。 これは、プロジェクトを開始する場合に推奨されるアプローチです。
最初に C# GUI を .cs ファイルとして Assets/Editor フォルダーにドロップするだけで (他のエディタースクリプトと同様に) プロトタイプを作成できます。後にコードが長くなり、より適切なモジュール化と IDE サポートが必要になってきたら、適切な Visual Studio プロジェクトに移動できます。これにより、.dll ファイルにコンパイルでき、ユーザーがプロジェクトに簡単にドロップできるようになり、コードを保護しやすくなります。
ネイティブ DSP と GUI DLL は両方とも複数のプラグインを加えることができ、そのバインディングは DLL ファイル名に関係なく、プラグイン内の効果名を通してのみ発生する事に気をつけてください。
ファイルタイプ
The native side of the plug-in SDK consists of one file (AudioPluginInterface.h). However, to add multiple plug-in effects within the same .dll, Unity provides additional code to handle the effect definition and parameter registration in a unified manner (AudioPluginUtil.h and AudioPluginUtil.cpp). Note that the NativePluginDemo project contains several example plug-ins to get you started and show a variety of different plug-in types that are useful in a game context. This code is available in the public domain so anyone can use this code as a starting point to their own creations.
プラグインの開発
To start developing a plug-in, define the parameters for your plug-in. Although, you don’t need to have a detailed plan of all the parameters that the plug-in should incldue, it’s useful to have a rough idea of the user experience and the various components you’d like to see.
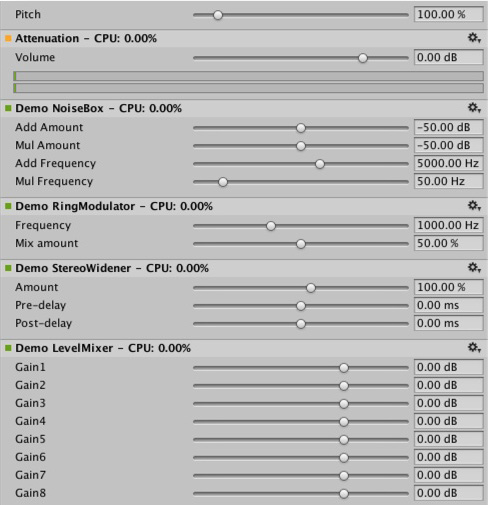
Unity が提供するプラグインのサンプルには、使いやすいユーティリティ関数がたくさん含まれています。 Ring Modulator プラグインの例を見てみましょう。これは、シンプルなプラグインです。正弦波で入力される信号を掛け合わせると、これはラジオノイズと壊れた受信機のような効果を与えます。特に、周波数が異なる複数のリングモジュレーション効果を連鎖すると、素晴らしい効果になります。
サンプルプラグインでパラメーターを処理するための基本的なスキームは、それらを enum 値として定義することです。これは、便利さと簡潔さの両方のために、float の配列へのインデックスとして使用します。
enum Param
{
    P_FREQ,
    P_MIX,
    P_NUM
};

int InternalRegisterEffectDefinition(UnityAudioEffectDefinition& definition)
{
    int numparams = P_NUM;
    definition.paramdefs = new UnityAudioParameterDefinition [numparams];
    RegisterParameter(definition, "Frequency", "Hz",
        0.0f, kMaxSampleRate, 1000.0f,
        1.0f, 3.0f,
        P_FREQ);
    RegisterParameter(definition, "Mix amount", "%",
        0.0f, 1.0f, 0.5f,
        100.0f, 1.0f,
        P_MIX);
    return numparams;
}
RegisterParameter 呼び出しの数字は、最小値、最大値、デフォルト値、そして表示のみに使用するスケーリング係数が続きます。すなわち、パーセント値の場合は、実際の値は
0 から 1 で、表示されるときは 100 で積算されます。このためのカスタム GUI コードはありませんが、前述したように Unity はこれらの基本的なパラメーター定義からデフォルトの GUI を生成します。未定義のパラメーターをチェックするシステムはありません。そのため、AudioPluginUtil システムは、宣言されたすべての enum 値 (P_NUM は除く) は、対応するパラメーター定義と一致すると想定します。
Behind the scenes the RegisterParameter function fills out an entry in the UnityAudioParameterDefinition array of the UnityAudioEffectDefinition structure that’s associated with that plug-in (see AudioEffectPluginInterface.h). In addition, set up the following remaining items in UnityAudioEffectDefinition:
- プラグインのインスタンス化を処理する関数へのコールバック (CreateCallback)。
-
SetFloatParameterCallback/UnityAudioEffect_GetFloatParameterCallbackのパラメーターを設定および取得。 -
UnityAudioEffect_ProcessCallbackを実際の処理。 - Destroy the plugin instance for
UnityAudioEffect_ReleaseCallbackwhen done
To make it easy to have multiple plugins in the same DLL, each plugin resides in its own namespace, and a specific naming convention for the callback functions is used such that the DEFINE_EFFECT and DECLARE_EFFECT macros can fill out the UnityAudioEffectDefinition structure. Underneath the hood all the effects definitions are stored in an array to which a pointer is returned by the only entry point of the library UnityGetAudioEffectDefinitions.
これは、VST や AudioUnits など他のプラグイン形式や、Unity オーディオプラグインインターフェースからマップするブリッジプラグインを開発したい場合、知っておくと便利です。その場合、ロード時にパラメーターの記述を設定する、より動的な方法を開発する必要があります。
Instantiating the plugin
You must next set the data for the instance of the plugin. In the example plugins, data is set into the EffectData structure. The allocation of this must happen in the corresponding CreateCallback which is called for each instance of the plugin in the mixer. Following is a simple example, where there’s only one sine-wave being multiplied to all channels. Typically, advanced plugins need you to allocate additional data per input channel.
struct EffectData
{
    struct Data
    {
        float p[P_NUM]; // パラメーター
        float s;        // オシレーターの正弦出力
        float c;        // オシレーターの余弦出力
    };
    union
    {
        Data data;
        unsigned char pad[(sizeof(Data) + 15) & ~15];
    };
};
UNITY_AUDIODSP_RESULT UNITY_AUDIODSP_CALLBACK CreateCallback(
    UnityAudioEffectState* state)
{
    EffectData* effectdata = new EffectData;
    memset(effectdata, 0, sizeof(EffectData));
    effectdata->data.c = 1.0f;
    state->effectdata = effectdata;
    InitParametersFromDefinitions(
        InternalRegisterEffectDefinition, effectdata->data.p);
    return UNITY_AUDIODSP_OK;
}
The UnityAudioEffectState contains various data from the host such as the sampling rate, the total number of samples processed (for timing), or whether the plugin is bypassed, and is passed to all callback functions.
To free the plugin instance, use the following corresponding function:
UNITY_AUDIODSP_RESULT UNITY_AUDIODSP_CALLBACK ReleaseCallback(
    UnityAudioEffectState* state)
{
    EffectData::Data* data = &state->GetEffectData<EffectData>()->data;
    delete data;
    return UNITY_AUDIODSP_OK;
}
オーディオの主な処理は ProcessCallback で起こります。
UNITY_AUDIODSP_RESULT UNITY_AUDIODSP_CALLBACK ProcessCallback(
    UnityAudioEffectState* state,
    float* inbuffer, float* outbuffer,
    unsigned int length,
    int inchannels, int outchannels)
{
    EffectData::Data* data = &state->GetEffectData<EffectData>()->data;

    float w = 2.0f * sinf(kPI * data->p[P_FREQ] / state->samplerate);
    for(unsigned int n = 0; n < length; n++)
    {
        for(int i = 0; i < outchannels; i++)
        {
            outbuffer[n * outchannels + i] =
                inbuffer[n * outchannels + i] *
                (1.0f - data->p[P_MIX] + data->p[P_MIX] * data->s);
        }
        data->s += data->c * w; // cheap way to calculate a sine-wave
        data->c -= data->s * w;
    }

    return UNITY_AUDIODSP_OK;
}
上の方の GetEffectData 関数は、上で宣言した構造体の EffectData::Data に状態変数の effectdata フィールドをキャストするヘルパー関数です。
含まれる他のシンプルなプラグインは、NoiseBox プラグインです。これは、可変周波数でのホワイトノイズ、または Lofinator のプラグインの入力信号を加えて、掛け合わせ、シンプルにダウンサンプリングし、信号の量子化を行います。これらのすべては組み合わたり、ゲーム用のアニメーションのパラメーターと一緒に用いられ、携帯電話から通信状態が悪い携帯無線、壊れた拡声器まで、あらゆるものをシミュレーションすることができます。
StereoWidener は、可変遅延で mono (モノラル) や side コンポーネントにステレオ入力信号を分解し、その後、それらをステレオ効果の感覚を高めるために再結合します。
どのプラットフォームでどのプラグインをロードするか
Native audio plug-ins use the same scheme as other native or managed plug-ins, in that, they must be associated with their respective platforms via the plug-in importer inspector. For information about the subfolders and where to place plug-ins, see Building plug-ins for desktop platforms. The platform association is necessary so that the system knows which plug-ins to include on a each build target in the standalone builds, and with the introduction of 64-bit support this even has to be specified within a platform. macOS plug-ins are useful because it supports universal binary format, which allows them to contain both 32 and 64 bit variants in the same bundle.
Native plug-ins in Unity that are called from managed code are loaded via the [DllImport] attribute, which reference the function to import from the native DLL. However, native audio plugins are different, because they need to be loaded before Unity starts creating any mixer assets that might need effects from the plug-in. The Editor doesn’t have this problem, because you can reload and rebuild the mixers that depend on plug-ins unlike in standalone builds, the plug-ins must be loaded before creating the mixer assets. To work around this, prefix the DLL of the plug-in audioplugin (case insensitive) for the system to detect and add it to a list of plug-ins that are automatically loaded at start. You must remember that the definitions inside the plug-in only define the names of the effects that are displayed inside Unity’s mixer. Regardless of what the .dll is called, it needs to start with the string audioplugin to be detected as such.
iOS のようなプラットフォームでは、プラグインコードは、生成された XCode プロジェクトによって作られる Unity のバイナリに静的にリンクされる必要があります。そして、プラグインのレンダリングデバイスと同じように、プラグインの登録がアプリケーションの起動コードに明示的に追加される必要があります。

macOS 上で、1 つのバンドルは、32 ビットと 64 ビットの両方のバージョンのプラグインを含むことができます。また、サイズを減らすためにそれらを分割することもできます。
カスタム GUI を持つプラグイン
このセクションでは、イコライザーやマルチバンドコンプレッションの効果など、高度なプラグインの使用例を紹介します。これらのプラグインは、上記のセクションで紹介したシンプルなプラグインよりも、はるかに多くのパラメーターを持ちます。さらに、高度なプラグインでは、パラメーター間の物理的な結合が必要であり、パラメーターを視覚化するために、上記の単純なスライダーよりもより良い方法が必要になります。例えば、イコライザーを考えてみましょう。各帯域には 3 つの異なるフィルターがあり、最終的なイコライゼーションカーブに一括して寄与します。これらの各フィルターには、周波数、Q ファクター、ゲインの 3 つのパラメーターがあり、物理的にリンクして各フィルターの形状を定義します。また、イコライザープラグインと大きな画面があれば、結果のカーブと各フィルターの寄与を表示するのに便利です。スライダーを 1 つずつ変更するのではなく、コントロール上の単純なドラッグ操作によって複数のパラメーターを同時に設定する方法でプラグインを操作します。
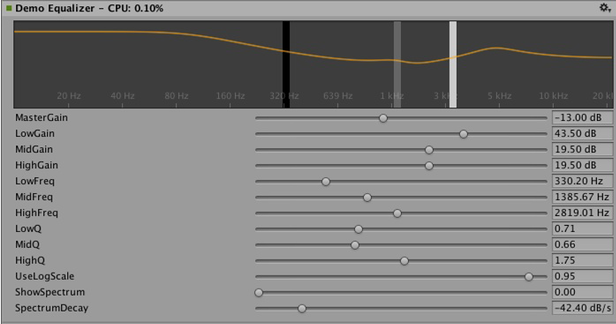
イコライザープラグインの GUI をカスタマイズするには、3 つのバンドをドラッグしてフィルターカーブのゲインと周波数を変更します。シフトを押しながらドラッグすると、各帯域の形状を変更できます。
In summary, the definition, initialization, deinitialization, and parameter handling follows the exact same enum-based method that the simple plugins use, and even the ProcessCallback code is rather short.
適切なプラグインは、以下のように試せます。
1. Visual Studio で AudioPluginDemoGUI.sln プロジェクトを開きます。
2. GUI コードに関連する C# クラスを探します。
After Unity loads the native plug-in dlls and registers the contained audio plug-ins, it starts looking for corresponding GUIs that match the names of the registered plug-ins. This happens through the Name property of the EqualizerCustomGUI class which, like all custom plugin GUIs, must inherit from IAudioEffectPluginGUI. The only important function inside this class is the bool OnGUI(IAudioEffectPlugin plugin) function. Through the IAudioEffectPlugin plugin argument this function gets a handle to the native plugin that it can use to read and write the parameters that the native plugin has defined.
ネイティブプラグインが呼び出すパラメーターを読み取るには、以下の通り。
plugin.GetFloatParameter("MasterGain", out masterGain);
パラメーターが見つかった場合は true を返します。 これを設定するには、以下を呼び出します。
plugin.SetFloatParameter("MasterGain", masterGain);
これも、パラメーターが存在する場合は true を返します。それが GUI とネイティブコード間のもっとも重要なバインドです。
また、この関数を使ってパラメーター NAME に最小値、最大値、デフォルト値を問い合わせることで、ネイティブコードと UI コードでこれらの定義が重複しないようにすることもできます。
plugin.GetFloatParameterInfo("NAME", out minVal, out maxVal, out defVal);
If your OnGUI function returns true, the Inspector will show the default UI sliders below the custom GUI. This is useful for GUI development as all the parameters are available while developing your custom GUI with the added advantage to check that the right actions performed on it result in the expected parameter changes.
The DSP processing that goes on in the Equalizer and Multiband plugins are filters taken from Robert Bristow Johnson’s excellent Audio EQ Cookbook. You can use Unity’s internal API functions to plot the curves and draw antialiased curves for the frequency response.
Both Equalizer and Multiband plugins also provide code to overlay the input and output spectra for visualizing the effect of the plugins, which suggests: The GUI code runs at much lower update rate (the frame rate) than the audio processing and doesn’t have access to the audio streams. Therefore, to read this data, the native code provides the following special function:
UNITY_AUDIODSP_RESULT UNITY_AUDIODSP_CALLBACK GetFloatParameterCallback(
    UnityAudioEffectState* state,
    int index,
    float* value,
    char *valuestr)
{
    EffectData::Data* data = &state->GetEffectData<EffectData>()->data;
    if(index >= P_NUM)
        return UNITY_AUDIODSP_ERR_UNSUPPORTED;
    if(value != NULL)
        *value = data->p[index];
    if(valuestr != NULL)
        valuestr[0] = 0;
  return UNITY_AUDIODSP_OK;
}
It enables reading an array of floating-point data from the native plugin. The plugin system doesn’t care about what that data is, as long as the request doesn’t slow down the UI or the native code. For the Equalizer and Multiband code, a utility class called FFTAnalyzer makes it easy to feed in input and output data from the plugin and get a spectrum back. This spectrum data is then resampled by GetFloatBufferCallback and handed to the C# UI code. The data must be resampled so that the FFTAnalyzer runs the analysis at a fixed frequency resolution while GetFloatBufferCallback just returns the number of samples requested, which is determined by the width of the view that’s displaying the data. For a simple plugin that has a minimal amount of DSP code you might want to use the CorrelationMeter plugin, which plots the amplitude of the left channel against the amplitude of the right channel to show the stereo effects of the signal.
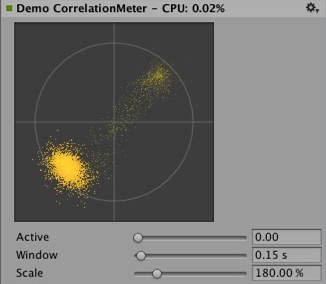

上は CorrelationMeter プラグインのカスタム GUI。
下は、イコライザーGUI とスペクトル分析 (緑のカーブがソース、赤は処理後)。
この時点で、イコライザーとマルチバンドエフェクトの両方が意図的にシンプルかつ最適化されずに保持されていることを指摘したいと思います。しかし、それらはプラグインシステムでサポートされるより複雑な UI の良い例だと考えます。関連するプラットホーム特有の最適化を行うには、たくさんのパラメータの調整して、本当にぴったりだと感じ、もっとも音楽的に思えるようにするなど、明らかにやるべきことがたくさんあります。Unity のプラグインの標準レパートリーを増やす便宜のために、ある時点で、これらのエフェクトのいくつかを Unity のビルトインのプラグインとして実装するかもしれません。しかし、ユーザーもこの難題に立ち向かい本当に良いプラグインを作成してくださるよう心から願っています。それに、ある時点で、それらがビルトインプラグインになっていないとも限りません。

コンボリューションリバーブのプラグイン例。インパルス応答は、パラメーターによって定義される減衰するランダムノイズです。リリース用のプラグインでは任意に記録されたインパルスをユーザーがロードできるようにしなければならないので、これはデモンストレーションのためだけに限られます。基本となるコンボリューションアルゴリズムは変わりません。

3 つの異なる時間スケールでレベルを測定するラウドネスモニターツールの例。 これもデモンストレーションを目的としたものですが、現在良く使われるラウドネス標準に準拠しており、モニターツールの構築し始めに適しています。 カーブレンダリングコードは Unity に組み込まれています。
DSP クロックに同期させる
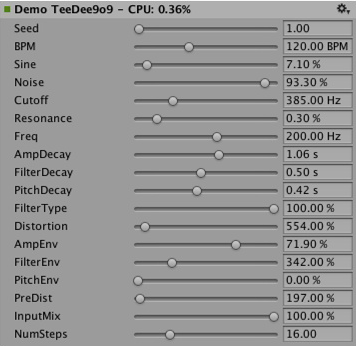
To try out some fun exercises, use the plug-in system to generate sound instead of processing it. For simple bassline and drum synthesizers for users who listen to acid trance, try simple clones of the main synths that defined this genre. Plugin_TeeBee.cpp and Plugin_TeeDee.cpp are simple synths that generate patterns with random notes, have parameters for tweaking the filters and envelopes in the synthesis engine. The state->dsptick parameter is read in the ProcessCallback to determine the position in a song. This counter is a global sample position, so you can divide it by the length of each note specified in samples and fire a note event to the synthesis engine whenever this division has a zero remainder. This way, all plugin effects stay in sync to the same sample-based clock. If you want to play a prerecorded piece of music with a known tempo through such an effect, use the timing info to apply tempo-synchronized filter effects or delays on the music.

立体化
The native audio plugin SDK is the foundation of the Spatialization SDK, which allows developing custom spatialization effects to instantiate per audio source. For more information, see Audio Spatializer SDK.
展望
これは、サウンドシステムの一部を高性能なネイティブコードに開放する努力の始まりに過ぎません。今後の予定に以下が含まれます。
- Unity の他の部分でネイティブオーディオを統合し、ミキサーの外で効果を使用します。
- より良いデフォルト GUI とバイナリデータの保存をサポートすることで、SDK を拡張し float 以外のパラメータータイプをサポートします。
免責事項
While there are many similarities in the design, Unity’s native audio SDK isn’t built on top of other plugin SDKs like Steinberg VST or Apple AudioUnits. While it’s possible to implement basic wrappers for these using this SDK that allow using such plugins with Unity, it’s important to note that this is strictly not managed by the Unity development team.
Hosting a plugin poses its own challenges. For example, dealing with the intricacies of expected invocation orders and handling custom GUI windows that are based on native code can quickly become unmanageable, making the example code unhelpful.
While it’s possible to load your VST or AU plugin or even effects for mocking up and testing sound design, note that using VST/AU limits you to few specific platforms. The advantage of writing audio plugins based on the Unity SDK however, is that it allows you to extend it to all platforms that support software-mixing and dynamically loaded native code. Therefore, use this approach ony if you want to make a nice solution for mocking up early sound design with your favourite tools before committing to dedicating time to develop custom plugins (or simply to use metering plugins in the Editor that don’t alter the sound in any way).