Set interactive render properties within Wig
For interactive rendering, Wig supports Viewport 2.0 and Legacy Default Viewport.
Render modes for the Maya onscreen render
| Basic shading | Fur shading |
|---|---|
 |
 |
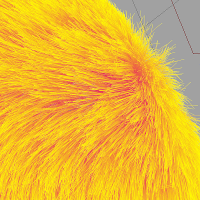
- Basic shading: this is a fast render mode designed for building grooms quickly. You set a color for the hair roots, another for the tips, and the hair graduates between the two.
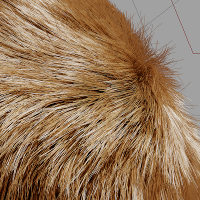
- Fur shading: this is a realistic, physics-based model for setting the hair color. You control the hair color by setting the simulated physical properties of the hair (such as the amount and type of melanin in the hair, the structure of the hair strands, etc.).
Fur shading and coloring
How fur shading works: Concepts
The main properties you control when setting the hair are grouped into:
- Coloration
- Specular
- Advanced
Hair color
Wig has two ways of setting hair color:
Melanin: this simulates how actual hair gets its color in the real world, by defining the amount and type of melanin in the hairs. This is the coloring model that the shaders use in the final render. Use this mode to approximate how the final render looks.
Absorption: this sets the hair color by defining the color of light that the hair absorbs, and the amount that it absorbs. We don't recommend you use this mode. Production hair shaders use melanin values to calculate hair color, so use melanin to get values that approximate production shaders.
The hair color depends on:
- The mix between the two types of melanin
- The density of melanin in the hair
- The medulla ratio
Melanin, medulla and color
There are two types of melanin in hair:
- Eumelanin: this is darker. Black hair has a lot of eumelanin, blonde hair has a small amount.
- Pheomelanin: this is redder. Red hair has a lot of it.
Wig lets you set amount of each using the Eumelanin Pheomelanin Mix. This is the ratio between eumelanin and pheomelanin in the hair. For example, at 0.8, 80% of the melanin in the hair is eumelanin.
You can also set the melanin density. This controls the amount of melanin in the hairs. Lower density values are paler, higher density is darker.
Finally, you can set the medulla ratio. This controls the size of the medulla within the hair. The medulla is the gap at the core of the hair:
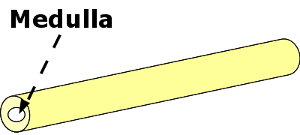
The size of the medulla affects how the light diffracts through the hair. Higher ratios give paler hair (as the light has less time to pick up the color from the melanin within the hair).
Specular attributes
In the real world, the surface of the hair isn't smooth (microscope images). The surface is rough, like a series of overlapping scales. As light hits these scales, they slightly change the angle at which it is reflected. We mimic these changes by setting the longitudinal angle: the extra angle applied to the reflection because of the rough surface of the hair.
There are two main longitudinal factors that you can set:
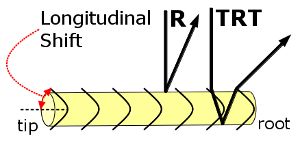
Longitudinal shift: this sets the angle of the scales that make up the hair.
As light reflects from the surface, it refracts off the hair's surface scales. Longitudinal shift thus controls the amount of additional refraction to add to light hitting the hair.
This affects how much the reflected light (R) diverges from the transmitted/reflected/transmitted light (TRT), as the TRT light gets twice the amount of additional refraction. At 0 (a smooth surface) the two kinds of light are basically on top of each other. As the value gets lower, they move apart.
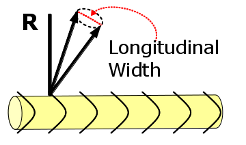
Longitudinal width: this sets how much the surface roughness makes the light diffuse.
As light reflects from the surface, the roughness causes it to spread out into a cone. The longitudinal width sets the size of this cone. This controls how much the light on the surface spreads out (diffuses).
Advanced details
You can control how the hair reacts to both direct (light shining on the hair and then bouncing to the eye) and indirect light (light that is reflected within the hair before returning to the eye). .
Light attributes
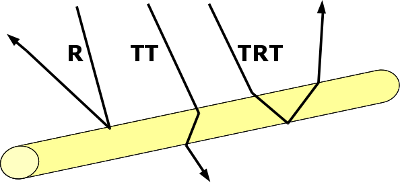
There are four light attributes for both direct and indirect light:
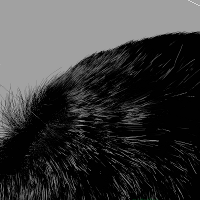
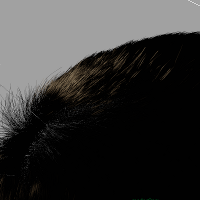
- R: the reflectance. This is the light that hits the hairs and bounces right off. This picks up some of the hair color.
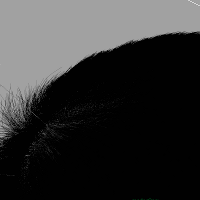
- TT: the transmission through. This is the light that passes through the hair and out the other side. This picks up some of the melanin color as it transmits through the hair. You can only see this once it has passed through the hair. If you're looking from the same side as the light source, you won't see the TT from that light.
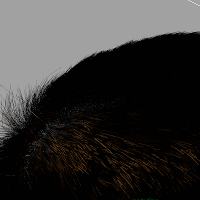
- TRT: the transmit, reflect, transmit light. This is the light that passes through the hair, then reflects back inside, is transmitted back through again, and finally passes out of the hair.
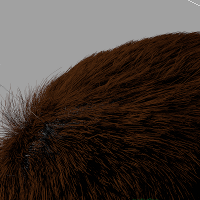
- FBack: this basically picks up the diffuse color of the hair.
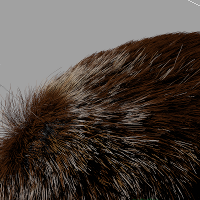
In the shading, you can turn each attribute on separately. Here's an example of the effects of each (using only direct light, with no indirect light):
| Base, no lighting | R only | TT only |
 |
 |
 |
| TRT only | FBack only | All lighting on |
 |
 |
 |
Using shading
The hair shading details are stored in the wmWigFurNodeShape attributes, under Shading > Colouration.
Set up lighting for your scene
- Add your lights to the scene.
- With the light selected, from the Lighting menu, select Use Selected Lights and then select Specify Selected Lights.
Set overall render details
First off, set the overall details of the hair shading:
Select the furset in the Outliner, and open the attributes panel.
Scroll down to the Shading area and expand the Fur area.
To turn on the full render, turn Enable Shading on.
The display updates to show the full hair shading.
Select which of the advanced previewing options you want to use:
This option Result Enable Multisample Antialiasing (MSAA) Turns on anti-aliasing. This gives a better result but slows down the render. Enable Width Preview Turning width on gives better, more realistic onscreen render results:: Without width, Wig shows hairs as being a single pixel wide, and does not change this with different zoom levels.: With width on, Wig shows the hair at the appropriate size in worldspace. When you're zoomed right in, the hairs look thicker; when zoomed right out, some hairs become thinner than a pixel and aren't displayed. Enable Tip Scale Preview Turns on the tip scale preview. If this is off, Wig shows hairs as staying the same width all along the length of the strand. If this is on, Wig shows the effects of the hair tip scaling (as set in the Tip > Scale for the fur set).
Note
Turning on width is a handy way to check the coverage on your groom. With width off, Wig always shows all hairs as a single pixel wide. This makes it hard to tell which areas are relatively more or less dense. With it on, you can zoom out to check that your groom has enough coverage.
For each option, you can choose to Disable [option] for Rotate/Pan/Zoom. This turns it off while you're moving the view around, to get a smoother move. When you finish moving the view, Maya starts anti-alising/width preview/tip scale preview again.
Note
If you don't have the anti-aliasing, width preview and tip preview disabled during moves, Wig calculates these as you are moving the hair. This dramatically slows down the interface.
Set hair color
To set the hair color:
From the Colour Source drop-down, select whether to use:
- Melanin: hair color is based on the amount and type of melanin in the hair.
Absorption: hair color is based on the color and amount of light it absorbs.
Note
We strongly recommend you only use Melanin mode.
In Melanin mode, set the other hair characteristics:
Set the Eumelanin Pheomelanin Mix to the appropriate mix.
Set the Melanin Density. This controls much melanin there is in the hair. Lower density values give whiter hair, higher values are darker.
For reference, a density of around 0.3 is good for a mid blonde hair.
See
Melanin, Medulla and Color<melanin_and_color>for details of how melanin influences hair color and some example settings.
In Absorption mode, set the Absorption Coefficient to the color that the hair absorbs. You can use the slider to darken/lighten the color from a base shade.
Note
The hair appears as the chromatic opposite of the selected color, as it absorbs the light of that color. For example, if you set the absorption color to bright red, the hair appears blue.
In both modes, set the Medulla Ratio. This controls the size of the hollow core of the hairs (the medulla). The size affects how light diffracts through the hair. Higher values make the hair lighter.
Set specular details
Under the Specular section, set how the hair reacts to specular highlights:
Set the LongitudinalShift. This sets how much the reflected (R) light diverges from the transmitted/reflected/transmitted light (TRT).
At 0, the two highlights are basically on top of each other. As the value gets lower (it cannot be set higher than 0), they move apart.
Under LongitudinalWidth, set the beta values for each kind of light hitting the hair (R, TT, and TRT).
Lower beta values give tighter highlights, higher values give more spread out highlights. 5 is a good average value for R (reflectance). If the value goes too high, the highlights spread out so much they are no longer visible.
Set advanced lighting details
The Advanced section allows you to set which aspects of the direct and indirect light to display, and the calculation methods used.
Under Advanced, set whether to use Use Spherical Gaussian in the calculations. The scene renders onscreen much faster if this is off, but it gives a result closer to the final render.
Turn this off for a faster render.
Note
We suggest you turn this off when doing the base groom, then turn it on to get a better idea of what the final render looks like.