Brush Settings
Some of the Wig tools let you paint effects onto your fur. For example, you can use the Length tool to vary the length of the hair, in order to change the appearance of your fur.
For these tools, you can configure your brush. Brushes have the following settings:
Opacity: how much the brush affects the underlying surface. Darker brushes have a greater effect.
Radius: the size of the brush. The brush works at full effect (as set in the Effect field, below) within this radius.
Falloff: the size of the falloff area. The effect of the brush gradually decreases across the falloff area, with the actual pattern of the falloff either controlled by a standard falloff curve control or by the Power setting.
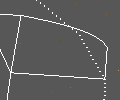
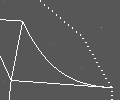
Power: for tools that don't have a manual falloff control, this sets how the brush effect decreases through the falloff area. Lower power settings give a squarer curve, higher power settings give curve that looks more bowed-in.
| Power of 0.2 | Power of 0.5 |
|---|---|
 |
 |
- Effect: the percentage of the hairs under the brush tip that the brush applies to on each stroke.
You can adjust the brush settings in the tool settings, or use the keyboard shortcuts:
Keyboard Shortcuts:
- Ctrl + middle-click and drag > Adjusts the brush radius
- Shift + middle-click and drag > Adjust the fallloff radius.
Reflection
Some tools have the option to set a reflection. This mirrors your actions across another plane in the view (X, Y, or Z plane). Use this to create a symmetric groom. For example, you can set to reflect across the X axis, and then as you groom the hair on one side of a model, Wig automatically applies the same groom to the other side of the model.
If a tool has a Reflection section in the Tool Properties, you can select which plane to mirror the effects on:

As you paint with reflection enabled, a mirror version of your brush appears on the model surface.

The actual brush is to the right, the mirror is to the left, and the X axis runs through the middle. As you paint, Wig also applies the effects of the actual brush to the reflection area.
Shadowing and self-shadowing
Wig supports shadows and self-shadows generated from hair. For each fur set, you can choose whether it casts shadows or not. At render time, Wig creates shadows from fur sets on:
- the underlying subdivision surface that the fur sets are attached to, and
- any other fur sets grown from the same subdivision surface.
Shadows cast by fur sets are transparent (similar to deep shadow maps).
Each subd node has a shadow weight. This controls how transparent the fur shadows are. Higher values make fur more opaque. At 0.1, it takes 10 hairs to produce a completely opaque shadow.
Wig calculates shadowing from hair by:
- Calculating how shaded (between 0, unshadowed, and 1, totally shadowed) each area is.
- Scaling that shadowing amount and biasing it in the range from 0 to the shadow threshold (which you can specify for each subd node).
- Multiplying that scaled visibility by the color of the object.