Scene cameras
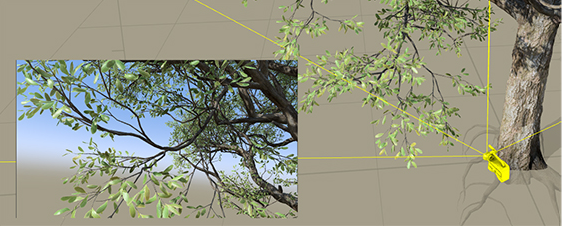
Scene cameras capture important viewpoints and mark the boundaries for exporting.
Use scene cameras to preview how a model will look in a scene or to define a region for exported materials (particularly useful for leaf clusters).
Working with scene cameras
Add a scene camera
You can add a scene camera in one of three ways:
- In the Toolbar, click on the Cameras button and use the menu to drop a new camera where you are or add a camera of your choosing.
- In the Tree Window Menu, right-click in the Tree Window and use the Add scene camera menu option to add a camera.
- In the Viewport Menu, click on the viewport label and use the Drop new camera here option to add a camera.
Edit scene cameras
Select a camera to view and edit its properties. You can also change any viewport to show the view from a particular camera by selecting the viewport label menu and choosing the camera in the list.
Preview camera path
To preview animated camera paths for FBX cameras, use the Timeline Bar.
Properties
See the sections below for descriptions of the scene camera's properties.
Settings
The properties in this group control the type and shape of the camera's capture volume.
Type
Set the type of scene camera.
| Property | Description |
|---|---|
| Perspective | Set the scene camera to a perspective type. |
| Ortho | Set the scene camera to an orthographic type. |
| FBX camera | Use an .fbx file as a scene camera. |
Perspective settings
FOV
Set the field of view for perspective cameras.
Near
Set the distance away from the camera's position for the near clipping plane.
Far
Set the distance away from the camera's position for the far clipping plane.
Orthographic settings
Width
Set the width (local x-axis dimension) of the capture region.
Height
Set the height (local y-axis dimension) of the capture region.
Depth
Set the depth (local z-axis dimension) of the capture region.
FBX camera settings
FBX filename
Load an .fbx file as the scene camera.
Cameras
Select a camera from the .fbx file. This property is relevant only if there are multiple cameras in the .fbx file.
FBX scale
Scale the x-, y-, and z-coordinates of the camera.
Visualization
Icon scale
Change the size of the camera icon in the Tree Window.
Overlay
The properties in this group control when a preview overlay is drawn in the Tree Window and its size.
Style
Choose when to draw an overlay for this camera from the following options:
| Property | Description |
|---|---|
| When selected | Show the overlay if the camera object is selected. |
| Always | Always show the overlay for this camera. |
| Never | Never show the overlay for this camera. |
Size
Use this slider to control how large the overlay appears in the Tree Window.
Render
The properties in this group provide a shortcut for exporting or rendering images. These properties are visible only when the scene camera Type is set to Perspective or FBX camera.
Resolution
Set the resolution of the output image or images.
Render photo
Open the Render Photo dialog already populated with this camera's settings.
Export image
Open the Export Image dialog already populated with this camera's settings.
Export
The properties in this group provide a shortcut for material exporting. These properties are visibly only when the scene camera Type is set to Orthographic.
Resolution
The resolution of the longest dimension of the output image (the aspect ratio of the camera will be maintained).
Export material
Open the Export Material dialog already populated with this camera's settings.
Transform
Moving and rotating the scene camera is usually made easier by using the transform gizmo in the Tree Window, but you can set the values explicitly, too.
Translation
X/Y/Z
Set the location of the scene camera.
Reset translation
Reset the location to the origin (0,0,0).
Rotation
Axis X/Y/Z
Determine the axis about which to rotate.
Angle
Set the angle to rotate around the axis.
Reset rotation
Reset the rotation to default (1,0,0,0).