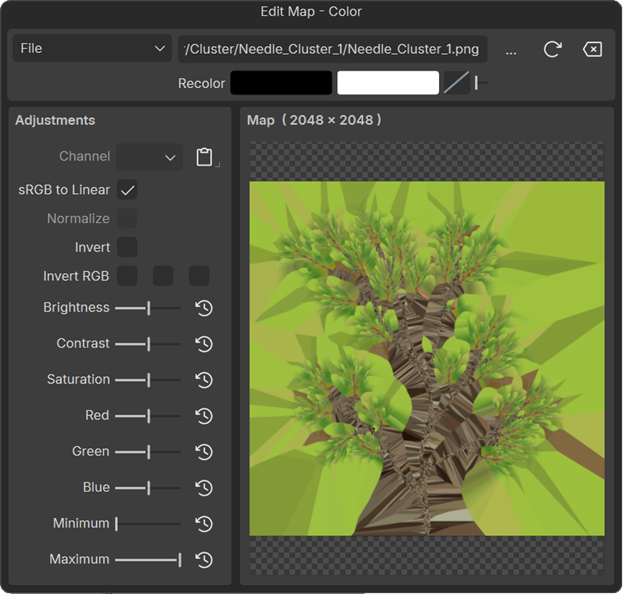
Map Editor
The Map Editor is the dialog presented when you click the texture buttons on the Material Asset Bar.
The controls at the top of the dialog allow you to browse for a texture, reload a texture, or remove a texture.

Map source
Map sources can be image files, color gradients, or noise patterns.
| Property | Description | |
|---|---|---|
| File | Load an image file as the map. | |
| Recolor | Change the map colors with the Color Editor. The curve sets the color distribution. The slider sets the amount of recoloring. | |
| Linear gradient | Use a linear gradient color pattern for the map. | |
| Center | Move the center position of the gradient along the x- or y-axis. | |
| Distance | Set the size of the transition between colors. | |
| Angle | Set the rotation of the gradient. At a value of 90, gradients run from bottom to top. At 0, gradients run from left to right. | |
| Color | Set the minimum and maximum colors with the Color Editor. The curve sets the color distribution. | |
| Radial gradient | Use a radial gradient color pattern for the map. | |
| Center | Set the center position of the gradient. With both values at 0.5, the gradient is exactly centered. | |
| Distance | Set the size of the transition between colors. | |
| Color | Set the minimum and maximum colors with the Color Editor. The curve sets the color distribution. | |
| Noise | Use a noise pattern for the map. | |
| Center | Set the start location of the noise pattern in UV space. | |
| Scale | Change the size of the noise pattern. This property affects the frequency of perturbations. | |
| Seed | Change the seed distribution. Use this property to line up multiple noise maps. | |
| Color | Set the minimum and maximum colors with the Color Editor. The curve sets the color distribution. | |
Adjustments
All adjustments can be done in real-time. Any adjustments made to the loaded textures will be baked in when the tree is exported.
| Property | Description |
|---|---|
| Channel | This option is available only for grayscale maps, such as Opacity or Gloss. A texture file may have multiple channels: red, green, blue, and possibly alpha. This option lets you choose which channel to use for this map. Luminance, which is the grayscale version of RGB, is also an option. |
| sRGB to Linear | All rendering in the SpeedTree Modeler is done in linear space. That is, with no gamma adjustment applied. Enabling this option converts a texture from sRGB (the most common image gamma) into linear space for rendering. If your texture is already in linear space (which is rare), then disable this option. |
| Normalize | This option is available only for grayscale maps, such as Opacity or Gloss. Normalize will rescale the texture data so that it uses the entire black to white range. |
| Invert | This inverts the texture. White becomes black, and vice-versa. |
| Invert RGB | These options let you invert individual channels of your texture. This is very useful on normal maps, which may be in a different space than the Modeler expects. For instance, normal maps with a flipped green channel are pretty common. |
| Brightness | This option makes the texture brighter or darker. |
| Contrast | This option can increase or decrease the contrast (the difference between the light and dark parts) of the texture. |
| Saturation | This option can increase or decrease the saturation of the texture, which is how "colorful" the texture appears. |
| Red | This option modifies the texture to be more or less red. |
| Green | This option modifies the texture to be more or less green. |
| Blue | This option modifies the texture to be more or less blue. |
| Minimum | Adjusting the minimum, along with the maximum, allows you to rescale the texture luminance into a certain range. This is especially useful when bringing the color map into the right range for PBR rendering. |
| Maximum | Adjusting the maximum, along with the minimum, allows you to rescale the texture luminance into a certain range. This is especially useful when bringing the color map into the right range for PBR rendering. |