커스텀 렌더러 기능을 생성하는 방법
이 섹션에서는 URP 렌더러용 커스텀 렌더러 기능을 생성하는 방법을 설명합니다.
이 섹션에서는 다음을 가정합니다.
- Scriptable Render Pipeline Settings 프로퍼티가 URP 에셋을 참조합니다(Project Settings > Graphics > Scriptable Render Pipeline Settings).
이 문서는 다음 섹션으로 구성됩니다.
예제 씬 및 게임 오브젝트 생성
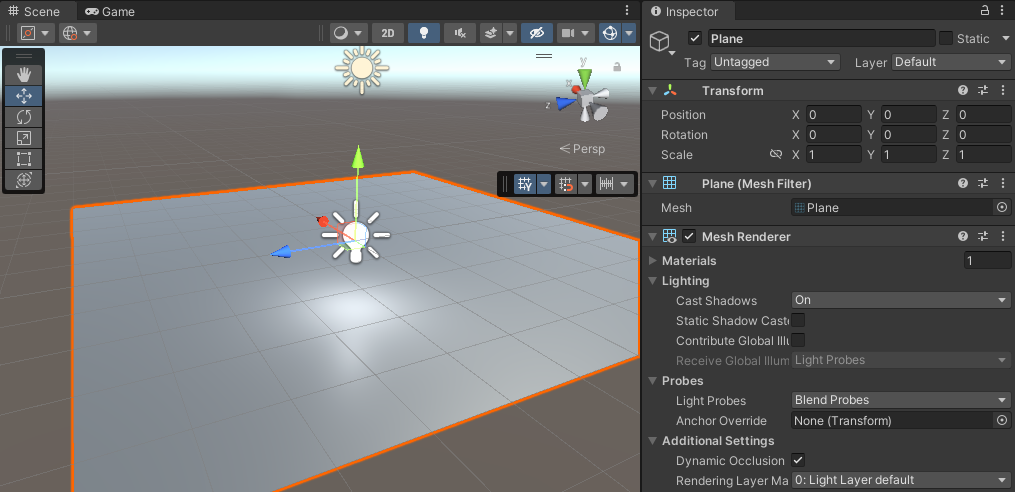
이 섹션의 단계를 수행하려면 다음 게임 오브젝트가 포함된 새로운 씬을 생성하십시오.
평면을 생성합니다.
새 머티리얼을 생성하고
Universal Render Pipeline/Lit셰이더를 할당합니다. 기본 컬러를 회색(예:#6A6A6A)으로 설정합니다.Plane이라고 명명합니다.점 광원을 생성하고 평면 위에 배치합니다.
씬이 아래 그림과 같이 보일 것입니다.
스크립터블 렌더러 기능을 생성하여 유니버설 렌더러에 추가
이 파트에서는 스크립터블 렌더러 기능을 생성하고, ScriptableRenderPass 인스턴스를 설정하고 스크립터블 렌더러에 삽입할 수 있는 메서드를 구현하는 방법을 설명합니다.
새 C# 스크립트를 생성합니다. 스크립트를
LensFlareRendererFeature.cs라고 명명합니다.스크립트를 열고 Unity에서 생성한
LensFlareRendererFeature클래스에서 모든 코드를 제거합니다. 다음using지시문을 추가합니다.using UnityEngine.Rendering.Universal;LensFlareRendererFeature클래스는ScriptableRendererFeature클래스에서 상속되어야 합니다.public class LensFlareRendererFeature : ScriptableRendererFeature클래스는 다음 메서드를 구현해야 합니다.
Create: Unity는 다음 이벤트에서 이 메서드를 호출합니다.렌더러 기능을 처음 로드하는 경우
렌더러 기능을 활성화 또는 비활성화하는 경우
렌더러 기능의 인스펙터에서 프로퍼티를 변경하는 경우
AddRenderPasses: Unity는 이 메서드를 프레임마다 각 카메라에 대해 한 번씩 호출합니다. 이 메서드를 사용하면 스크립터블 렌더러에ScriptableRenderPass인스턴스를 삽입할 수 있습니다.
이제 기본 메서드가 포함된 커스텀 LensFlareRendererFeature 렌더러 기능이 생성되었습니다.
아래는 이 파트의 완전한 코드입니다.
using UnityEngine;
using UnityEngine.Rendering;
using UnityEngine.Rendering.Universal;

public class LensFlareRendererFeature : ScriptableRendererFeature
{
    public override void Create()
    { }

    public override void AddRenderPasses(ScriptableRenderer renderer,
    ref RenderingData renderingData)
    { }
}
생성한 렌더러 기능을 유니버설 렌더러 에셋에 추가하십시오. 이 링크에서 렌더러에 렌더러 기능을 추가하는 방법을 확인할 수 있습니다.
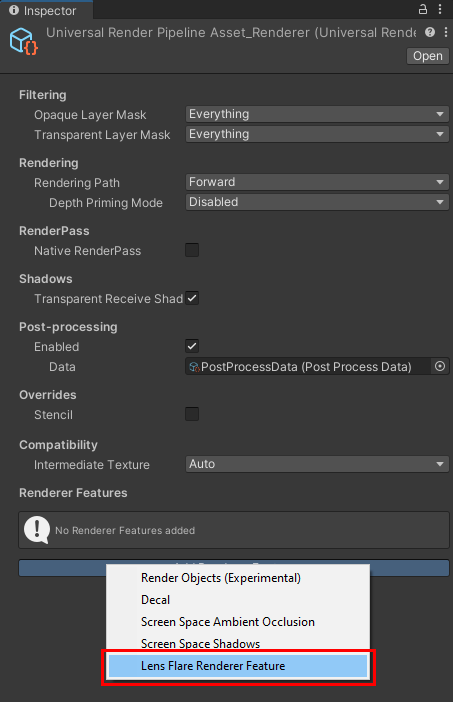
유니버설 렌더러에 렌즈 플레어 렌더러 기능을 추가합니다.
스크립터블 렌더 패스를 생성하고 대기열에 추가
이 파트에서는 스크립터블 렌더 패스를 생성하고 해당 인스턴스를 스크립터블 렌더러의 대기열에 추가하는 방법을 설명합니다.
LensFlareRendererFeature클래스에서ScriptableRenderPass로부터 상속되는LensFlarePass클래스를 선언합니다.class LensFlarePass : ScriptableRenderPass { }LensFlarePass에서Execute메서드를 추가합니다.Unity가 프레임마다
Execute메서드를 실행합니다. 이 메서드에서 커스텀 렌더링 기능을 구현할 수 있습니다.public override void Execute(ScriptableRenderContext context, ref RenderingData renderingData) { }LensFlareRendererFeature클래스에서 프라이빗LensFlarePass필드를 선언합니다.private LensFlarePass _lensFlarePass;Create메서드에서_lensFlarePass오브젝트를 인스턴스화합니다._lensFlarePass = new LensFlarePass(FlareSettings);AddRenderPasses메서드에서renderer오브젝트의EnqueuePass메서드를 사용하여 렌더링 대기열에_lensFlarePass를 추가합니다.renderer.EnqueuePass(_lensFlarePass);
이제 커스텀 LensFlareRendererFeature 렌더러 기능이 커스텀 LensFlarePass 패스 내에서 Execute 메서드를 실행합니다.
아래는 이 파트의 완전한 코드입니다.
using UnityEngine;
using UnityEngine.Rendering;
using UnityEngine.Rendering.Universal;

public class LensFlareRendererFeature : ScriptableRendererFeature
{
    class LensFlarePass : ScriptableRenderPass
    {
        public override void Execute(ScriptableRenderContext context, ref RenderingData renderingData)
        {
            Debug.Log(message: "The Execute() method runs.");
        }
    }

    private LensFlarePass _lensFlarePass;

    public override void Create()
    {
        _lensFlarePass = new LensFlarePass();
    }

    public override void AddRenderPasses(ScriptableRenderer renderer, ref RenderingData renderingData)
    {
        renderer.EnqueuePass(_lensFlarePass);
    }
}
Execute 메서드에서 렌더링 커맨드 구현
이 파트에서는 Execute 메서드에서 커스텀 로직을 구현하는 방법을 설명합니다.
CommandBuffer 타입 오브젝트를 생성합니다. 이 오브젝트에는 실행할 렌더링 커맨드 리스트가 들어 있습니다.
Execute메서드에서 다음 줄을 추가합니다.CommandBuffer cmd = CommandBufferPool.Get(name: "LensFlarePass");CommandBufferPool.Get(name: "LensFlarePass")메서드가 새 커맨드 버퍼를 가져와서 이름을 할당합니다.커맨드 버퍼를 실행하는 줄과 커맨드 버퍼를 해제하는 줄을 추가합니다.
Execute메서드에서 커맨드 버퍼 선언 뒤에 다음 줄을 추가합니다.context.ExecuteCommandBuffer(cmd); CommandBufferPool.Release(cmd);이제 보일러플레이트 파트가 준비되었으며 커스텀 렌더링 로직을 구현할 수 있습니다.
다음 단계에서는 커스텀 렌더링 로직을 구현합니다.
이 예제에서는 렌더러 기능이 사각형에 렌즈 플레어를 텍스처로 그립니다. 이를 구현하려면 머티리얼과 메시(사각형)가 필요합니다.
LensFlarePass클래스에서 두 개의 프라이빗 필드, 즉Material과Mesh를 선언합니다.private Material _material; private Mesh _mesh;그런 다음, 해당 변수를 인수로 취하는 생성자를 선언합니다.
public LensFlarePass(Material material, Mesh mesh) { _material = material; _mesh = mesh; }이제
LensFlarePass클래스가 두 개의 인수를 기대합니다. 인수를 사용하여 클래스를 초기화하려면LensFlareRendererFeature클래스에 다음과 같은 공용 필드를 추가합니다.public Material material; public Mesh mesh;그런 다음,
Create메서드의LensFlarePass선언에 해당 인수를 추가합니다._lensFlarePass = new LensFlarePass(material, mesh);Execute메서드에서cmd오브젝트의DrawMesh메서드를 사용합니다. 이 메서드는_material필드와_mesh필드를 인수로 취합니다.cmd오브젝트 선언과context.ExecuteCommandBuffer(cmd)커맨드 사이에 다음 줄을 추가합니다.cmd.DrawMesh(_mesh, Matrix4x4.identity, _material);Unity가
null인수를 사용하여DrawMesh메서드를 호출하도록 하려면AddRenderPasses메서드에서EnqueuePass호출을 null 검사 조건으로 래핑합니다.if (material != null && mesh != null) { renderer.EnqueuePass(_lensFlarePass); }
이제 LensFlarePass 클래스의 Execute 메서드에 다음과 같은 기본 로직이 구현되었습니다.
새 커맨드 버퍼를 가져와서
LensFlarePass라고 이름을 할당합니다.렌더링 커맨드를 추가합니다.
커맨드 버퍼를 실행합니다.
버퍼를 해제합니다.
참고:
Material및Mesh프로퍼티가 null이므로, 아직은 Unity가LensFlarePass패스를 대기열에 추가하지 않습니다.
아래는 이 파트의 완전한 코드입니다.
using UnityEngine;
using UnityEngine.Rendering;
using UnityEngine.Rendering.Universal;
public class LensFlareRendererFeature : ScriptableRendererFeature
{
class LensFlarePass : ScriptableRenderPass
{
private Material _material;
private Mesh _mesh;
public LensFlarePass(Material material, Mesh mesh)
{
_material = material;
_mesh = mesh;
}
public override void Execute(ScriptableRenderContext context,
ref RenderingData renderingData)
{
CommandBuffer cmd = CommandBufferPool.Get(name: "LensFlarePass");
cmd.DrawMesh(_mesh, Matrix4x4.identity, _material);
context.ExecuteCommandBuffer(cmd);
CommandBufferPool.Release(cmd);
}
}
private LensFlarePass _lensFlarePass;
public Material material;
public Mesh mesh;
public override void Create()
{
_lensFlarePass = new LensFlarePass(material, mesh);
}
public override void AddRenderPasses(ScriptableRenderer renderer,
ref RenderingData renderingData)
{
if (material != null && mesh != null)
{
renderer.EnqueuePass(_lensFlarePass);
}
}
}
예제별 머티리얼 및 렌더링 코드 구현
이 섹션에서는 렌즈 플레어 효과를 위한 머티리얼을 생성하는 방법과 광원의 위치에서 플레어를 렌더링하는 코드를 구현하는 방법을 설명합니다.
새 머티리얼을 생성하고
Universal Render Pipeline/Unlit셰이더를 할당합니다.LensFlare라고 명명합니다.데모 목적으로 머티리얼의 기본 컬러를 빨간색으로 변경합니다.
유니버설 렌더러의
Lens Flare Renderer Feature에서 Material 프로퍼티에 있는LensFlare머티리얼을 선택하고 Mesh 프로퍼티에 있는Quad메시를 선택합니다.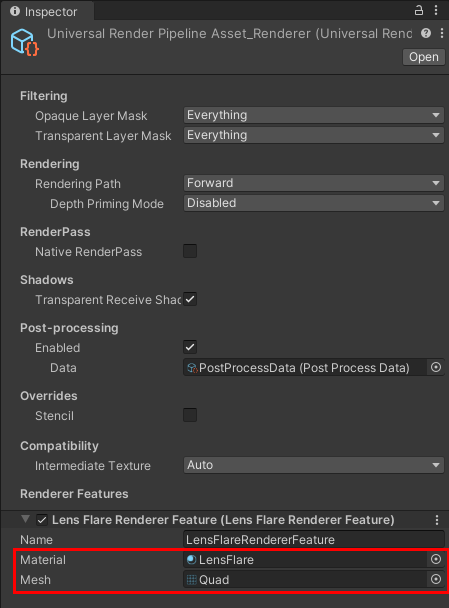
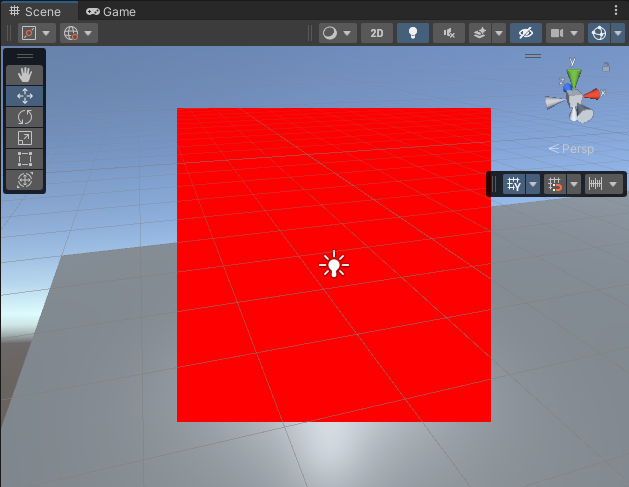
렌더러 기능이 씬에 사각형을 그리지만 이 시점에서는 검은색으로 표시됩니다. 이는
Universal Render Pipeline/Unlit셰이더에 여러 개의 패스가 있고, 그중 하나가 사각형을 검은색으로 칠하기 때문입니다. 이 동작을 변경하려면shaderPass인수를 취하는cmd.DrawMesh메서드 오버로드를 사용하여 셰이더 패스 0을 지정하십시오.cmd.DrawMesh(_mesh, Matrix4x4.identity, _material, 0, 0);
다음 단계는 이 예제에서 효과 구현과 관련된 변경 사항을 보여줍니다. 이러한 변경 사항은 설명을 위한 목적입니다.
Execute메서드에서 다음 줄을 추가합니다. 해당 줄을cmd오브젝트 선언 뒤에 배치합니다. 이 줄을 배치하면 Unity가 다음과 같은 방식으로 플레어가 있는 사각형을 그립니다.- 스크린 공간에서.
- 올바른 종횡비를 사용하여.
- 각 광원에 대해 광원 중심에서
// Get the Camera data from the renderingData argument. Camera camera = renderingData.cameraData.camera; // Set the projection matrix so that Unity draws the quad in screen space cmd.SetViewProjectionMatrices(Matrix4x4.identity, Matrix4x4.identity); // Add the scale variable, use the Camera aspect ratio for the y coordinate Vector3 scale = new Vector3(1, camera.aspect, 1); // Draw a quad for each Light, at the screen space position of the Light. foreach (VisibleLight visibleLight in renderingData.lightData.visibleLights) { Light light = visibleLight.light; // Convert the position of each Light from world to viewport point. Vector3 position = camera.WorldToViewportPoint(light.transform.position) * 2 - Vector3.one; // Set the z coordinate of the quads to 0 so that Uniy draws them on the same plane. position.z = 0; // Change the Matrix4x4 argument in the cmd.DrawMesh method to use the position and // the scale variables. cmd.DrawMesh(_mesh, Matrix4x4.TRS(position, Quaternion.identity, scale), _material, 0, 0); }이제 Unity가 각 광원의 중앙에 사각형을 그립니다.
렌즈 플레어를 시각화하려면
LensFlare머티리얼을 다음과 같이 변경합니다.다음 텍스처를 베이스 맵에 추가합니다.

컬러를 흰색으로 설정합니다.
Surface Type을Transparent로 설정합니다.Blending Mode를Additive로 설정합니다.
이제 Unity가 사각형에 렌즈 플레어 텍스처를 그리지만 플레어의 일부가 보이지 않습니다.
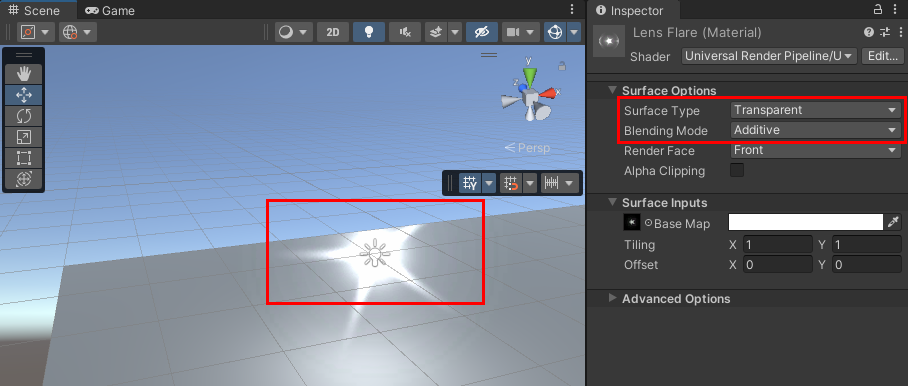
이는 Unity가 LensFlarePass 렌더 패스 후에 스카이박스를 그리기 때문입니다.
렌더 패스 순서 변경
Unity가 렌더 패스를 그리는 순서를 확인하려면 Frame Debugger (Window > Analysis > Frame Debugger)를 엽니다.
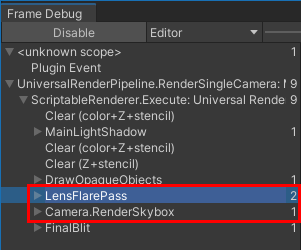
스카이박스 패스 후에 LensFlarePass 패스를 대기열에 추가하려면 LensFlarePass의 renderPassEvent 프로퍼티를 사용합니다. 프로퍼티에 RenderPassEvent 열거형의 AfterRenderingSkybox 이벤트를 할당합니다.
Create 메서드에서 다음과 같이 변경합니다.
public override void Create()
{
_lensFlarePass = new LensFlarePass(material, mesh);
// Draw the lens flare effect after the skybox.
_lensFlarePass.renderPassEvent = RenderPassEvent.AfterRenderingSkybox;
}
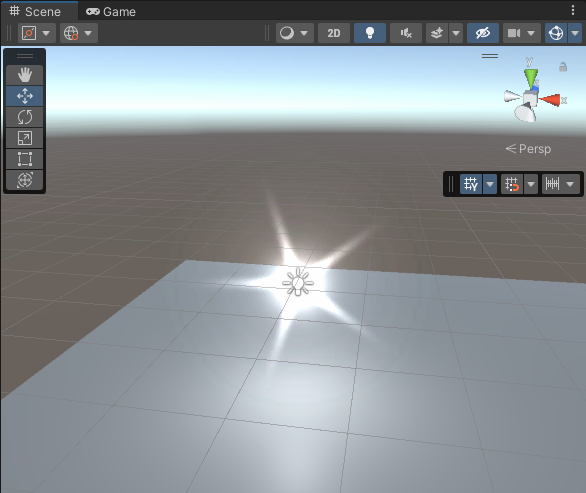
이제 Unity가 스카이박스 위에 렌즈 플레어를 그립니다.
이 예제의 코드 완성
아래는 이 예제의 완전한 코드입니다.
using UnityEngine;
using UnityEngine.Rendering;
using UnityEngine.Rendering.Universal;
public class LensFlareRendererFeature : ScriptableRendererFeature
{
class LensFlarePass : ScriptableRenderPass
{
private Material _material;
private Mesh _mesh;
public LensFlarePass(Material material, Mesh mesh)
{
    _material = material;
    _mesh = mesh;
}
public override void Execute(ScriptableRenderContext context,
ref RenderingData renderingData)
{
CommandBuffer cmd = CommandBufferPool.Get(name: "LensFlarePass");
// Get the Camera data from the renderingData argument.
Camera camera = renderingData.cameraData.camera;
// Set the projection matrix so that Unity draws the quad in screen space.
cmd.SetViewProjectionMatrices(Matrix4x4.identity, Matrix4x4.identity);
// Add the scale variable, use the Camera aspect ratio for the y coordinate
Vector3 scale = new Vector3(1, camera.aspect, 1);
// Draw a quad for each Light, at the screen space position of the Light.
foreach (VisibleLight visibleLight in renderingData.lightData.visibleLights)
{
Light light = visibleLight.light;
// Convert the position of each Light from world to viewport point.
Vector3 position =
camera.WorldToViewportPoint(light.transform.position) * 2 - Vector3.one;
// Set the z coordinate of the quads to 0 so that Uniy draws them on the same
// plane.
position.z = 0;
// Change the Matrix4x4 argument in the cmd.DrawMesh method to use
// the position and the scale variables.
cmd.DrawMesh(_mesh, Matrix4x4.TRS(position, Quaternion.identity, scale),
_material, 0, 0);
}
context.ExecuteCommandBuffer(cmd);
CommandBufferPool.Release(cmd);
}
}
private LensFlarePass _lensFlarePass;
public Material material;
public Mesh mesh;
public override void Create()
{
_lensFlarePass = new LensFlarePass(material, mesh);
// Draw the lens flare effect after the skybox.
_lensFlarePass.renderPassEvent = RenderPassEvent.AfterRenderingSkybox;
}
public override void AddRenderPasses(ScriptableRenderer renderer, ref RenderingData renderingData)
{
if (material != null && mesh != null)
{
    renderer.EnqueuePass(_lensFlarePass);
}
}
}