Using WebGL Templates
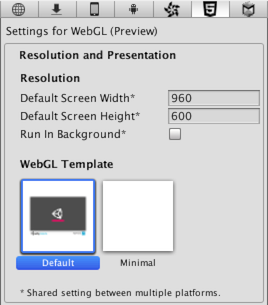
When you build a WebGL project, Unity embeds the player in an HTML page so that it can be played in the browser. The default page is a simple white page with a loading bar on a grey canvas. Alternatively, you can select a minimal template (with only the necessary boilerplate code to run the WebGL content) in the Player Settings inspector (menu: Edit > Project Settings > Player).
The built-in HTML pages are fine for testing and demonstrating a minimal player but for production purposes, it is often desirable to see the player hosted in the page where it will eventually be deployed. For example, if the Unity content interacts with other elements in the page via the external call interface then it must be tested with a page that provides those interacting elements. Unity allows you to supply your own pages to host the player by using WebGL templates.
Structure of a WebGL Template
Custom templates are added to a project by creating a folder called “WebGLTemplates” in the Assets folder - the templates themselves are sub-folders within this folder. Each template folder contains an index.html file along with any other resources the page needs, such as images or stylesheets.
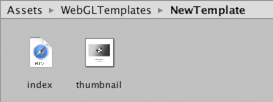
Once created, the template will appear among the options on the Player Settings inspector. (the name of the template will be the same as its folder). Optionally, the folder can contain a file named thumbnail.png, which should have dimensions of 128x128 pixels. The thumbnail image will be displayed in the inspector to hint at what the finished page will look like.
The html file needs to contain a canvas element with the id “canvas”. Then you must insert the UNITY_WEBGL_LOADER_GLUE tag, which will generate the required script tags to embed the Unity content, which will then render to that canvas element.
Template Tags
빌드 프로세스 중에 Unity 에디터는 페이지 텍스트에서 특수 태그 문자열을 찾아서 에디터에서 제공한 값으로 바꿉니다. 여기에는 이름, 화면상의 크기, 기타 플레이어에 대한 유용한 여러 정보가 포함됩니다.
태그는 페이지 소스에서 퍼센트 기호(%)로 구분됩니다. 예를 들어 플레이어 설정에서 제품 이름이 “MyPlayer”로 정의된 경우
<title>%UNITY_WEB_NAME%</title>
…in the template’s index file will be replaced with
<title>MyPlayer</title>
…in the host page generated for the build. The complete set of tags is given below:-
UNITY_WEB_NAME: Name of the player.
UNITY_WEBGL_LOADER_GLUE: This will inject the necessary script tags to embed the WebGL content. This is required to be in the template’s index.html file.
UNITY_WIDTH and UNITY_HEIGHT: Onscreen width and height of the player in pixels.
UNITY_DEVELOPMENT_PLAYER: 1 when building a development player, 0 otherwise.
UNITY_CUSTOM_SOME_TAG: If you add a tag to the index file with the form UNITY_CUSTOM_XXX, then this tag will appear in the Player Settings when your template is selected. For example, if something like
<title>Unity Player | %UNITY_CUSTOM_MYTAG%</title>
…is added to the source, the Player Settings will look like this:-
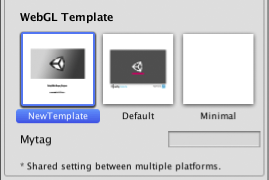
The textbox next to the tag’s name contains the text that the custom tag will be replaced with during the build.
예제
템플릿 태그의 사용법을 설명하기 위해 여기에서는 Unity가 최소 WebGL 템플릿에 사용하는 HTML 소스가 나와 있습니다.
<!doctype html>
<html lang="en-us">
<head>
<meta charset="utf-8">
<meta http-equiv="Content-Type" content="text/html; charset=utf-8">
<title>Unity WebGL Player | %UNITY_WEB_NAME%</title>
<link rel="stylesheet" href="TemplateData/style.css">
<link rel="shortcut icon" href="TemplateData/favicon.ico" />
<script src="TemplateData/UnityProgress.js"></script>
</head>
<body class="template">
<p class="header"><span>Unity WebGL Player | </span>%UNITY_WEB_NAME%</p>
<div class="template-wrap clear">
<canvas class="emscripten" id="canvas" oncontextmenu="event.preventDefault()" height="%UNITY_HEIGHT%px" width="%UNITY_WIDTH%px"></canvas>
<div class="logo"></div>
<div class="fullscreen"><img src="TemplateData/fullscreen.png" width="38" height="38" alt="Fullscreen" title="Fullscreen" onclick="SetFullscreen(1);" /></div>
<div class="title">%UNITY_WEB_NAME%</div>
</div>
<p class="footer">« created with <a href="http://unity3d.com/" title="Go to unity3d.com">Unity</a> »</p>
%UNITY_WEBGL_LOADER_GLUE%
</body>
</html>
Adding a progress bar
Unity WebGL content will not automatically render a progress bar for you when it loads - the template needs to handle that. The default template included in Unity contains a UnityProgress.js file which implements a simple progress bar. You can reuse that for your own templates, or use it as a reference for creating your own. Since the progress bar is completely implemented in JavaScript, you can completely customize or replace it to show anything you want as a progress indication.