프로퍼티 드로어
프로퍼티 드로어는 스크립트에서 속성을 사용하거나 특정 Serializable 클래스가 표시되어야 하는 방법을 제어하여 인스펙터(Inspector) 창 에 특정 컨트롤이 표시되는 방법을 커스터마이즈할 때 사용할 수 있습니다.
프로퍼티 드로어는 다음 두 가지 용도로 사용됩니다.
- 모든 Serializable 클래스 인스턴스의 GUI 커스터마이즈
- 커스텀 프로퍼티 속성 을 사용하여 스크립트 멤버의 GUI 커스터마이즈
Serializable 클래스의 GUI 커스터마이즈
커스텀 Serializable 클래스가 있는 경우 Property Drawer 를 사용하여 Inspector 에서 클래스가 표시되는 방법을 제어할 수 있습니다. 아래 스크립트 예제의 Serializable 클래스 Ingredient 를 상세히 살펴 보십시오. 참고: 해당 스크립트는 에디터 스크립트가 아닙니다. 프로퍼티 속성 클래스는 일반 스크립트 파일에 삽입해야 합니다.
JavaScript(예제):
enum IngredientUnit { Spoon, Cup, Bowl, Piece }

// Custom serializable class
class Ingredient extends System.Object {
    var name : String;
    var amount : int = 1;
    var unit : IngredientUnit;
}

var potionResult : Ingredient;
var potionIngredients : Ingredient[];

function Update () {
    // Update logic here...
}
C#(예제):
using UnityEngine;
using System.Collections;

public enum IngredientUnit { Spoon, Cup, Bowl, Piece }

// Custom serializable class
[System.Serializable]
public class Ingredient : System.Object {
    string name;
    int amount = 1;
    IngredientUnit unit;
}

public class Recipe : MonoBehaviour {
    Ingredient potionResult;
    Ingredient[] potionIngredients;

    void Update() {
        // Update logic here...
    }
}
using UnityEngine;
using System.IO;

class Testing : MonoBehaviour{

    enum IngredientUnit { Spoon, Cup, Bowl, Piece }

    // Custom serializable class
    [System.Serializable]
    class Ingredient{
        string name;
        int amount = 1;
        IngredientUnit unit;
    }

    Ingredient potionResult;
    Ingredient[] potionIngredients;

    void Update () {
    // Update logic here...
    }
}
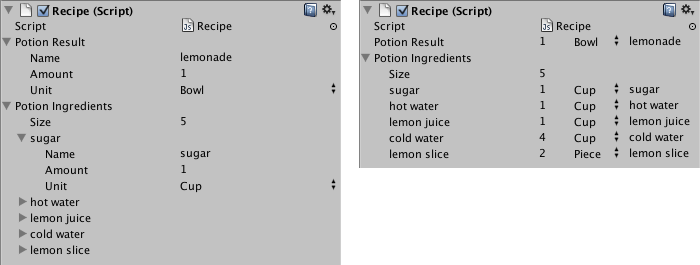
커스텀 프로퍼티 드로어를 사용하여 인스펙터 내에서 Ingredient 클래스가 표시되는 모습을 변경할 수 있습니다. 커스텀 프로퍼티 드로어가 있는 경우와 없는 경우 인스펙터에서 Ingredient 프로퍼티가 어떻게 보여지는지 비교해 보십시오.
CustomPropertyDrawer 속성을 이용하여 프로퍼티 드로어를 Serializable 클래스에 연결하고 드로어인 Serializable 클래스의 타입을 전달할 수 있습니다.
JavaScript(예제):
@CustomPropertyDrawer(Ingredient)
class IngredientDrawer extends PropertyDrawer {

    // Draw the property inside the given rect
    function OnGUI (position : Rect, property : SerializedProperty, label : GUIContent) {
        // Using BeginProperty / EndProperty on the parent property means that
        // prefab override logic works on the entire property.
        EditorGUI.BeginProperty (position, label, property);

        // Draw label
        position = EditorGUI.PrefixLabel (position, GUIUtility.GetControlID (FocusType.Passive), label);

        // Don't make child fields be indented
        var indent = EditorGUI.indentLevel;
        EditorGUI.indentLevel = 0;

        // Calculate rects
        var amountRect = new Rect (position.x, position.y, 30, position.height);
        var unitRect = new Rect (position.x+35, position.y, 50, position.height);
        var nameRect = new Rect (position.x+90, position.y, position.width-90, position.height);

        // Draw fields - passs GUIContent.none to each so they are drawn without labels
        EditorGUI.PropertyField (amountRect, property.FindPropertyRelative ("amount"), GUIContent.none);
        EditorGUI.PropertyField (unitRect, property.FindPropertyRelative ("unit"), GUIContent.none);
        EditorGUI.PropertyField (nameRect, property.FindPropertyRelative ("name"), GUIContent.none);

        // Set indent back to what it was
        EditorGUI.indentLevel = indent;

        EditorGUI.EndProperty ();
    }
}
C#(예제):
using UnityEngine;
using UnityEditor;
using System.Collections;

[CustomPropertyDrawer(typeof(Ingredient))]
public class IngredientDrawer : PropertyDrawer {

    // Draw the property inside the given rect
    void OnGUI(Rect position, SerializedProperty property, GUIContent label) {
        // Using BeginProperty / EndProperty on the parent property means that
        // prefab override logic works on the entire property.
        EditorGUI.BeginProperty(position, label, property);

        // Draw label
        position = EditorGUI.PrefixLabel(position, GUIUtility.GetControlID(FocusType.Passive), label);

        // Don't make child fields be indented
        int indent = EditorGUI.indentLevel;
        EditorGUI.indentLevel = 0;

        // Calculate rects
        Rect amountRect = new Rect(position.x, position.y, 30, position.height);
        Rect unitRect = new Rect(position.x+35, position.y, 50, position.height);
        Rect nameRect = new Rect(position.x+90, position.y, position.width-90, position.height);

        // Draw fields - passs GUIContent.none to each so they are drawn without labels
        EditorGUI.PropertyField(amountRect, property.FindPropertyRelative ("amount"), GUIContent.none);
        EditorGUI.PropertyField(unitRect, property.FindPropertyRelative ("unit"), GUIContent.none);
        EditorGUI.PropertyField(nameRect, property.FindPropertyRelative ("name"), GUIContent.none);

        // Set indent back to what it was
        EditorGUI.indentLevel = indent;

        EditorGUI.EndProperty();
    }
}
using UnityEngine;
using UnityEditor;
using System.Collections;


[CustomPropertyDrawer (Ingredient)]
class IngredientDrawer : PropertyDrawer {

    // Draw the property inside the given rect
    void OnGUI (Rect position, SerializedProperty property, GUIContent label) {
        // Using BeginProperty / EndProperty on the parent property means that
        // prefab override logic works on the entire property.
        EditorGUI.BeginProperty (position, label, property);

        // Draw label
        position = EditorGUI.PrefixLabel (position, GUIUtility.GetControlID (FocusType.Passive), label);

        // Don't make child fields be indented
        var indent = EditorGUI.indentLevel;
        EditorGUI.indentLevel = 0;

        // Calculate rects
        Rect amountRect = new Rect (position.x, position.y, 30, position.height);
        Rect unitRect = new Rect (position.x+35, position.y, 50, position.height);
        Rect nameRect = new Rect (position.x+90, position.y, position.width-90, position.height);

        // Draw fields - passs GUIContent.none to each so they are drawn without labels
        EditorGUI.PropertyField (amountRect, property.FindPropertyRelative ("amount"), GUIContent.none);
        EditorGUI.PropertyField (unitRect, property.FindPropertyRelative ("unit"), GUIContent.none);
        EditorGUI.PropertyField (nameRect, property.FindPropertyRelative ("name"), GUIContent.none);

        // Set indent back to what it was
        EditorGUI.indentLevel = indent;

        EditorGUI.EndProperty ();
    }
}
프로퍼티 속성을 사용한 스크립트 멤버 GUI 커스터마이즈
Property Drawer 를 사용해 커스텀 Property Attributes 가 있는 스크립트에서 멤버가 보여지는 모습을 변경할 수도 있습니다. 스크립트에서 부동 소수점과 정수를 특정 범위로 제한하고 Inspector 에 슬라이더로 표시하려는 경우, 다음과 같이 RangeAttribute 라고 하는 빌트인 PropertyAttribute 를 사용할 수 있습니다.
JavaScript(예제):
// Show this float in the Inspector as a slider between 0 and 10
@Range (0.0, 10.0)
var myFloat = 0.0;

//C# example.
[Range(0.0f, 10.0f)]
public float myFloat = 0.0f;
C#(예제):
// Show this float in the Inspector as a slider between 0 and 10
[Range(0.0f, 10.0f)]
float myFloat = 0.0f;
원하는 PropertyAttribute 도 직접 만들 수 있습니다. 여기서는 RangeAttribute 의 코드를 예제로 사용합니다. 속성은 PropertyAttribute 클래스를 확장해야 합니다. 원할 경우 프로퍼티가 파라미터를 사용하고 퍼블릭 멤버 변수로 저장할 수 있습니다.
JavaScript(예제):
class RangeAttribute extends PropertyAttribute {
    var min : float;
    var max : float;

    function RangeAttribute (min : float, max : float) {
        this.min = min;
        this.max = max;
    }
}
C#(예제):
using UnityEngine;
using System.Collections;


public class RangeAttribute : PropertyAttribute {
    public float min;
    public float max;

    public RangeAttribute (float min, float max) {
        this.min = min;
        this.max = max;
    }
}
using UnityEngine;
using System.Collections;

public class Testing : PropertyAttribute
{
        float min;
        float max;

        void RangeAttribute (float min, float max) {
            this.min = min;
            this.max = max;
        }
}
이제 속성을 갖게 되었으므로 해당 속성이 있는 프로퍼티를 드로우하는 Property Drawer 를 만들어야 합니다. 드로어는 PropertyDrawer 클래스를 확장해야 하고, 어느 드로어의 속성으로 사용되는지 알리는 CustomPropertyDrawer 속성을 포함해야 합니다.
프로퍼티 드로어 클래스는 에디터 스트립트에서 에디터라는 폴더 안에 넣어야 합니다.
JavaScript(예제):
// Tell the RangeDrawer that it is a drawer for properties with the RangeAttribute.
@CustomPropertyDrawer (RangeAttribute)
class RangeDrawer extends PropertyDrawer {

    // Draw the property inside the given rect
    function OnGUI (position : Rect, property : SerializedProperty, label : GUIContent) {

        // First get the attribute since it contains the range for the slider
        var range : RangeAttribute = attribute as RangeAttribute;

        // Now draw the property as a Slider or an IntSlider based on whether it's a float or integer.
        if (property.propertyType == SerializedPropertyType.Float)
            EditorGUI.Slider (position, property, range.min, range.max, label);
        else if (property.propertyType == SerializedPropertyType.Integer)
            EditorGUI.IntSlider (position, property, range.min, range.max, label);
        else
            EditorGUI.LabelField (position, label.text, "Use Range with float or int.");
    }
}
C#(예제):
using UnityEngine;
using UnityEditor;
using System.Collections;

// Tell the RangeDrawer that it is a drawer for properties with the RangeAttribute.

[CustomPropertyDrawer(typeof(RangeAttribute))]
public class RangeDrawer : PropertyDrawer {

    // Draw the property inside the given rect
    void OnGUI (Rect position, SerializedProperty property, GUIContent label) {

        // First get the attribute since it contains the range for the slider
        RangeAttribute range  = attribute as RangeAttribute;

        // Now draw the property as a Slider or an IntSlider based on whether it's a float or integer.
        if (property.propertyType == SerializedPropertyType.Float)
            EditorGUI.Slider(position, property, range.min, range.max, label);
        else if (property.propertyType == SerializedPropertyType.Integer)
            EditorGUI.IntSlider(position, property, (int) range.min, (int) range.max, label);
        else
            EditorGUI.LabelField(position, label.text, "Use Range with float or int.");
    }
}
퍼포먼스와 관련한 이유로 EditorGUILayout 함수를 프로퍼티 드로어와 함께 사용할 수 없습니다.