Using Animation Curves
The Property List
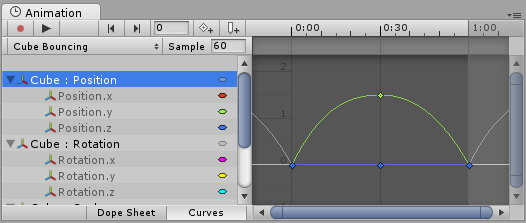
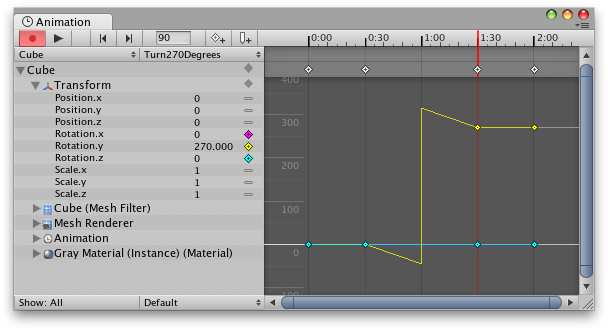
In an Animation Clip, any animatable property can have an Animation Curve, which means that the Animation Clip controls that property. In the property list area of the Animation View, all animated properties are listed. With the Animation View in Dope Sheet mode, the animated values for each property appear only as linear tracks, however in Curves mode you are able to see the the changing values of properties visualised as a grap view.
In “Curves” mode, the Animation Curves have colored curve indicators, each colour representing the values for one of the currently selected properties in the property list. For information on how to add curves to an animation property, see the section on Using the Animation View.
Understanding Curves, Keys and Keyframes
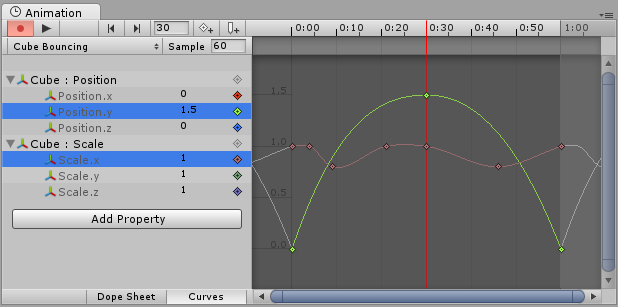
Animation Curve 에는 커브가 지나가는 컨트롤 가능한 포인트인 여러 key 가 있습니다. 이는 Curve Editor 의 커브에 작은 마름모 기호로 표현됩니다. 한 개 이상의 표시된 커브에서 key 를 가진 프레임을 keyframe 이라고 합니다.
If a property has a key in the currently previewed frame, the curve indicator will have a diamond shape.

Curve Editor 는 선택된 프로퍼티의 커브만 보여줍니다. 프로퍼티 리스트에서 여러 프로퍼티가 선택됐다면 커브는 함께 오버레이된 상태로 표시됩니다.
Adding and Moving Keyframes
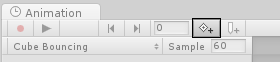
Keyframe 버튼 을 클릭해서 현재 미리보기 중인 프레임에 Keyframe 을 추가할 수 있습니다.
keyframe 버튼 을 클릭해서 현재 미리보기 중인 프레임에 keyframe 을 추가할 수 있습니다. 현재 선택된 모든 커브에 키프레임이 추가됩니다. 또한 새로운 keyframe 을 만들 프레임의 커브를 더블 클릭해서 프레임 중 하나의 커브에 키프레임을 추가할 수도 있습니다. Keyframe Line 을 오른쪽 클릭하고 컨텍스트 메뉴에서 Add Keyframe 을 선택해서 keyframe 을 추가하는 것도 가능합니다. keyframes 을 추가하면 마우스로 드래그할 수 있습니다. 여러 keyframes 를 선택해서 한 번에 드래그할 수도 있습니다. Keyframes 를 선택하고 Delete 를 누르거나 오른쪽 클릭해 컨텍스트 메뉴에서 Delete Keyframe 을 선택해 Keyframe 을 삭제할 수 있습니다.
Supported Animatable Properties
Animation View 를 사용하여 Game Object 위치, 회전, 크기를 비롯하여 많은 것을 애니메이션화할 수 있습니다. 어떤 Component 또는 Material 의 프로퍼티든 애니메이션화할 수 있으며, 스크립트 컴포넌트의 public 변수까지도 가능합니다. 복잡한 시각 효과나 동작을 하는 애니메이션을 만들려면 관련 프로퍼티에 Animation Curve 만 추가하면 됩니다.
애니메이션 시스템에서는 다음 프로퍼티 타입을 지원합니다.
- Float
- Color
- Vector2
- Vector3
- Vector4
- 쿼터니언
- Boolean
배열은 지원되지 않으며, 구조체 및 위에 나열된 것 이외의 오브젝트도 마찬가지입니다.
boolean 프로퍼티에서 값 0 은 False 와 같으며 다른 모든 값은 True 와 같습니다.
다음은 Animation View 를 사용할 수 있는 많은 일 중 몇 가지 예제입니다.
- Light 의 Color 와 Intensity 를 애니메이션화하여 깜박이거나 떨리게 만들 수 있습니다.
- 반복 Audio Source 의 Pitch, Volume 을 애니메이션화하여 사운드 에셋의 용량을 최소화하면서 바람 부는 소리, 엔진 소리, 물 흐르는 소리를 재현할 수 있습니다.
- Material 의 Texture Offset 을 애니메이션화하여 벨트나 트랙의 움직임, 물의 흐름 또는 특수 효과를 시뮬레이션할 수 있습니다.
- 여러 Ellipsoid Particle Emitters 의 Emit 상태와 Velocities 를 애니메이션화하여 화려한 불꽃놀이나 분수를 생성할 수 있습니다.
- 스크립트 컴포넌트의 변수를 애니메이션화하여 시간 경과에 따른 동작 변화를 구현할 수 있습니다.
Animation Curves 를 이용해 게임 로직을 조절하는 경우 Unity에서 재생 또는 샘플하는 방식을 참조하십시오.
Rotation Interpolation Types
Unity에서 회전은 Quaternion 으로 나타납니다. Quaternion에는 .x, .y, .z, .w 값으로 구성되며 방법을 정확히 알지 않는 이상은 수동으로 수정해서는 안됩니다. 대신 회전은 보통 .x, .y, .z 값이 세 개의 축 주위의 회전을 나타내는 Euler Angles 를 사용해 조정됩니다.
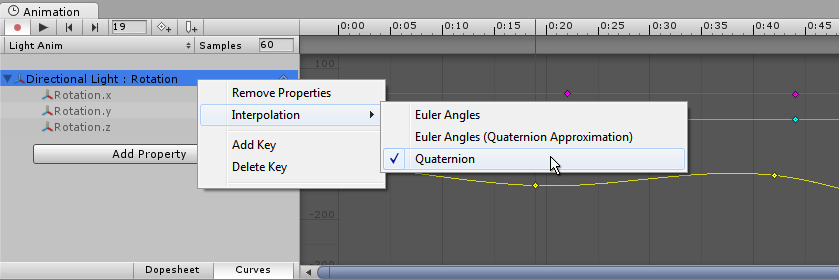
두 개의 회전 사이의 보간은 Quaternion 값 또는 Euler Angles 값 중 하나에서 실행하는 것입니다. Animation View 를 사용하면 Transform 회전을 애니메이션화할 때 사용할 보간을 선택할 수 있습니다. 그러나 회전은 어떤 보간을 선택하는지에 관계없이 항상 Euler Angles 의 형태로 표시됩니다.
쿼터니언 보간
Quaternion interpolation always generates nice interpolations along the shortest path between two rotations. This avoids rotation interpolation artifacts such as Gimbal Lock. However, Quaternion interpolation cannot represent rotations larger than 180 degrees, because it is then shorter to go the other way around. If you use Quaternion interpolation and place two keys further apart than 180 degrees, the curve will look discontinuous, even though the actual rotation is still smooth - it simply goes the other way around, because it is shorter. If rotations larger than 180 degrees are desired, additional keys must be placed in between. When using Quaternion interpolation, changing the keys or tangents of one curve may also change the shapes of the other two curves, since all three curves are created from the internal Quaternion representation. When using Quaternion interpolation, keys are always linked, so that creating a key at a specific time for one of the three curves will also create a key at that time for the other two curves.
오일러 각 보간
오일러 각 보간은 많은 사람들이 자주 사용하는 작업입니다. Euler Angle은 임의의 큰 회전을 나타낼 수 있으며, .x, .y, .z 곡선은 서로 독립적입니다. 오일러 각 보간은 여러 축을 중심으로 동시에 회전할 때 발생하는 Gimbal Lock 등의 결함을 발생시킬 수 있지만, 작업에 있어 직관적이고 한 번에 하나의 축을 중심으로 회전하는 간단한 작업에 적합합니다. 오일러 각 보간이 사용되는 경우, Unity는 내부에서 사용되는 쿼터니언 표현으로 커브를 내부에서 베이킹합니다. 이것은 외부 프로그램에서 Unity에 애니메이션을 임포트할 때 일어나는 과정과 비슷합니다. 이 곡선 베이킹 시 처리 과정에서 여분의 키를 추가할 수 있으며, 탄젠트 타입이 Constant 인 경우, 서브 프레임 레벨에서는 완전히 정확하지 않을 수 있습니다.