Multiplayer Lobby
Many multiplayer games have a staging area for players to join before playing the actual game. In this area, often called the “lobby”, players may be able to pick options and be able to set themselves as ready for the game to start.
The NetworkLobbyManager is a specialized NetworkManager that provides a lobby for Unity Multiplayer games. It includes:
- Limit on number of players that can join
- Support for multiple players per client with a limit on number of players per client
- Prevent players from joining game in-progress
- Per-player ready state, so that game starts when all players are ready
- Per-player configuration data
- Re-joining the lobby when the game is finished
- 로비 이벤트의 커스텀 로직을 지원하는 가상 함수
- 로비와 상호작용하기 위한 단순한 사용자 인터페이스
아래는 서버에서 호출되는 NetworkLobbyManager 가상 함수입니다.
- OnLobbyStartHost
- OnLobbyStopHost
- OnLobbyStartServer
- OnLobbyServerConnect
- OnLobbyServerDisconnect
- OnLobbyServerSceneChanged
- OnLobbyServerCreateLobbyPlayer
- OnLobbyServerCreateGamePlayer
- OnLobbyServerPlayerRemoved
- OnLobbyServerSceneLoadedForPlayer
- OnLobbyServerPlayersReady
All of the above server functions have empty default implementations, except for OnLobbyServerPlayersReady, which calls ServerChangeScene with the PlayScene.
아래는 클라이언트에서 호출되는 NetworkLobbyManager 가상 함수입니다.
- OnLobbyClientEnter
- OnLobbyClientExit
- OnLobbyClientConnect
- OnLobbyClientDisconnect
- OnLobbyStartClient
- OnLobbyStopClient
- OnLobbyClientSceneChanged
- OnLobbyClientAddPlayerFailed
위 클라이언트 함수는 모두 빈 디폴트 구현 상태입니다.
Lobby Player Objects
There are two kinds of player objects - each which has a prefab slot in the NetworkLobbyManager. The slots can be seen in this screenshot:
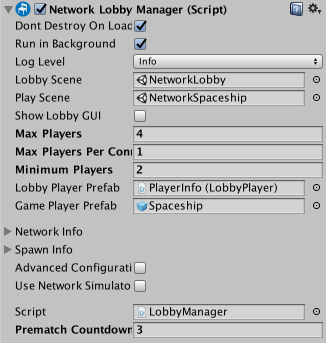
LobbyPlayer는 플레이어가 로비에 참여할 때 LobbyPlayerPrefab에서 생성됩니다.
- 각 플레이어당 하나의 LobbyPlayer
- 클라이언트가 연결하거나 플레이어가 추가될 때 생성
- 클라이언트가 접속을 해제할 때까지 존재
- 로비에서 플레이어 준비 플래그를 유지
- 로비에 있는 동안 커맨드 처리
- 게임 고유 플레이어 데이터를 유지하기 위해 이 프리팹에 사용자 스크립트 추가
- 이 프리팹에는 반드시 NetworkLobbyPlayer 컴포넌트가 있어야 합니다.
Minimum Players
The “Minimum Players” field represents the minimum number of “Ready” players in the Lobby to start the Match with. If the number of connected clients is more than the “Minimum Players” value, then waiting for all connected clients to become “Ready” will start the Match.
아래는 “최소 플레이어” 수가 2인 경우입니다.
- Start one instance of the game and start Host. Then in game Lobby UI press “Start” for your player. You will still be in Lobby mode because minimum number of Ready players to start game is 2.
- Start two more instances of the game and start Clients there. It doesn’t matter that “Minimum Players” set to 2. Wait for all - 3 in this case - connected players to become Ready.
- Press “Start” in Lobby UI for one player. Two players are Ready, but still in Lobby mode. Press “Start” in the Lobby UI for the last player and now all players moved to Game mode.
게임플레이어(GamePlayer)
GamePlayer는 게임이 시작하는 시점에서 GamePlayerPrefab에서 생성됩니다.
- 각 플레이어당 하나의 GamePlayer
- 게임 씬이 시작될 때 생성됨
- 로비에 다시 입장하면 제거됨
- 게임에 있는 동안의 명령 처리
- This prefab must have a NetworkIdentity component
NetworkLobbyPlayer 컴포넌트는 LobbyPlayer 오브젝트에서 사용합니다. 커스텀 로비 동작을 위해 사용될 수 있는 일부 가상 함수 콜백을 제공합니다.
    public virtual void OnClientEnterLobby();
        public virtual void OnClientExitLobby();
        public virtual void OnClientReady(bool readyState);
The function OnClientEnterLobby is called on the client when the game enters the lobby. This happens when the lobby scene starts for the first time, and also when returning to the lobby from the game-play scene.
The function OnClientExitLobby is called on the client when the game exists the lobby. This happens when switching to the game-play scene.
OnClientReady 함수는 해당 플레이어의 준비 상태가 변경되는 경우 호출됩니다.
Adding the Lobby to a Game
멀티플레이어 로비 에셋 패키지를 사용하지 않고 NetworkLobby를 멀티플레이어 게임에 추가하는 과정
- Create a new lobby scene
- Add the scene to the build settings, as the first scene
- Create a new game object in the new scene, rename it to LobbyManager
- Add the NetworkLobbyManager component to the LobbyManager object
- Add the NetworkManagerHUD component to the LobbyManager object
- Open the inspector for the NetworkLobbyManager component
- Set the LobbyScene slot of the NetworkLobbyManger to the scene that contains the LobbyManager object
- Set the PlayScene slot of the NetworkLobbyManager to the main game-play scene for the game
- Create a new gameObject and rename it to LobbyPlayer
- Add the NetworkLobbyPlayer component to the LobbyPlayer
- Create a prefab for the LobbyPlayer and delete the instance from the scene
- Set the LobbyPlayerPrefab slot to the LobbyPlayer prefab
- Set the GamePlayerPrefab slot to the prefab for the player in the main game
- Save the scene.
- 게임을 실행합니다.
This version of the NetworkLobbyManager uses the OnGUI user interface like the NetworkManagerHUD. For a better user interface use the multiplayer-lobby asset package.
The NetworkLobbyManager has many virtual function callbacks that can be used for custom lobby behaviour. Most important is OnLobbyServerSceneLoadedForPlayer which is called on the server for each player as they transition from the lobby to the main game. This is the ideal place to apply settings from the lobby to the player’s game-play object.
    // for users to apply settings from their lobby player object to their in-game player object
    public override bool OnLobbyServerSceneLoadedForPlayer(GameObject lobbyPlayer, GameObject gamePlayer)
    {
        var cc = lobbyPlayer.GetComponent<ColorControl>();
        var player = gamePlayer.GetComponent<Player>();
        player.myColor = cc.myColor;
        return true;
    }
Sample Project
Unity 에셋 스토어에는 NetworkLobbyManager를 사용하고 로비 GUI를 제공하는 예제 프로젝트가 있습니다. 이 프로젝트를 시작점으로 활용하여 로비가 있는 멀티플레이어 게임을 만들 수 있습니다.