Creating Screen Transitons
The need to transition between multiple UI Screens is fairly common. In this page we will explore a simple way to create and manage those transitions using animation and State Machines to drive and control each screen.
개요
The high-level idea is that each of our Screens will have an Animator Controller with two states (Open and Closed) and a boolean Parameter (Open). To transition between screens you will only need to close the currently open Screen and open the desired one. To make this process easier we will create a small Class ScreenManager that will keep track and take care of closing any already open Screen for us. The button that triggers the transition will only have to ask the ScreenManager to open the desired screen.
탐색 고려
UI 요소의 컨트롤러/키보드 내비게이션을 지원하려면 몇 가지 사항을 염두에 두는 것이 중요합니다. 플레이어가 화면 밖의 요소를 선택할 수 있도록 하기 위해 Selectable 요소가 화면 외부에 있는 것을 피하는 것이 중요합니다. 스크린 밖의 계층 구조를 비활성화하여 선택할 수 있으며, 새 스크린이 표시 될 때 요소를 선택한 것으로 설정해야 하는지 확인해야 합니다. 그렇지 않으면 플레이어가 새 스크린으로 이동할 수 없습니다. 아래의 ScreenManager 클래스에서 이 모든 것을 처리합니다.
애니메이터 컨트롤러 설정
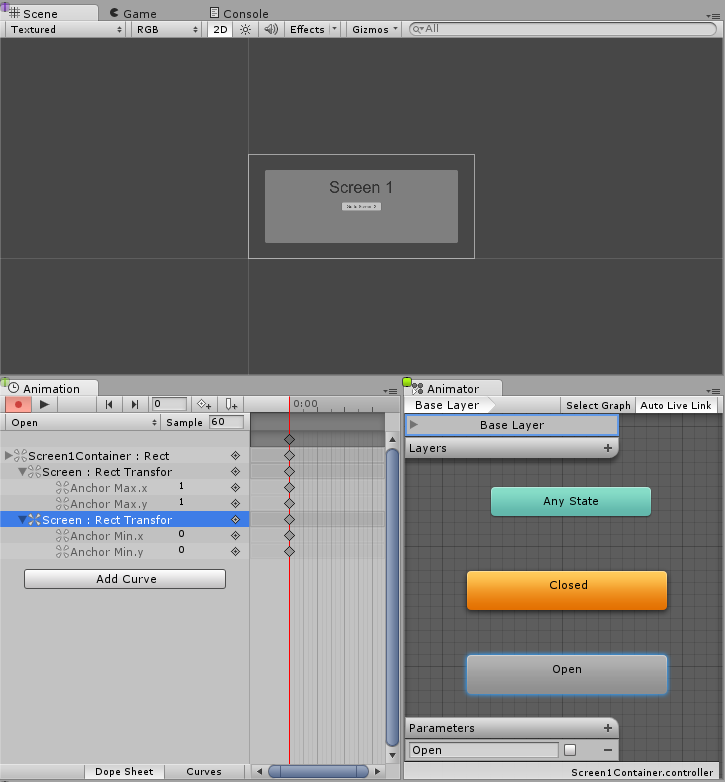
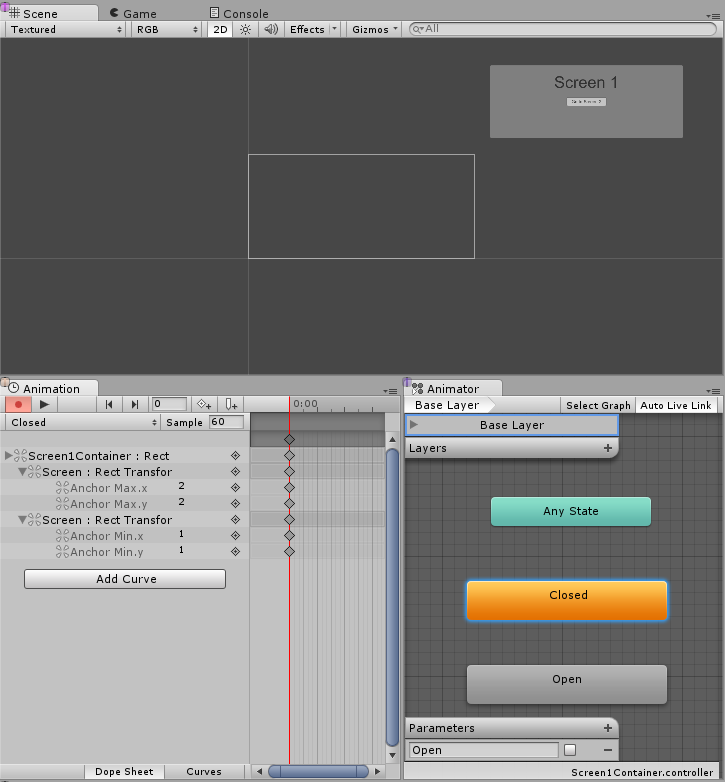
애니메이션 컨트롤러가 스크린 전환을 수행하기 위한 가장 일반적인 최소한의 설정에 대해 알아보겠습니다. 컨트롤러에는 하나의 부울 파라미터(Open)와 두 개의 상태(Open 및 Closed)가 필요하고, 각 상태에는 키프레임이 하나만 있는 애니메이션이 포함되어야 합니다. 이 방법으로 상태 머신이 전환 블렌딩을 자동으로 수행할 수 있게 합니다.
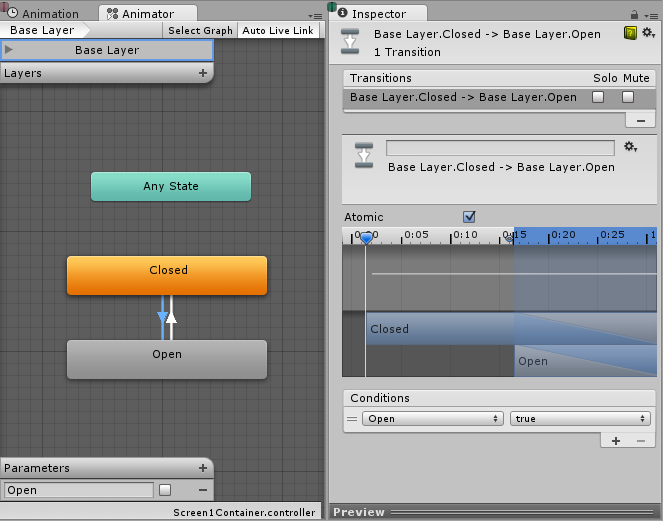
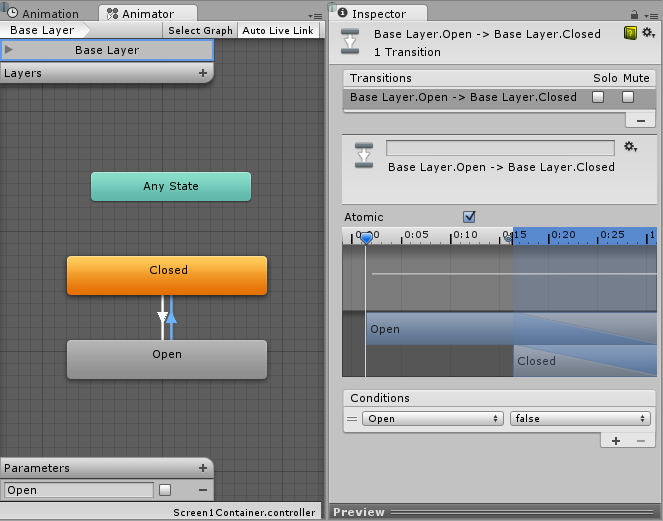
이제 두 상태 사이에 모두 전환을 생성해야 하므로, Open에서 Closed로 전환하는 것을 시작으로 조건을 올바르게 설정해 보겠습니다. 여기서는 Open 파라미터가 false로 설정된 경우 Open에서 Closed로 전환하려고 합니다. 이제 Closed에서 Open으로의 전환을 만들고 Open 파라미터가 true일 때 Closed에서 Open으로 전환하는 조건을 설정합니다.
Managing the Screens
With all the above set up, the only thing missing is for us to set the parameter Open to true on the screens Animator we want to transition to and Open to false on the currently open screens Animator. To do that we will create a small Script that will take care of that for us.
using UnityEngine;
using UnityEngine.UI;
using UnityEngine.EventSystems;
using System.Collections;
using System.Collections.Generic;

public class ScreenManager : MonoBehaviour {

    //Screen to open automatically at the start of the Scene
    public Animator initiallyOpen;

    //Currently Open Screen
    private Animator m_Open;

    //Hash of the parameter we use to control the transitions.
    private int m_OpenParameterId;

    //The GameObject Selected before we opened the current Screen.
    //Used when closing a Screen, so we can go back to the button that opened it.
    private GameObject m_PreviouslySelected;

    //Animator State and Transition names we need to check against.
    const string k_OpenTransitionName = "Open";
    const string k_ClosedStateName = "Closed";

    public void OnEnable()
    {
        //We cache the Hash to the "Open" Parameter, so we can feed to Animator.SetBool.
        m_OpenParameterId = Animator.StringToHash (k_OpenTransitionName);

        //If set, open the initial Screen now.
        if (initiallyOpen == null)
            return;
        OpenPanel(initiallyOpen);
    }

    //Closes the currently open panel and opens the provided one.
    //It also takes care of handling the navigation, setting the new Selected element.
    public void OpenPanel (Animator anim)
    {
        if (m_Open == anim)
            return;

        //Activate the new Screen hierarchy so we can animate it.
        anim.gameObject.SetActive(true);
        //Save the currently selected button that was used to open this Screen. (CloseCurrent will modify it)
        var newPreviouslySelected = EventSystem.current.currentSelectedGameObject;
        //Move the Screen to front.
        anim.transform.SetAsLastSibling();

        CloseCurrent();

        m_PreviouslySelected = newPreviouslySelected;

        //Set the new Screen as then open one.
        m_Open = anim;
        //Start the open animation
        m_Open.SetBool(m_OpenParameterId, true);

        //Set an element in the new screen as the new Selected one.
        GameObject go = FindFirstEnabledSelectable(anim.gameObject);
        SetSelected(go);
    }

    //Finds the first Selectable element in the providade hierarchy.
    static GameObject FindFirstEnabledSelectable (GameObject gameObject)
    {
        GameObject go = null;
        var selectables = gameObject.GetComponentsInChildren<Selectable> (true);
        foreach (var selectable in selectables) {
            if (selectable.IsActive () && selectable.IsInteractable ()) {
                go = selectable.gameObject;
                break;
            }
        }
        return go;
    }

    //Closes the currently open Screen
    //It also takes care of navigation.
    //Reverting selection to the Selectable used before opening the current screen.
    public void CloseCurrent()
    {
        if (m_Open == null)
            return;

        //Start the close animation.
        m_Open.SetBool(m_OpenParameterId, false);

        //Reverting selection to the Selectable used before opening the current screen.
        SetSelected(m_PreviouslySelected);
        //Start Coroutine to disable the hierarchy when closing animation finishes.
        StartCoroutine(DisablePanelDeleyed(m_Open));
        //No screen open.
        m_Open = null;
    }

    //Coroutine that will detect when the Closing animation is finished and it will deactivate the
    //hierarchy.
    IEnumerator DisablePanelDeleyed(Animator anim)
    {
        bool closedStateReached = false;
        bool wantToClose = true;
        while (!closedStateReached && wantToClose)
        {
            if (!anim.IsInTransition(0))
                closedStateReached = anim.GetCurrentAnimatorStateInfo(0).IsName(k_ClosedStateName);

            wantToClose = !anim.GetBool(m_OpenParameterId);

            yield return new WaitForEndOfFrame();
        }

        if (wantToClose)
            anim.gameObject.SetActive(false);
    }

    //Make the provided GameObject selected
    //When using the mouse/touch we actually want to set it as the previously selected and
    //set nothing as selected for now.
    private void SetSelected(GameObject go)
    {
        //Select the GameObject.
        EventSystem.current.SetSelectedGameObject(go);

        //If we are using the keyboard right now, that's all we need to do.
        var standaloneInputModule = EventSystem.current.currentInputModule as StandaloneInputModule;
        if (standaloneInputModule != null && standaloneInputModule.inputMode == StandaloneInputModule.InputMode.Buttons)
            return;

        //Since we are using a pointer device, we don't want anything selected.
        //But if the user switches to the keyboard, we want to start the navigation from the provided game object.
        //So here we set the current Selected to null, so the provided gameObject becomes the Last Selected in the EventSystem.
        EventSystem.current.SetSelectedGameObject(null);
    }
}
스크립트를 연결해 보겠습니다. 이렇게 하려면 새 게임 오브젝트를 만들고 이름을 “ScreenManager” 등으로 바꾸고 그 위에 컴포넌트를 추가합니다. 여기에 초기 스크린을 할당할 수 있고, 씬이 시작될 때 이 스크린이 열립니다.
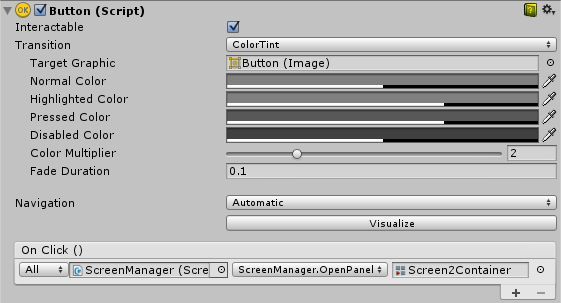
이제 마지막으로 UI 버튼이 작동하도록 해보겠습니다. 스크린 전환을 트리거할 버튼을 선택하고 인스펙터의 On Click () 리스트에 있는 새 액션을 추가합니다. 방금 생성한 ScreenManager 게임 오브젝트를 ObjectField로 드래그하고 드롭다운에서 ScreenManager->OpenPanel (Animator) 를 선택한 후 사용자가 버튼을 클릭하면 열고자 하는 패널을 마지막 ObjectField로 드래그 앤 드롭합니다.
참고
This technique has the advantage that the only requirement for it to work is that each screen should have an AnimatorController with an Open parameter and a Closed state. It’s completely unconcerned with the details of how your Screen or your State Machine is constructed. And works nicely with nested Screens, you would just need one ScreenManager for each nested level.
The State Machine we setup above had the default state as Closed, so all of the Screens that use this controller would start as closed. That’s why on the ScreenManager we provide a initiallyOpen property, so you can specify what is the first screen to be shown.