Warning
Warning: Unity Simulation is deprecated as of December 2023, and is no longer available.
Running a simulation with Distributed Rendering
After configuring Distributed Rendering and tagging the GameObjects in the scene to suit our needs, we are now ready to run the simulation!
To launch a simulation with Distributed Rendering, you’ll first need to create a Player Build. Then you’ll need to launch multiple instances of this build, where each instance is launched as either the Server (maximum of one instance) or as a Client.
Launching the instances
Build the application
File->Build Settings-> SelectTarget Platform->Build
Open the Terminal or Command Line at the location of the application
Start the application with no arguments to run as the Server.
Add the options
-batchmode -nographicson Linux and Windows to run the Server without any graphical or window system overhead$ <build-name.x86_64> -logFile <log-path>
Start the application with the
-renderargument to run as the ClientAdd the option
-ip <address>with the IP address of the Server for<address>to establish an explicit connection$ <build-name>.x86_64 -render -group-id 1 -logFile <log-path> & ... & <build-name>.x86_64 -render -group-id N -logFile <log-path>If using VMs, include the
--ip <server's internal IP address>parameter.
💡 Note: In case
Camera Affinity ModeorScene Serialization Modeis turned on, start as many Clients as the number of camera nodes in the scene. However, in caseLock Step Sync Modeis activated, start as many Clients as one less than the number of camera nodes in the scene (because the Server renders one of the camera nodes).
The Client Launcher
As the number of Clients and configurations increase, keeping track of Clients launched can get tricky. To solve this, the Distributed Rendering package comes with a Client Launcher module that makes the process of running a Server and Clients a lot smoother. Using this component, Clients can be directly launched from the Editor or from a build stored on the system without specifying any arguments using Terminal or Command Line.
💡 Note: The
ClientLaunchercomponent is not currently supported in IL2CPP builds.
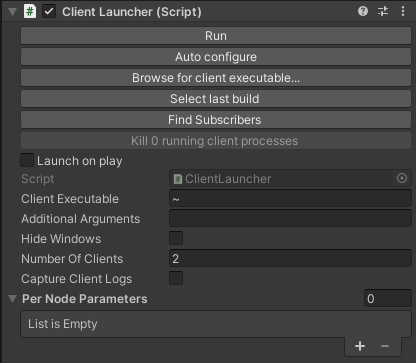
This component can be added to any GameObject in the scene. It contains the following options:
Run: Launch the Server and Client(s). Not accessible if
Launch On Playis selected.Auto Configure: This fills in the launcher module with information that most suits the project based on the current settings. This includes filling in the
Client Executablelocation and theNumber Of Clientsbased on the number of cameras tagged in the scene and the Server mode. Make sure to hit this button after any major changes in the scene that may affect Distributed Rendering.Browse for client executable...: This lets the user browse their system for an executable file for this project, which is then set in the
Client Executablefield.Select last build: This automatically sets the
Client Executablefield with the location of the last built executable.Find Subscribers: Displays the number and names of cameras tagged with a
Camera Modecomponent.Kill _ running client processes: Kills any running Client processes.
Launch On Play: Toggle to launch Client(s) when Play mode is activated. The -launch-clients command line option can be used to override this externally.
Client Executable: Location of an executable of the current project.
Additional Arguments: Any additional arguments the user may want to specify.
Hide Windows: Runs the Clients with the
-batchModeswitch, so that they don't display a window.Number Of Clients: Number of Clients to run.
Capture Client Logs: Sends the Client logs back to the Server and to be displayed in the Editor Console.
Per Node Parameters: Provides a list of unique parameters to the command line for each Client invocation.
Command line options
While executing the simulation, the following command line options are also available for instance specific configurations:
--helpLog DR help text, then exit.
--distributed-rendering,--no-distributed-renderingRun the simulation with Distributed Rendering.
--render,--no-renderIdentify the running instance as a Client. Any instance that is not the unique Server should include this flag when launched.
--pause-at-startup,--no-pause-at-startupPause the simulation at startup.
--physics,--no-physicsEnable physics system update.
--frame-batching,--no-frame-batchingEnable sending multiple frames to a Client at a time.
--frame-batch-load-balancing,--no-frame-batch-load-balancingEnable load balanching for frame batching (only when running in Asynchronous mode).
--frame-batch-size <integer>Maximum number of frames to send in a single batch (only when frame batching is enabled).
--debug-ui,--no-debug-uiEnable the debug UI display.
--server-address <address (string)>For Clients, indicates the IP Address or host name of the Server.
--ip <server's internal IP address>For Clients, creates an explicit connection between the Client and the Server. This is especially useful when using VMs.
--wait-for-clients,--no-wait-for-clientsOverride the server WaitForClients setting.
--frame-count <integer>Maximum number of frames to render before exiting (set to 0 to run endlessly). While this is useful for debugging, it should be avoided when running in an environment without shell access.
--network-port <UInt16>Overrides the "Network Port" option. Network address port where the socket connection will be established between the Server and Clients.
--discovery-ping-interval <float>Override the interval in seconds that the UDP cluster will ping for auto-discovery of other Clients on the local network. This is unused in Clients when connecting directly to a Server at a specific address using the
--ipoption.--group-id <integer>User-defined group ID to assign to the running Client instance (ignored on Server instance).
--workload-id <integer>User-defined workload ID to assign to the running Client instance (ignored on Server instance). Any value that is 0 or less is considered "not set" and not providing this option when launching a Client is the equivalent of passing --workload-id 0.
--client-name <string>User-defined name to assign to the running Client instance (ignored on Server instance).
--render-node-count <integer>User-defined number of expected render nodes to be launched while running in lock-step mode (defaults to number of tracked cameras).
--connection-timeout <integer>Client connection to server timeout, in milliseconds. Client instance quits if timer expires and no connection has been made (ignored on scene server instances). Zero indicates no timeout.
--launch-clients,--no-launch-clientsIf ClientLauncher component is active in the Scene Server, override its
Launch On Playsetting.--sync-mode <mode (string)>Sets the Server sync mode to one of four possible options:
asynchronous,camera-affinity,lock-stepandscene-serialization.