Warning
Warning: Unity Simulation is deprecated as of December 2023, and is no longer available.
Instantiate Gameobjects at Runtime
Simulations often consist of many actors or objects that are only introduced at runtime, like random obstacles, moving people etc. Doing this ensures that the simulation is dynamic and the robot is trained to encounter every possible situation.
Distributed Rendering, however, requires dynamic objects to be tagged in advance. Thus instantiating at runtime directly might cause issues with GameObject synchronization across Clients, which is where Runtime Prefab Instantiation comes in handy.
In Lock Step Sync mode, GameObjects being instantiated can be tracked using the GameObject extension method TrackPrefabInstance, and by listing the corresponding prefabs under Distributed Rendering Scene Data for seamless distribution across Clients.
Runtime Prefab Instantiation
After completing Lock Step Sync Mode setup steps like setting the mode in the Distributed Rendering Config menu and setting a camera as isServer (see this section for more details), tracking the prefabs to be instantiated involves 2 simple steps; list the prefabs under Distributed Rendering Scene Data, and track them using TrackPrefabInstance.
To list the prefabs that will be instantiated:
- In the Scene Hierarchy, right click and select:
GameObject->Create Empty- Rename the new object to
DRSystem
- Rename the new object to
- Click on the
DRSystemobject and in the inspector panel, select:Add Component- Search for
Distributed Rendering Scene Dataand select it
- Search for
- Add elements to the
Prefabslist and set them as the prefabs to be instantiated.
Make sure to add all the prefabs that will be potentially spawned via script at runtime to this list.
To track the listed prefabs, use the TrackPrefabInstance GameObject extension on the instantiated GameObject in the following manner:
    var go = Instantiate(prefab);
    go.TrackPrefabInstance(prefab);
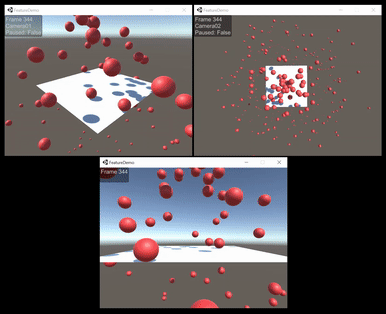
Building a scene that dynamically launches red balls, following the above steps and then launching it gives us the following output on the Clients: