Warning
Warning: Unity Simulation is deprecated as of December 2023, and is no longer available.
Write a new Operation
This package provides a series of standard Operations that can be used in any Initializer, like ResetTransform or Prune. However, you might find yourself needing to do something specific to your project that can't be covered by what already exists. In this case, you will want to write your own Operation.
What exactly is an Operation?
Operations are simply actions that apply to one or many objects in your simulation environment. These can be as simple as changing the position of objects, or as complicated as, for example, spawning objects and placing them using your preferred sampling method.
All Operations in the package inherit from the Operations class. All this contains is the definition for the abstract Apply method, whose goal is to define what happens to the object(s) selected. Below is the entire definition for the abstract Operation class:
public abstract class Operation
{
  public abstract HashSet<GameObject> Apply(PlanContext context);
}
SimpleOperation vs. Operation
This guide covers how to inherit from the Operation class, but note that there also exists a
SimpleOperationclass, which also inherits from Operation.SimpleOperations implement aSimpleApplymethod, which, instead of running on the entire set of selected assets, only applies to one asset at a time. This can be useful for more granular actions that don't need to know the bigger picture of what else exists within the asset selection.
Start by creating a new script for your custom Operation.
- In your Project's Scripts directory, create a new C# Script (Right click > Create > C# Script)
Implement it!
Next, open the recipe below and follow the steps to implement your custom Operation! We'll use the example of writing an Operation that sets all of the selected assets to a new local scale.
1. Import Permutations namespaces
Add a using directive for the Unity.Simulation.Permutations.Initialization.Plan and Step namespaces in order to access the APIs.
using Unity.Simulation.Permutations.Initialization.Plan;
using Unity.Simulation.Permutations.Initialization.Step;
2. Mark class Serializable
Indicate that your new Operation class can be serialized so that it can be selected from the Initializer Inspector later.
using Unity.Simulation.Permutations.Initialization.Plan;
using Unity.Simulation.Permutations.Initialization.Step;

[Serializable]
public class ...
3. Inherit from Operation
Name your new class, and have it inherit from the Operation class. The Operation base class will do all of the heavy lifting of when and where it will be called—you don't have to worry about that!
Remove any MonoBehaviour functions that may have been auto-generated in your script, such as Start and Update.
[Serializable]
public class ScaleObjects : Operation
{
    ...
}
4. Define customizable parameters
At the top of your class, you can define any modifiable parameters you need. In this example, we're setting the scale of selected objects, so let's make the Scale a customizable value.
Add the [SerializeField] attribute to your field so that your Initializer can display these fields for editing in your Inspector.
[SerializeField]
Vector3 m_Scale = Vector3.one;
5. Add Apply override definition
Override the Apply method. Note that the method definition takes in a PlanContext—this points to the necessary classes that tell your Initializer which assets to select, and where.
public override HashSet<GameObject> Apply(PlanContext context)
{
   ...
}
6. Implement Apply override
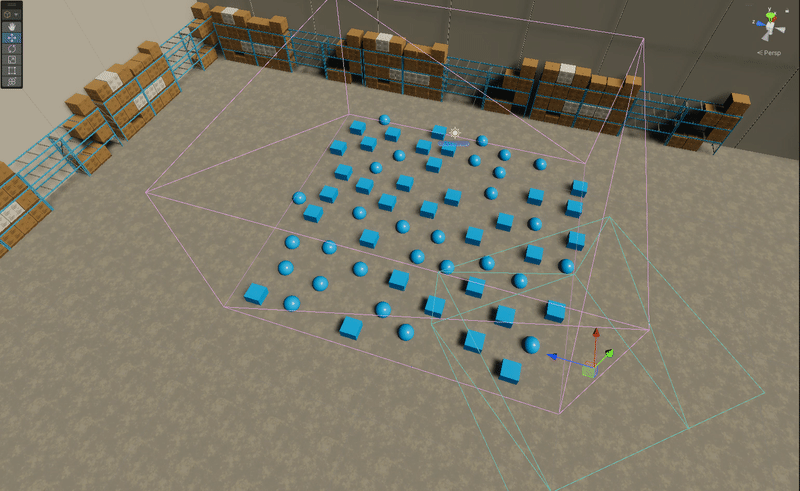
This is where it all happens! If you need to, you can use the context to access values like the Region bounds, or how many assets have been selected. In this case, we're grabbing the context.AllSelectedAssets in order to iterate through them all and change their local scale to our customizable m_Scale value.
We're also tracking all of the colored objects to return a HashSet of them to the PlanStep, where they'll be marked as modified.
public override HashSet<GameObject> Apply(PlanContext context)
{
    var modifiedObjects = new HashSet<GameObject>();
    foreach (var go in context.AllSelectedAssets)
    {
        modifiedObjects.Add(go);
        go.transform.localScale = m_Scale;
    }
    Debug.Log($"Scaled {modifiedObjects.Count} assets to {m_Scale}");
    return modifiedObjects;
}
In summary, here's a full example of what your script might look like!
using System;
using System.Collections.Generic;
using Unity.Simulation.Permutations.Initialization.Plan;
using Unity.Simulation.Permutations.Initialization.Step;
using UnityEngine;

[Serializable]
public class ScaleObjects : Operation
{
    [SerializeField]
    Vector3 m_Scale = Vector3.one;

    public override HashSet<GameObject> Apply(PlanContext context)
    {
        var modifiedObjects = new HashSet<GameObject>();
        foreach (var go in context.AllSelectedAssets)
        {
            modifiedObjects.Add(go);
            go.transform.localScale = m_Scale;
        }
        Debug.Log($"Scaled {modifiedObjects.Count} assets to {m_Scale}");
        return modifiedObjects;
    }
}
Add it to your Initializer
Once you've completed and saved your custom Operation, it's time to add it to your Initializer!
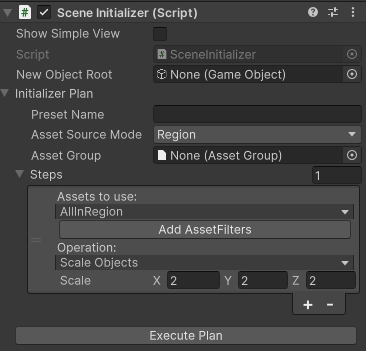
- On your Scene Initializer component, uncheck Show Simple View
- If it's not already expanded, expand the Initializer Plan and its Steps
- Find the desired Step you want to use this Operation in, or add a new Step
- On the chosen Step, expand the Operation dropdown. Your custom Operation should already show up! Select it to use it on this Step
- Execute your Initializer as usual and watch your new Operation in action!
Check out Create a New Initializer for more information on custom configurations.