Warning
Warning: Unity Simulation is deprecated as of December 2023, and is no longer available.
Navigating Unity
This page contains general guides to using Unity, including an outline of the editor interface, navigating and manipulating the scene, and creating standalone builds.
Unity interface
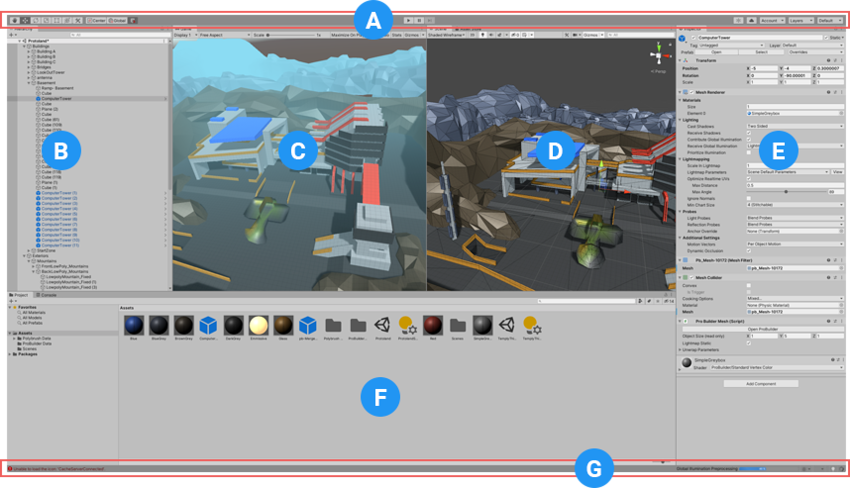
- (A) The Toolbar provides access to your Unity Account, Unity Cloud Services, and Unity Collaborate, the play, pause and step controls, and Unity Search, a layer visibility menu, and the Editor layout menu (which provides some alternate layouts for the Editor windows, and allows you to save your own custom layouts).
- (B) The Hierarchy window is a hierarchical text representation of every GameObject in the Scene. Each item in the Scene has an entry in the hierarchy, so the two windows are inherently linked. The hierarchy reveals the structure of how GameObjects attach to each other.
- (C) The Game view simulates what your final rendered game will look like through your Scene Cameras. When you click the Play button, the simulation begins.
- (D) The Scene view allows you to visually navigate and edit your Scene. The Scene view can show a 3D or 2D perspective, depending on the type of Project you are working on.
- (E) Overlays contain the basic tools for manipulating the Scene view and the GameObjects within it. You can also add custom Overlays to improve your workflow.
- (F) The Inspector window allows you to view and edit all the properties of the currently selected GameObject. Because different types of GameObjects have different sets of properties, the layout and contents of the Inspector window change each time you select a different GameObject.
- (G) The Project window displays your library of Assets that are available to use in your Project. When you import Assets into your Project, they appear here.
- (H) The status bar provides notifications about various Unity processes, and quick access to related tools and settings.
Scene view navigation
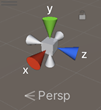
The Scene Gizmo appears in the Scene view. This displays the Scene view Camera’s current orientation, and allows you to modify the viewing angle and projection mode.
The Scene Gizmo has a conical arm on each side of the cube. The arms at the forefront are labelled X, Y, and Z. Click on any of the conical axis arms to snap the Scene view Camera to the axis it represents (for example: top view, left view and front view). You can also right-click the cube to bring up a menu with a list of viewing angles. To return to the default viewing angle, right-click the Scene Gizmo and click Free.
You can also toggle Perspective on and off. This changes the projection mode of the Scene view between Perspective and Orthographic (sometimes called “isometric”). To do this, click the cube in the center of the Scene Gizmo, or the text below it. The Orthographic view has no perspective, and is useful in combination with clicking one of the conical axis arms to get a front, top or side elevation.
Move, orbit and zoom in the Scene view
You can use the Arrow Keys to move around the Scene as though “walking” through it. The up and down arrows move the Camera forward and backward in the direction it’s facing. The left and right arrows pan the view sideways. Hold down the Shift key with an arrow to move faster.
The View tool
When the View tool is selected (shortcut: Q), the following mouse controls are available:
| Control: | Description: |
|---|---|
| Move |  Click and drag to move the Camera around. |
| Orbit |  Hold Alt (Windows) or Option (macOS), and left-click and drag to orbit the Camera around the current pivot point.\n\nThis option isn’t available in 2D mode, because the view is orthographic. |
| Zoom |  Hold Alt (Windows) or Option (macOS), and right-click and drag to zoom the Scene view.\n\nOn macOS, you can also hold Control, and left-click and drag instead. |
Hold down Shift to increase the rate of movement and zooming.
Flythrough mode
Use the Flythrough mode to navigate the Scene view by flying around in first-person, similar to how you would navigate in many games:
- Click and hold the right mouse button.
- Move the view around using the mouse, the WASD keys to move left/right/forward/backward, and the Q and E keys to move up and down.
- Hold down Shift to move faster.
Flythrough mode is designed for Perspective Mode. In Orthographic Mode, holding down the right mouse button and moving the mouse orbits the Camera instead.
Note that Flythrough mode isn’t available in 2D mode. Instead, holding the right mouse button down while moving the mouse pans around the Scene view.
Center the view on a GameObject
To center the Scene view on a GameObject, select the GameObject in the Hierarchy, then move the mouse over the Scene view and press F. If the GameObject is already selected, F zooms in to the pivot point. This feature can also be found in the menu bar under Edit > Frame Selected.
To lock the view to the GameObject even when the GameObject is moving, press Shift+F. This feature can also be found in the menu bar under Edit > Lock View to Selected.
Moving the camera
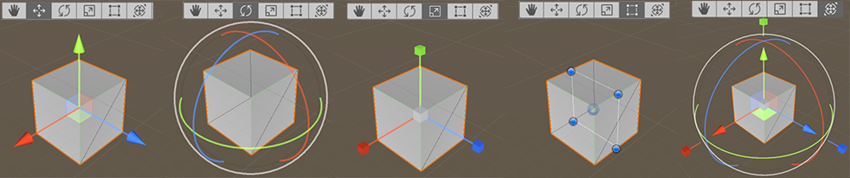
To alter the Transform component of the GameObject, use the mouse to manipulate any Gizmo axis, or type values directly into the number fields of the Transform component in the Inspector.
Alternatively, you can select each of the four Transform modes with a hotkey: W for Move, E for Rotate, R for Scale, T for RectTransform, and Y for Transform or use the Tools Overlay in the Scene view.
Unity builds
Unity can build your application for different platforms and with different settings.
To select your platform and settings, and start the build process, use the Build Settings window. To access the Build Settings window: from Unity’s main menu, go to File > Build Settings.
Managing scenes in a build
When you build your application, Unity builds all selected scenes in the Scenes In Build pane. Unity builds scenes in the order in which they appear in the list.
You can add, exclude, remove, and reorder scenes in the list:
- To add all currently open scenes to the list: Select Add Open Scenes. You can also drag scenes from your Project window into the list.
- To exclude a scene in the list from the build: Clear the checkbox next to that scene. This removes the scene from the build, but not from the list.
- To remove a scene from the list: Select the scene and press Delete.
- To adjust the scene order: Drag and drop scenes in the list to reorder them.
Platform list
Each build must have a target platform. The Platform pane lists all the platforms you can build for.
Each version of Unity installed on your computer has its own platform list.
If the platform you need is not on the list, do one of the following:
In the Build Settings window:
- Select the platform you want to add.
- Select Install or Download.
In Unity Hub > Installs:
- Select the three dots on the version of Unity you’re using.
- Select Add Modules.
- Follow the instructions to install the platform module.
To change the build’s target platform:
- Select the platform you want to switch to. Tip: The list displays the Unity icon next to the platform currently selected as the target platform.
- Select Switch Platforms. If Unity needs to re-import your assets in formats that match your target platform, the switch process can take a long time.