Set up your scene
To set up your scene to use Unity OpenXR: Meta, first follow the standard AR Foundation Scene setup instructions. The following sections detail additional setup steps specific to projects that target Meta's OpenXR runtime.
Configure input actions
Ensure that the Tracked Pose Driver component on your camera has "centerEyePosition [XR HMD]" included in the position and rotation input actions.
Configure camera background for Passthrough
The Passthrough camera captures real-time images of the external environment to provide the user with a view of their surroundings while wearing a headset.
Meta Passthrough requires that your camera has a transparent background.
Note
The Passthrough video is layered behind the image rendered by the scene camera. If you configure the camera's background color (or clear flags) to use a skybox or an opaque solid color, then the Passthrough video is covered up by the camera background.
After you have completed the AR Foundation scene setup steps, follow these instructions to configure your scene to render with a transparent camera background:
- Locate the GameObject named XR Origin in your GameObject hierarchy. (Refer to Scene setup in the AR Foundation manual for instructions on how to set up the scene if it doesn't already contain an XR Origin.)
- Expand the hierarchy to reveal the Camera Offset and Main Camera GameObjects.
- Inspect the Main Camera GameObject.
- Select from the following options. The options differ based on the render pipeline you're using:
- URP: In the Environment section, set the Background Type to Solid Color.
- Built-In Render Pipeline: Set Clear Flags to Solid Color.
- Select the Background color to open the color picker.
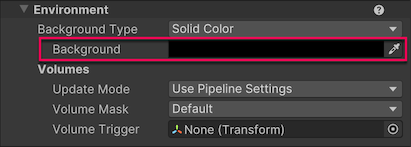
Camera background color picker in the Inspector window.
- Set the color's A (alpha) value to
0.
Your scene is now configured to support Meta Passthrough.
Permissions
Meta's OpenXR runtime requires your app to obtain an Android system permission before you can use any Space Setup data. Your user must grant your app the com.oculus.permission.USE_SCENE permission before you can access any data associated with planes, bounding boxes, meshes, or occlusion.
If your scene uses AR Foundation's ARPlaneManager, ARBoundingBoxManager, ARMeshManager, or AROcclusionManager components, you should disable them, because they can't do any work without the required system permission. After your app receives permission, you can safely enable these manager components.
Scene permission example
The following example code shows you one way to implement permission management with a MonoBehaviour:
#if UNITY_ANDROID
using UnityEngine.Android;
#endif // UNITY_ANDROID
using UnityEngine.Events;

namespace UnityEngine.XR.OpenXR.Features.Meta.Tests
{
    public class PermissionsCheck : MonoBehaviour
    {
        const string k_DefaultPermissionId = "com.oculus.permission.USE_SCENE";

#pragma warning disable CS0414
        [SerializeField]
        [Tooltip("The Android system permission to request")]
        string m_PermissionId = k_DefaultPermissionId;

        [SerializeField]
        [Tooltip("Invoked when permission is denied")]
        UnityEvent<string> m_PermissionDenied;

        [SerializeField]
        [Tooltip("Invoked when permission is granted")]
        UnityEvent<string> m_PermissionGranted;
#pragma warning restore CS0414

#if UNITY_ANDROID
        void Start()
        {
            if (Permission.HasUserAuthorizedPermission(m_PermissionId))
            {
                OnPermissionGranted(m_PermissionId);
            }
            else
            {
                var callbacks = new PermissionCallbacks();
                callbacks.PermissionDenied += OnPermissionDenied;
                callbacks.PermissionGranted += OnPermissionGranted;

                Debug.Log($"Requesting permission for: {m_PermissionId}");
                Permission.RequestUserPermission(m_PermissionId, callbacks);
            }
        }

        void OnPermissionDenied(string permission)
        {
            Debug.LogWarning($"User denied permission for: {m_PermissionId}");
            m_PermissionDenied.Invoke(permission);
        }

        void OnPermissionGranted(string permission)
        {
            Debug.Log($"User granted permission for: {m_PermissionId}");
            m_PermissionGranted.Invoke(permission);
        }
#endif // UNITY_ANDROID
    }
}
Note
The AR Foundation Samples GitHub repository includes a working demo of the PermissionsCheck component.
To use this example code, add the Permissions Check component to a GameObject in your AR scene. Then in the Inspector, subscribe to either the Permission Denied or Permission Granted events by clicking the Add (+) button.
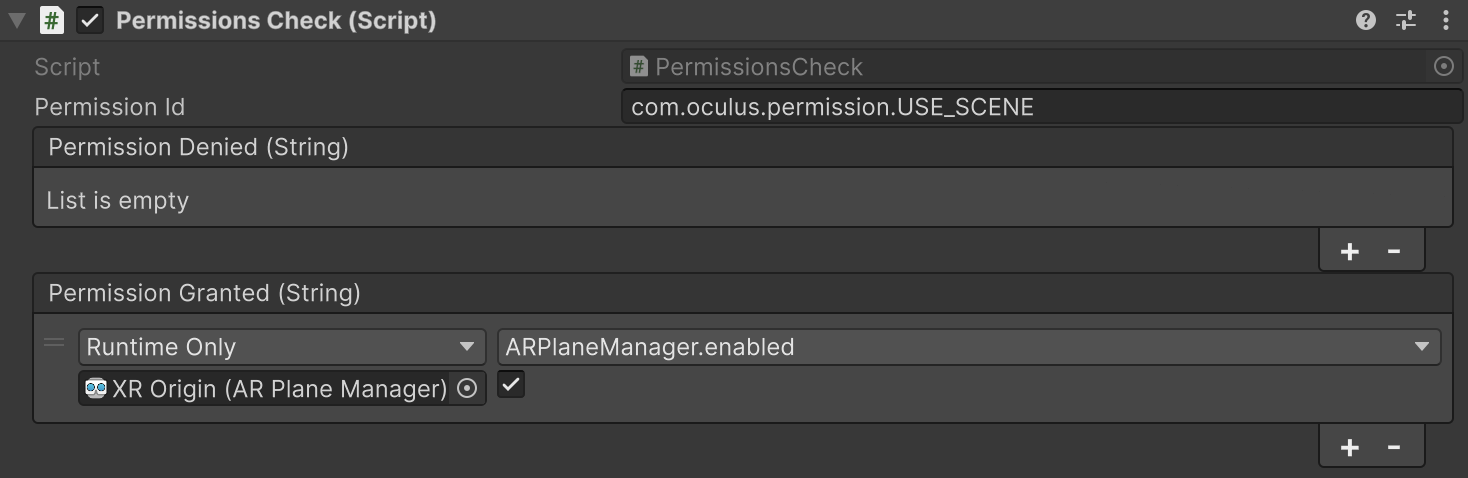
Permissions Check component set up to enable the AR Plane Manager component when permission is granted.