Scenes
You can use DOTS Mode Scenes (referred to as just "Scenes" when in DOTS Mode) to group related sets of Entities that you want to use together in your game or app. Scenes can contain any number of entities, and you can arrange them in a hierarchical structure within the Scene.
Arranging your Entities in a hierarchical structure gives you a way to logically group Entities within a Scene, and also provides the same transform parenting features as in classic Unity.
You can have multiple Scenes in the Hierarchy at any given time, and Scenes can be loaded or unloaded at runtime. Each Scene is stored as an Asset in your Project, and has the .utdata filename extension.
Creating Scenes
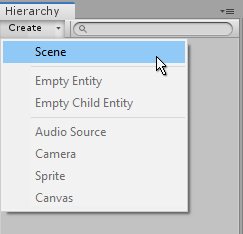
Creating a new Scene from the Hierarchy window's Create button.
There are a number of other ways to create Scenes in DOTS Mode:
Click on the Create **button at the top of the Hierarchy window and select **Create Scene.
Use the Project window Create Button, and select Scene.
Right click within the Project window and select **Create > Scene **from the context menu.
Select Assets > Create > Scene from the main menu at the top of the Unity editor.
Opening / Loading Scenes
You can open a Scene to edit in the editor by double-clicking the Scene asset in the Project window. Scenes are always opened additively in DOTS Mode. This means opening a new scene does not close the current scene you are working on.
The Scene options menu
The Scene options menu is available on Scenes which you have loaded, and are therefore visible in the Hierarchy window.
To open the Scene options menu, click the Scene options button. It appears as three vertical dots, at the right-hand end of the bar containing the Scene name, in the Hierarchy window.
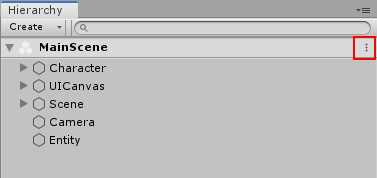
The Scene options dropdown button in the Hierarchy.
The Scene options menu allows you to perform three actions:
Unload the Scene (which will remove it from the Hierarchy)
Add/Remove the Scene from the currently open Project
Add/Remove the Scene from the Project's Startup Scenes.
Startup Scenes
At least one Scene must be specified as a Startup Scene. These are the Scenes which will be loaded automatically when your game or app starts. You must use code to load other Scenes as required at runtime. Use the SceneService API to do this.
You can check and modify which Scenes are currently specified as Startup Scenes in the DOTS Project Settings.
The Active Scene
One Scene can be the "active" Scene at any given time. The purpose of specifying an active Scene is to determine where new Entities should be created.
Some methods of creating new Entities in the editor implicitly allow you to specify the Scene they belong to while you are creating them - such as when you right-click a Scene, or drag an Asset from the Project window onto an Scene.
Other methods - such as using the Assets > Create menu - allow you to create an Entity without specifying a group. When you create an Entity in the editor without explicitly specifying which Scene it should belong to, it is added to whichever is the currently active group.
You can change which is the currently active group by right-clicking on an Scene in the Hierarchy window, and selecting Set active Scene.
Note: Opening a DOTS Mode scene does not automatically open the associated DOTS Mode project. This can cause problems or confusion, because it is possible for a classic Unity project to contain multiple DOTS Mode projects. One such problem, for example, would be if you have one DOTS Mode project open (Project A), and you then open an Entity Scene associated with a different DOTS Mode project (Project B). If the Scene you opened has dependencies on modules that are included in the correct Project (Project B) but not included in the Project A's Assembly Definition, it will not work.