Mixed Reality Template Quick Start Guide
Unity’s Mixed Reality (MR) Template provides a starting point for mixed reality development in Unity. The template configures project settings, pre-installs the right packages, and includes various pre-configured Example Assets to demonstrate how to set up a project that is ready for MR. Please refer to the XR Project Setup documentation for additional information.
Unity directly supports the following Mixed Reality platforms:
The MR Template uses the following Unity XR features:
- OpenXR - A scalable package that enables cross-platform support for multiple hardware environments.
- AR Foundation - Unity’s framework for multiplatform AR development.
- XR Interaction Toolkit - A high-level, component-based, interaction system for creating XR experiences. It provides a framework that makes 3D and UI interactions available from Unity input events.
Known Limitations for Meta Quest Devices:
For plane detection to properly work on a Meta Quest device, the new Space Setup feature found in Settings > Physical Space > Space Setup needs to already be completed on the Quest headset before entering the build. It is advised to add at least one piece of furniture with a horizontal surface, such as a table.
If using the Meta-OpenXR package, it currently only supports certain types of horizontal plane classifications with an up-facing normal vector:
Couch,TableandFloor.Currently there is no Link support for Meta Quest devices. Plane detection and passthrough only work after making an Android build. By pressing play in the Unity editor, passthrough and plane detection will not appear unless using the XR Simulation feature of AR Foundation.
There is a known issue when using the
2.1.0version of theUnity OpenXR Metapackage that can result in errors being thrown each frame when using theAR Plane Managercomponent.
Known Limitations for Android XR Devices:
Persistence operations (save, load, erase) may immediately fail because the underlying persistence data is not ready and will result in users having to manually retry a persistence operation a second time.
The
Delete All Assetsbutton may fail depending on the version of AndroidXR being used.The
AR Plane Managercomponent'sDetection Modemay not correctly adhere to the set value, resulting in bothHorizontalandVerticalplanes from displaying regardless of the value set.The UI indicates Bounding Boxes are enabled, but that feature is not currently supported on Android XR devices.
Platform support
AR Foundation provider plug-ins rely on platform implementations of AR features. Not all features are available on all platforms.
The following table lists the available features in each Unity-supported provider plug-in:
| Feature | HoloLens | Meta Quest | Android XR | XR Simulation |
|---|---|---|---|---|
| Session | Yes | Yes | Yes | Yes |
| Device tracking | Yes | Yes | Yes | Yes |
| Camera | Yes | Yes | Yes | |
| Plane detection | Yes | Yes | Yes | Yes |
| Bounding Box detection | Yes | Yes | ||
| Face tracking | Yes | |||
| Ray casts | Yes | Yes | Yes | Yes |
| Anchors | Yes | Yes | Yes | Yes |
| Meshing | Yes | Yes | Yes | |
| Occlusion | Yes | Yes | Yes |
Using the Sample Scene
The MR Template contains a Scene named SampleScene located in Assets/Scenes. This scene’s Hierarchy is pre-configured with GameObjects that allow your application to manage controller and hand tracking, interaction with spatial UI and virtual objects, and context-aware features such as plane detection and passthrough.
You can use this Scene as a reference, or you can remove the example Assets from it and use it as a starting point for your own Project.
Sample Scene Hierarchy Overview
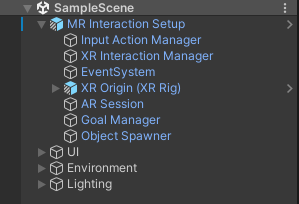
MR Interaction Setup
The MR Interaction Setup in Unity is the main GameObject for configuring the extended reality (XR) camera and the origin point of the XR experience in Unity. The MR Interaction Setup includes additional configuration beyond the basic XR Origin Setup, such as:
- Different input systems such as Controllers and Hands,
- Various interactors (poke, direct, ray) driven by that input.
Context-Aware Features
The MR Template includes various essential features for mixed reality development, including demonstrating basic plane detection and passthrough.
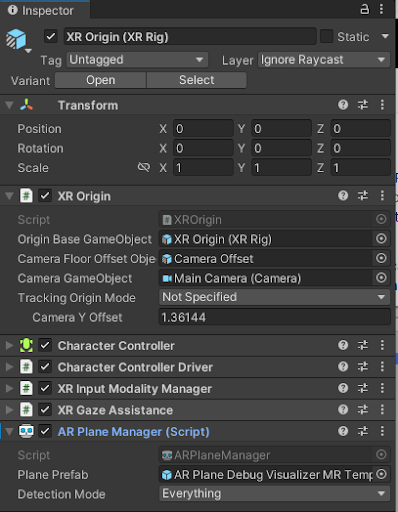
For plane detection, the AR Session controls the lifecycle and configuration options for an AR session and is located in the MR Interaction Setup GameObject. There is only one active session. If you have multiple ARSession components, they all communicate to the same session and will conflict with each other. The AR Plane Manager creates GameObjects for each detected plane in the environment. The component is located on the same GameObject as the XR Origin component.
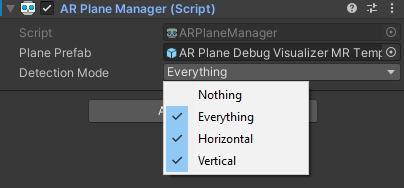
A plane is a flat surface represented by a pose, dimensions, and boundary points. Examples of features in the environment that can be detected as planes are horizontal tables, floors, ceilings, countertops, and vertical walls. You can specify a Detection Mode, which can be set to Horizontal, Vertical, Everything (any alignment can be detected) or Nothing (no planes can be detected). Some platforms require extra work to perform vertical plane detection, so if you only need horizontal planes, you should disable vertical plane detection. In addition, the AR Plane Manager allows you to specify a prefab for plane visualization. For more information, please refer to the AR Plane Manager documentation.
To enable passthrough, the AR Camera Manager is included as a component on the Main Camera GameObject. Also, note that the camera background is set to black, with 0 alpha.
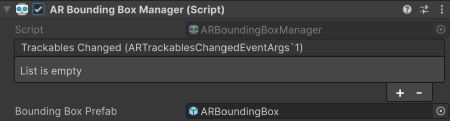
Bounding box support is available through the ARBoundingBoxManager component on the XR Origin. The bounding box tab on the hand menu allows you to enable and disable bounding boxes as well as toggle bounding box visuals and debug information.
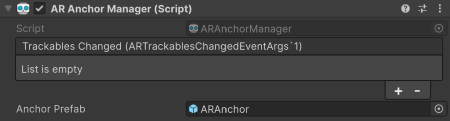
Persistent anchor support is available through the ARAnchorManager component on the XR Origin. This enables you to save spawned objects and load them in the current or subsequent AR Sessions.
The persistent anchors tab on the hand menu allows you to save the current objects in your scene that have been spawned with an anchor. From this same tab, you can load saved objects and delete the saved persistent anchor data.
Note
The Delete All button on the persistent anchors tab deletes the saved persistent anchor data, not the objects spawned in the scene. Deleting the spawned object can be done in the first tab with the Assets : Delete All button.
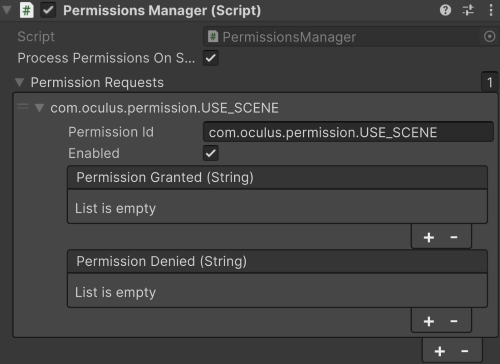
Many of the features and capabilities for Mixed Reality headsets must be given permissions by the user: for example, eye tracking, hand tracking, and scene understanding features such as AR plane detection. The PermissionsManager component allows you to define permissions requests for various headsets as needed. For each permission requested, Unity events can be triggered when the permission is granted or denied. These can be used to trigger functions or enable and disable components based on the result of the permission request.This can be easily modified to suit your specific needs.
Object Spawner
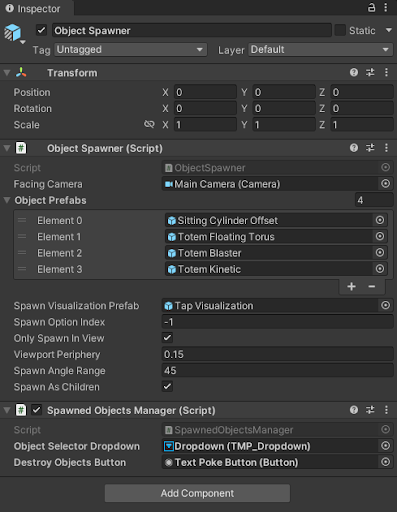
The Object Spawner is located in the MR Interaction Setup GameObject and enables you to spawn assets in your space triggered by a collision event from the Contact Spawn Trigger GameObject that is attached to the palm of the hand. The Object Spawner allows you to customize the objects you would like to spawn using the Object Prefabs list.
Interactables
There are various objects in the Object Spawner that the user is able to interact with. In XRI, these are called interactables. The grab interactable allows a user to pick up a GameObject using either a direct or ray interactor. Grab interactables need a Rigidbody and a Collider to define the interactable area.
There are (4) different types of interactable examples used with the Object Spawner in the SampleScene. The Sitting Cylinder Offset GameObject demonstrates a basic grab interactable that uses physics to interact and collide with the physical environment. The other three, Totem Floating Torus, Totem Blaster, and Totem Kinetic, use the AR Transformer and enable the virtual objects to interact with planes found in the real world.
By grabbing the base of the totems, the user can move the object along a plane found in the physical environment. By grabbing the virtual objects above, the user can explore other types of interactions; floating grab interactables with the Totem Floating Torus, passive hand physics interactions with Totem Kinetic, and a custom particle blaster interactable with Totem Blaster.
Affordance System
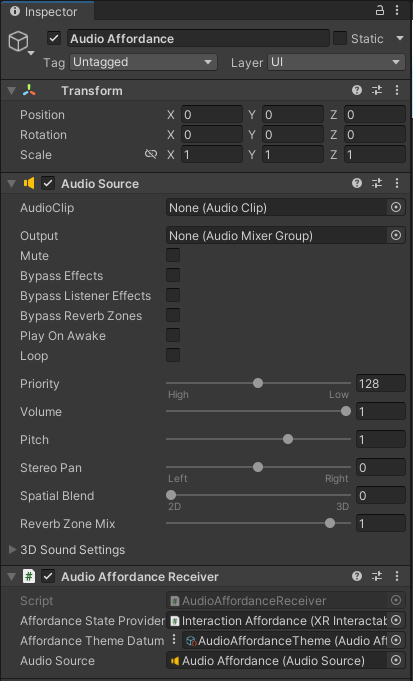
In addition, the Affordance system provides feedback for the user with visual and auditory cues. This requires the use of the XR Interactable Affordance State Provider with a specified interactable source. For the interactables included in the Sample scene, there is an Audio Affordance Receiver and a Color Affordance Receiver already set up.
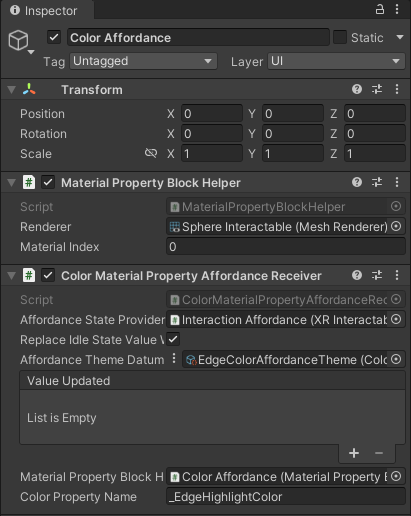
Color Affordance Receiver Example
The color affordance receiver applies colors from the affordance theme datum to material property block color property. This allows you to define different color to apply for different interaction states.
Audio Affordance Receiver Example
The audio affordance receiver plays audio clips stored in the audio affordance theme datum. It requires an audio source. This allows you to define different audio clips to be played for different interaction states.
These Affordance Receivers are driven by Affordance System Themes found in Assets > MRTemplateAssets > Themes.
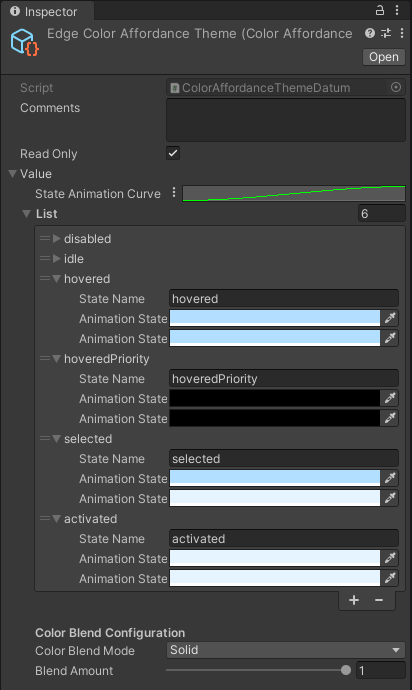
Edge Color Affordance Theme Example
This theme is used to define colors to apply to materials based on the interaction state. The animation curve is used to lerp the color between animation states.
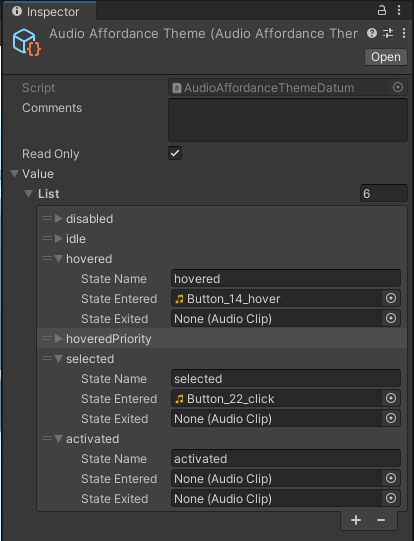
Audio Affordance Theme Example
This theme is used to define the audio clips to play based on interaction state. You can configure different clips for state entered or state exited.
Spatial UI
The Sample Scene contains various spatial UI examples which allows both near and far interactions with UI elements. There are (3) main examples of spatial UI in the SampleScene. This includes a coaching UI and video player for onboarding users into a new MR application, as well as a menu that is constrained to the user’s hand containing various controls and settings for the SampleScene.
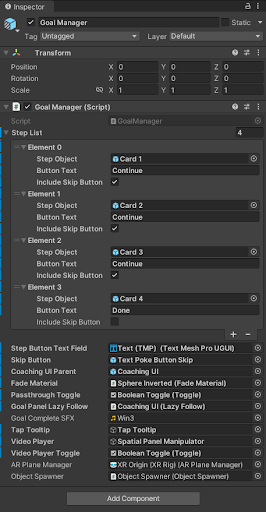
The Coaching UI GameObject is controlled by the Goal Manager located in the MR Interaction Setup. The Goal Manager controls the progression of content within the UI, turning on/off related GameObjects, as well as altering the Lazy Follow behavior depending on the instructions in the step.
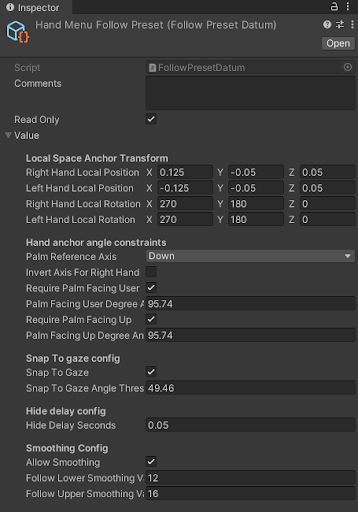
The Hand Menu Setup Gameobject includes a basic scroll menu that launches when the user’s palm is facing upwards and towards the user. The menu is populated with examples of various list view items including a toggle, button, and dropdown UI element.The interaction follow behavior of the hand menu can be configured in the Hand Menu Follow Preset and Controller Follow Preset.
The Spatial Panel Manipulator displays a video player to communicate basic input mapping for the SampleScene. Users have the ability to move the canvas in space by grabbing the canvas by either the header or handle at the bottom of the canvas. Bill-boarding with the Lazy Follow component is on the prefab by default, with the positional transformation of the canvas being determined by the direct/ray interactor.
Project Configuration
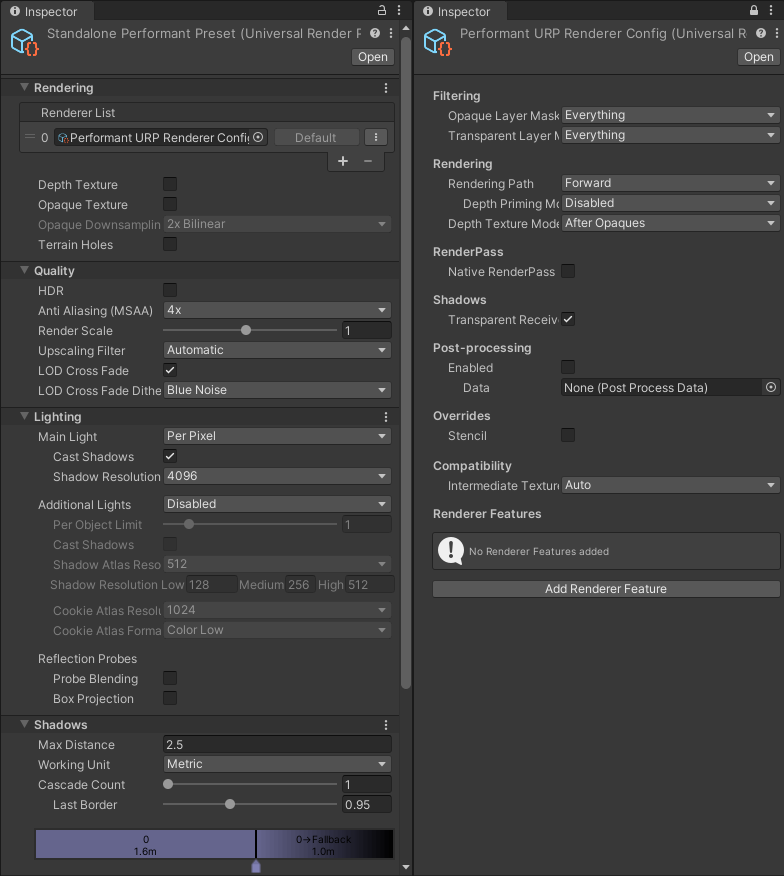
Various presets are used to accommodate graphics & rendering requirements for different platforms. By selecting the target platform in the Build Settings, i.e. Windows, Mac, Linux or Android, different URP Config Settings are automatically updated for the user. The presets can be found in Assets/Settings/Project Configuration.
For Quest-based devices, the Standalone Performant Preset and Performant URP Renderer Config assets provide a good baseline of graphics settings for older model standalone headsets such as the Quest 2. You may also want to experiment with the Standalone Balanced Preset and Balanced URP Renderer Config for higher-powered standalone headsets such as the Quest Pro and Quest 3. If you are building for Magic Leap 2, please refer to their recommended graphics settings.
Additional information can be found in the URP documentation.
In addition, by selecting the target platform in Build Settings, OpenXR feature groups and interaction profiles are preconfigured. By default, the Android build target updates the settings for Meta Quest support. Additional information can be found in the OpenXR documentation.
Graphics APIs
The last setting you may need to adjust if you are using the Android build target is the Graphics API. By default, the Mixed Reality Template uses the Vulkan graphics API for compatibility and performance reasons, including reduced build times. If you are targeting a device that does not fully support the Vulkan API, you may have to add OpenGLES3 to this list. You can do this by following these steps:
- Go to Edit > Project Settings.
- Click Player in the left-hand pane.
- Click the Android tab.
- Expand Other Settings.
- Locate the Graphics APIs list and click the + symbol.
- In the drop-down, click OpenGLES3 to add it to the list.
- Click File > Save Project to save these changes.
Android XR Support (Public Experimental Release)
If you want to change the configuration to deploy to an Android XR device, there are some additional setup options (while the package is still in a public experimental state).
Add the Android XR OpenXR package to your newly-created project
The easiest option is to click the following link to automatically bring up the Package Manager package install window: com.unity.xr.androidxr-openxr.
You may also manually install the package by opening the Package Manager. Go to Window > Package Manager.
From this window you can install the package in one of two ways:
- The first option is to
Install package by name....
In Package Manager, click the plus symbol (
+) in the upper left corner and choose Install package by name... from the dropdown.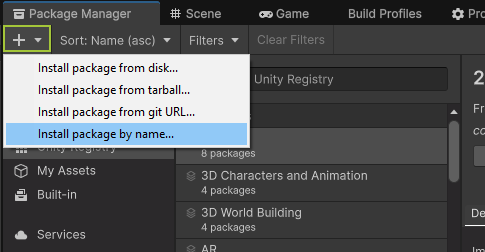
In the box that appears, enter the Android XR package name (
com.unity.xr.androidxr-openxr), leave the version field blank, and press the Install button.
- The second option is to install the Android XR package
Install package from tarball....
In Package Manager, click the plus symbol (
+) in the upper-left corner and choose Install package from tarball... from the dropdown. In the file window, navigate to where you have previously downloaded.tgzfile for the Android XR package.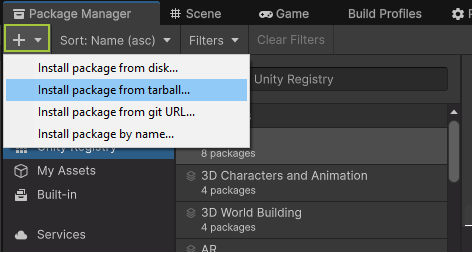
- The first option is to
Scene Modification
In the SampleScene, select the Permissions Manager GameObject in the hierarchy and enable each of the permissions requests under the Android XR platform type shown below.
Note
The addition of the Android XR permissions are scene changes and will be lost if the permissions manager is removed. The images below provide a snapshot of each permission configuration.
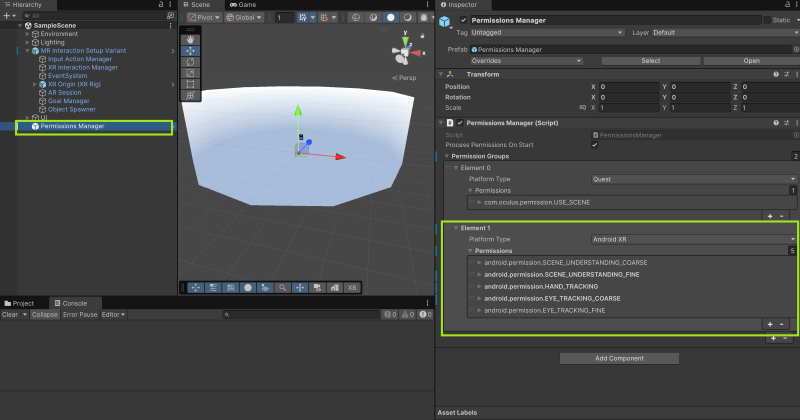
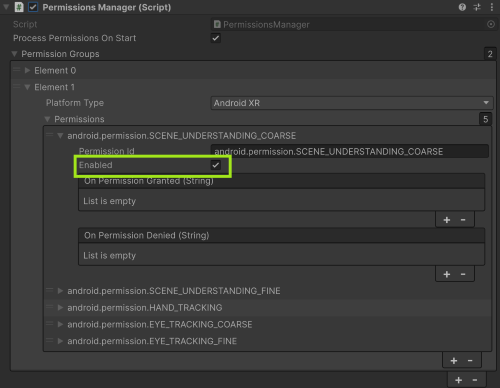
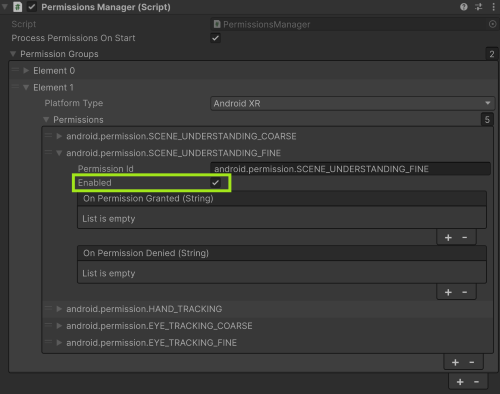
To enable the permission request, expand the drop down of each and check Enabled.
android.permission.SCENE_UNDERSTANDING_COARSE
android.permission.SCENE_UNDERSTANDING_FINE
android.permission.HAND_TRACKING
![]()
android.permission.EYE_TRACKING_COARSE
![]()
android.permission.EYE_TRACKING_FINE
![]()
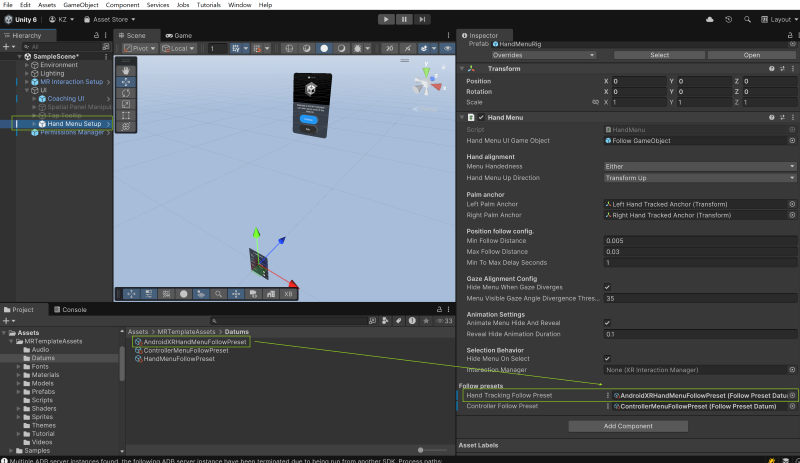
There was a known issue with the rotation of the hand menu when using hand tracking. In the hierarchy, locate the HandMenu component on the Hand Menu Setup GameObject and replace the Hand Tracking Follow Preset field with the AndroidXRHandMenuFollowPreset. This scriptable object can be found at Assets/MRTemplateAssets/Datums/. Alternatively, the ControllerMenuFollowPreset can also be used.
Project Settings
Once the package is installed, the Project Settings must be configured to support the newly added package. Navigate to Project Settings by going to Edit > Project Settings.
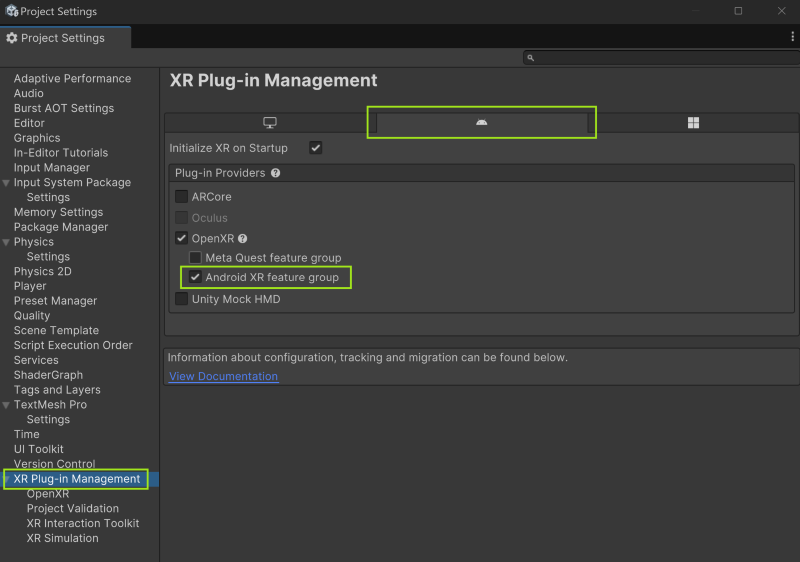
In the Project Settings window, navigate to the XR Plug-in Management settings in the left-hand pane. Under the Android build target, enable the Android XR feature group option under the OpenXR option in the Plug-in Providers list.
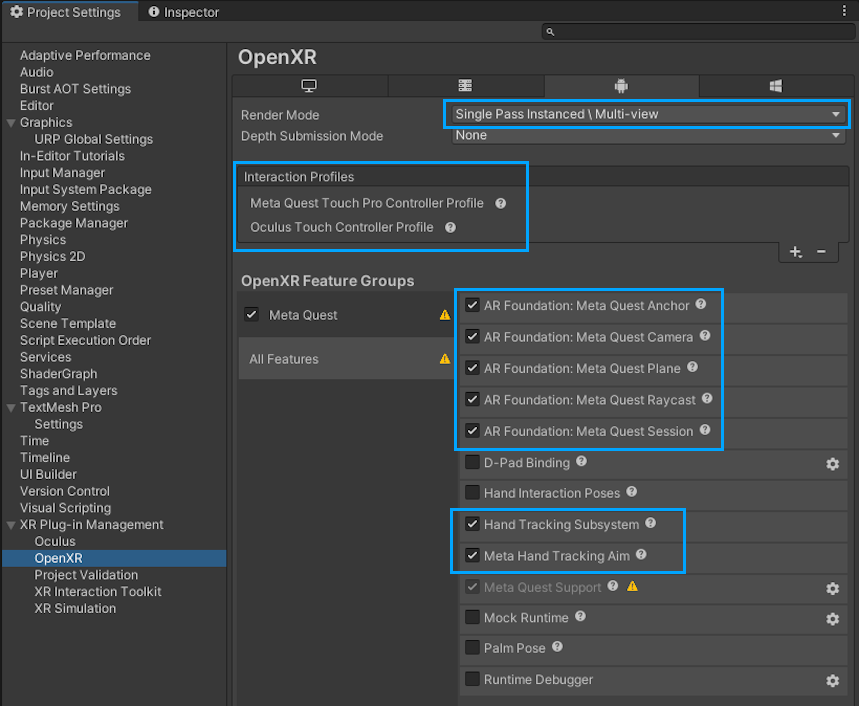
In the Project Settings window navigate to the XR Plug-in Management > OpenXR settings window. Then change the settings to match the image below.
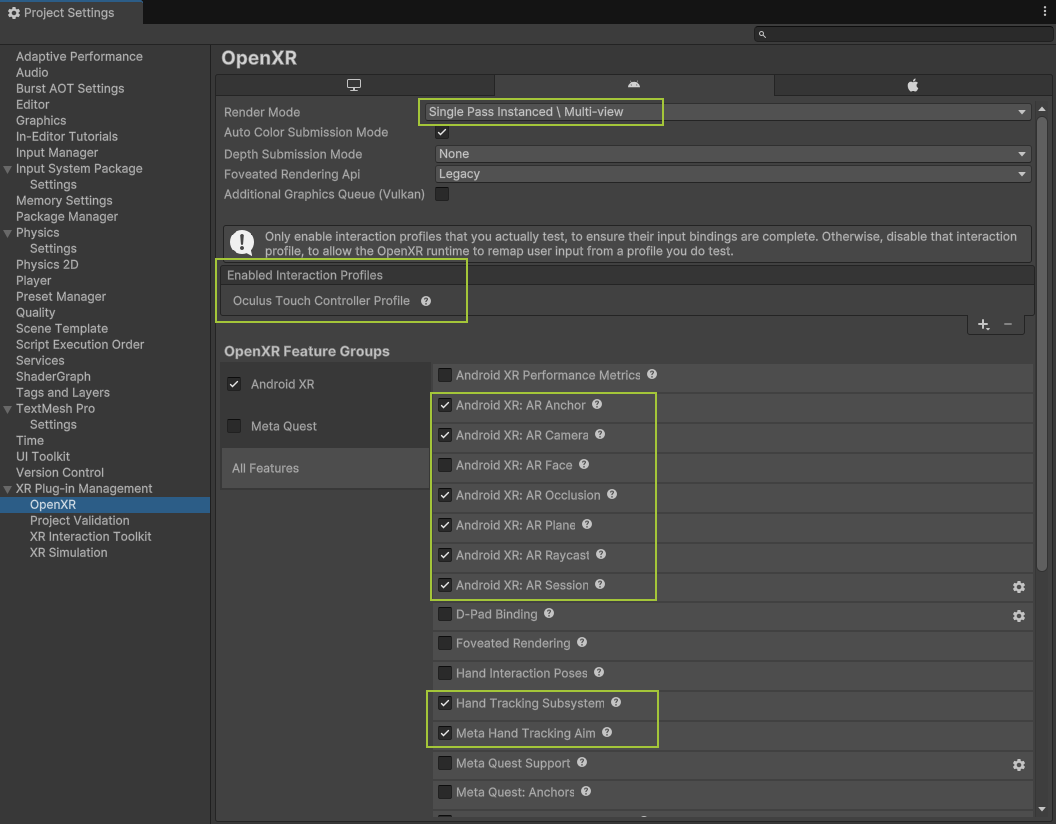
Note
If you do not see the Android XR option in the OpenXR Feature Groups, make sure to enable the Android XR feature group in the XR Plug-in Management settings window. This step is documented above.
Building to Device
Additional configuration may be required depending on the target platform selected for deployment.
Meta Quest Devices
For Meta Quest devices, the project should be configured appropriately, but you will still need to switch to the Android build target. After switching to the Android build target, click the Build and Run button in the Build window to deploy directly to your device. For updated information and additional build options, visit the Meta documentation for build and configuration.
Alternatively, we recommend using Meta Quest Link to play your games directly to device inside the Unity Editor to enable rapid development. For more information on how to get started with Meta Quest Link, please review the Meta documentation for Meta Quest Link in Unity.
Android XR Devices
Be sure to read and configure the Android XR project settings before building.
For Android XR supported devices, the project should be configured appropriately, but you will still need to switch to the Android build target. After switching to the Android build target, click the Build and Run button in the Build window to deploy directly to your device.
Note
AndroidXR OpenXR Features and Meta Quest OpenXR Features are mutually exclusive. You must disable all features from one group in order to run the other.
Microsoft HoloLens 2
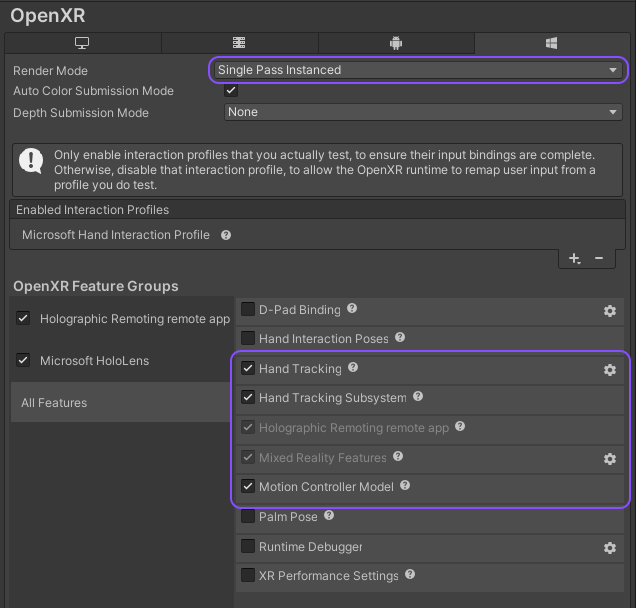
The Windows Mixed Reality package is no longer supported directly in Unity. Instead, the OpenXR package is the default for all WMR platforms, including HoloLens 2. To build to HoloLens 2 or the HoloLens 2 Emulator, there are a few additional steps to get your app to run on device. The Mixed Reality OpenXR Plugin needs to be installed via the Microsoft Mixed Reality Feature Tool and is located in the Discover Features -> Platform Support section. Follow these instructions for the most up-to-date information. In general, the following settings should be enabled in the OpenXR project settings for the Universal Windows Platform: Hand Tracking, Hand Tracking Subsystem, Holographic Remoting remote app (for in-Editor support outlined below), Mixed Reality Features and Motion Controller Model (for Windows Mixed Reality support). The image below shows the minimum recommended settings:
Additionally, we highly recommend running your application from the Unity Editor using the Holographic Remoting feature. This allows rapid iteration without having to go through the added steps required to build and deploy each time.
Warning
When configuring the Render Mode to use Single Pass Instanced as pictured above, the material used for the hand models will not render correctly and should be substituted with a material and shader that renders correctly in single pass mode. You can change the render mode to Multi-pass, but might experience degraded performance depending on your content.
Note
Some optional system-wide OpenXR tool kits or plugins installed on the host PC may cause the Unity Editor to crash when using the Holographic Remoting feature. If this happens, check the editor's log file (located at %USERPROFILE%\AppData\Local\Unity\Editor\Editor.log on Windows), then remove or disable the indicated plugin on the host PC.
Magic Leap 2
To build to Magic Leap 2, you should be able to switch build targets and simply click the Build and Run button in the Build Settings window once the project is properly configured based on the Magic Leap documentation. Additional details or options can be found in the Magic Leap documentation for Building a Simple App in Unity.
Alternatively, you can also run the Unity App Simulator by following their Unity App Simulator instructions.