Custom Function Node
Use the Custom Function Node to inject your own custom HLSL code in Shader Graphs to do some fine-grained optimization, for example.
You can either write small functions directly into graphs by using the string mode, or reference external HLSL files. Use the Custom Port Menu to define your own input and output ports on the node itself.

| Property | Description |
|---|---|
| Inputs | Define the node's input ports. The names you enter here define the names for the input values you use in the code. |
| Outputs | Define the node's output ports. The names you enter here define the names for the output values you use in the code. |
| Type | Select the way to reference the custom function in the node. The options are:
|
| Name | The name of the custom function in the code, without the function precision suffix _half or _float . |
| Source | When you set Type to File, the reference to the HLSL file that includes the custom functions. The file can be anywhere in your Unity project and must have the .hlsl extension. For more details, refer to file content syntax. |
| Body | When you set Type to String, the HLSL code that defines the contents of the custom functions. Unity handles the arguments, braces, and indent scope automatically. |
Set up a Custom Function node
To set up a Custom Function node:
- Create a new node of Custom Function type (from the Utility category).
- In the Graph Inspector, select Node Settings.
- Define custom Inputs and Outputs to set the node's ports and the corresponding variables to use in the custom function.
- Define the custom function according to your needs, either with a file or a string.
Define the custom function with a string
In String mode, the graph generates the shader function.
To define the function with a string:
- In the Graph Inspector, in the Node Settings, Set Type to String.
- In the Name field, specify a name for the function.
- In the Body field, write the contents of the function. Unity handles the arguments, braces, and indent scope automatically.
In String mode, you may use the token $precision instead of half or float in the Body field. Unity replaces this with the correct type when the node is processed, based on that node's precision.
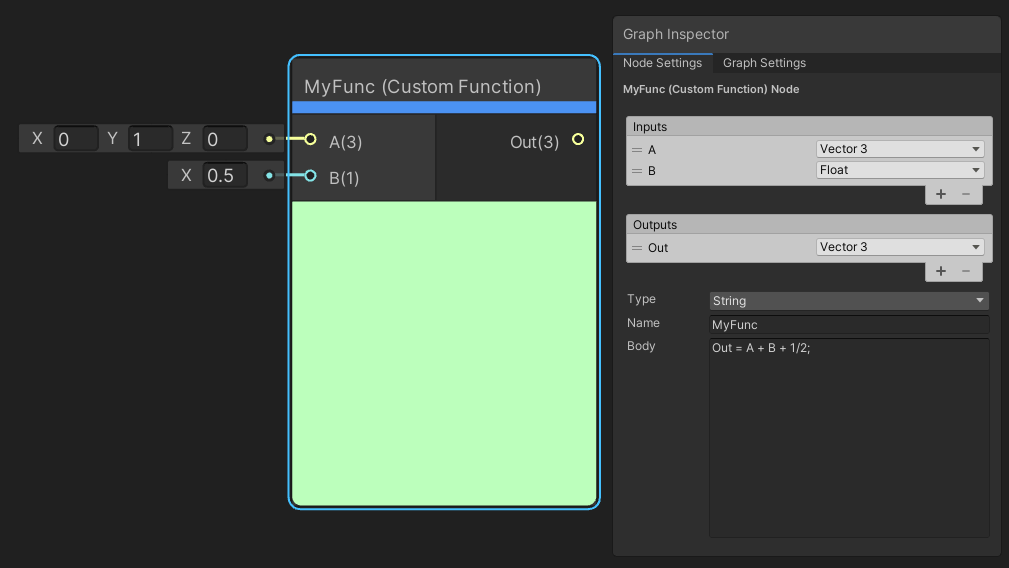
The example in the image above generates the following function:
void MyFunction_float(float3 A, float B, out float3 Out)
{
    Out  =  A + B + 1/2;
}
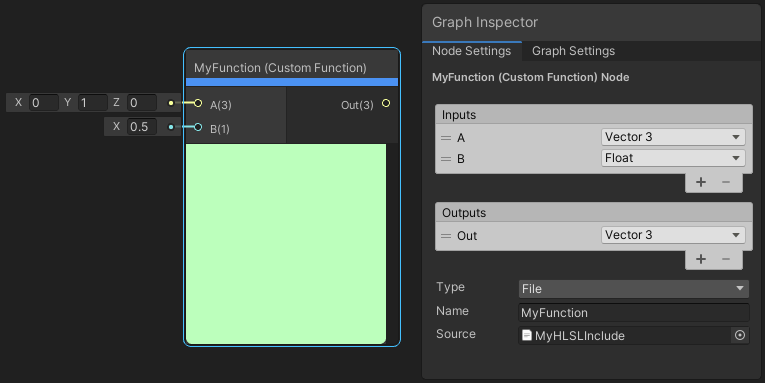
Define the custom function with a file
In File mode, the graph does not automatically generate the shader function. This mode injects an include reference in the final generated shader, and uses a function from within the referenced file.
To create an HLSL file to use from a Custom Function node:
- Use your file system to create an empty text file with the
.hlslextension in any folder of your Unity project. - Write your custom function according to the file content syntax.
To use a function from the HLSL file in the node:
- In the Graph Inspector, in the Node Settings, set Type to File.
- In the Source field, reference the HLSL file that contains the function.
- In the Name field, specify the name of the function to call in the file, without the function precision suffix
_halfor_float.
File content syntax, details, and examples
HLSL files you reference in Custom Function nodes can contain one or multiple functions. In all cases, you have to match the following expectations:
- The file should include a
#ifndefcondition along with a#definestatement with an identifier to make sure Unity doesn't load the same functions twice, which would result in a compile error.- You must use the same id string for the
#ifndefcondition and the#definestatement. - If you create multiple HLSL files for Custom Function nodes in the same project, you must use a different id string for each file.
- You must use the same id string for the
- Each function name must have a precision suffix:
- Use
_floatto run the function in full precision mode. - Use
_halfif you need to save resources, which might only apply to certain platforms.
- Use
- The function arguments must correspond to the Inputs you defined in the Node Settings.
For example:
//UNITY_SHADER_NO_UPGRADE
#ifndef MYHLSLINCLUDE_INCLUDED
#define MYHLSLINCLUDE_INCLUDED

void MyFunction_float(float3 A, float B, out float3 Out)
{
    Out = A + B;
}
#endif //MYHLSLINCLUDE_INCLUDED
The File mode allows for more flexibility with custom functions in a graph.
Shared data and uniform variables
To supply shared data to your function without additional ports, use uniform variables defined outside the function scope.
//UNITY_SHADER_NO_UPGRADE
#ifndef MYHLSLINCLUDE_INCLUDED
#define MYHLSLINCLUDE_INCLUDED
float4x4 _MyMatrix;
void MyFunction_float(float3 A, float B, out float3 Out)
{
    A = mul(float4(A, 0.0), _MyMatrix).rgb;
    Out = A + B;
}
#endif //MYHLSLINCLUDE_INCLUDED
When you add a uniform variable in a Custom Function, like the float4x4 matrix in the example above, you make this variable global. As a result:
- You can set this uniform globally only, using
Shader.SetGlobalMatrix(). - You don't have to add an input parameter to allow the shader to access them directly.
- You can't set it per material, because it's not declared in the
UnityPerMaterialcbuffer and doesn't have a material property associated with it.
Multiple functions and multiple files
You can define multiple functions in the same file, and call them from your referenced function. Alternatively, you can reference the same file, but use different functions from different Custom Function nodes.
//UNITY_SHADER_NO_UPGRADE
#ifndef MYHLSLINCLUDE_INCLUDED
#define MYHLSLINCLUDE_INCLUDED
float3 MyOtherFunction_float(float3 In)
{
    return In * In;
}

void MyFunction_float(float3 A, float B, out float3 Out)
{
    A = MyOtherFunction_float(A);
    Out = A + B;
}
#endif //MYHLSLINCLUDE_INCLUDED
You can even include other files that contain other functions.
//UNITY_SHADER_NO_UPGRADE
#ifndef MYHLSLINCLUDE_INCLUDED
#define MYHLSLINCLUDE_INCLUDED
#include "Assets/MyOtherInclude.hlsl"
void MyFunction_float(float3 A, float B, out float3 Out)
{
    A = MyOtherFunction_float(A);
    Out = A + B;
}
#endif //MYHLSLINCLUDE_INCLUDED
Call Unity shader code functions
You can call from your custom function any shader code functions that are part of existing Unity's Render Pipeline libraries.
However, be aware of the following:
- Your project must include the library that contains the shader code functions you need to call. To prevent errors, you should always isolate the code with an
#if defined()condition according to the library you're using, and define fallback values for the variables. The usual keywords that identify Unity shader code libraries are the following:- For the Built-In Render Pipeline (BiRP) library, use
#if defined(BUILTIN_PIPELINE_CORE_INCLUDED). - For the Universal Render Pipeline (URP) library, use
#if defined(UNIVERSAL_PIPELINE_CORE_INCLUDED). - For the High-Definition Render Pipeline (HDRP) library, use
#if defined(UNITY_HEADER_HD_INCLUDED).
- For the Built-In Render Pipeline (BiRP) library, use
- The Shader Graph node and main previews can't access Unity's Render Pipeline libraries in the Editor. This generates compile errors in the Editor even though the shader works correctly in your project. To prevent this issue, you have to isolate the code with an
#ifdef SHADERGRAPH_PREVIEWcondition and also define default values for the variables in the Shader Graph preview context. - The code in libraries might change over time from one Unity version to another. You need to make sure to regularly test and update your custom functions in your projects.
Here is an example with URP library function calls and the above-mentioned conditional protections set up:
#ifdef SHADERGRAPH_PREVIEW
	half3 color = half3(0,0,0);
	half atten = 1;
	half3 dir = half3 (0.707, 0, 0.707);

#else
	#if defined(UNIVERSAL_PIPELINE_CORE_INCLUDED)
		half4 shadowCoord = TransformWorldToShadowCoord(WorldPosition);
		Light mainLight = GetMainLight(shadowCoord);
		half3 color = mainLight.color;
		half atten = mainLight.shadowAttenuation;
		half3 dir = mainLight.direction;
	#else
		half3 color = half3(0, 0, 0);
		half atten = 1;
		half3 dir = half3 (0.707, 0, 0.707);
	#endif

#endif
Reuse Custom Function Nodes
The Custom Function node, on its own, is a single node instance. If you wish to reuse the same custom function without re-creating the inputs, outputs, and function referencing, include the Custom Function node in a Sub Graph. Once created, the Sub Graph appears in the Create Node Menu, along with the nodes.

You can create a Sub Graph and add a Custom Function node to it, or right-click an existing Custom Function node and select Convert to Sub Graph. To add the appropriate input and output ports, use the Graph Inspector and Custom Port Menu.
Work with texture wires
From version 10.3, Shader Graph has five new data structures to ensure that Custom Function nodes and Sub Graphs input and output data from texture wire in a consistent way. The new structures also make it possible for SamplerState to compile on GLES2 platforms and access data associated with textures via myInputTex.samplerstate and myInputTex.texelSize.
Four structures are for the texture types, and one is for the sampler state:
- UnityTexture2D
- UnityTexture2DArray
- UnityTexture3D
- UnityTextureCube
- UnitySamplerState
Custom Function nodes you create with earlier versions of Shader Graph continue to work after this change. As part of the automatic update, Unity transitions them to the new Bare node type. This type replicates the old input and output behavior. All other types pass the new structs.
However, you should manually upgrade Custom Function nodes that produce texture or samplerstate types as output to ensure that they behave consistently—and to gain the benefits of the new design. Unity flags this type of outdated Custom Function Nodes with a warning when you open your Shader Graph in 10.3 or later.
How to upgrade
- Change all of the input and output types from Bare to non-Bare.
String type: Ensure that your HLSL string already uses Unity's texture access macros (such as
SAMPLE_TEXTURE2D).File type: Replace Bare types (such as Texture2D) with the new struct types (such as UnityTexture2D) in your function parameters.
- If your HLSL code is using platform-specific or non-standard texture operations, you'll need to convert the way you access textures to take that structure into account. For example,
myInputTex.GetDimensions(...)would becomemyInputTex.tex.GetDimensions(...)
From version 10.3, you can access data associated with textures via myInputTex.samplerstate and myInputTex.texelSize.